Setting Custom Listing Options
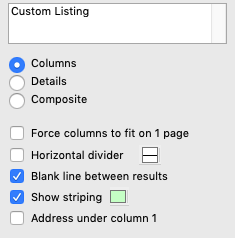
The center column of the Custom Listing window contains formatting options for the report. Items found here primarily determine how the report appears.

Report Title: The top box in the formatting options section allow you to specify a title for your report
You can choose to print background striping on alternating lines of the Custom Listing. Check Show Striping to turn this feature on. To select the striping color, click the Color box and choose a color from the color palette.
Force Columns to fit on 1 page: By default, the custom listing will size the column to fit the data being printed. This may cause the listing to print off the page. To keep the report on one page, check the option to Force Columns to fit on 1 page. This option is used in conjunction with the Width option on the Modify Custom Listing Sets window.
Horizontal Divider: If you’d like to print a divider line between rows on the listing, check Horizontal Divider and click the small box next to it to select a line style. Line styles range from thick to hairline and solid, dotted or dashed.
Blank line between results: If you want a blank line separating each result on the report, check Blank line between results.
Address under column 1: Checking this box will print the address block under the whatever field you specified to be in the first column. You do not need to include the Address Block or other address fields in the set.
Custom Listing Formats
In the format section of the Custom Listing window, you can choose one of three formats: Columns, Detail, and Composite.
The Columns format, as the name implies, displays the fields selected in columns across the page.

The Details format prints each field selected on its own line, with the fields for each record grouped.

If you only need counts and subtotals for the data you have selected, use the Composite format. Use the Configure Sorts and Totals button to sort and subtotal the data. In the example below, Individual Last Name has been chosen for subtotals.

