
To login or request a Mail Sortation Service, please use this link.
Beginning in 2017, the U.S. Postal Service changed its requirements on how discount mail is sorted. As a result, the sortation of Discount Mail in CDM+/DonorWorks that was formerly available was out of compliance. In response to these changes, the sort orders for Discount Mail and Carrier Route were removed from CDM+ in versions 10.0.8 and later. In addition, the option to print a barcode on labels and envelopes is no longer available in versions 10.1.6 and later.
Mail Sortation Service
For over 20 years Suran Systems, Inc. has provided mailing services for hundreds of clients in Central Kentucky. We are offering a free sortation service to CDM+/DonorWorks users to facilitate your next discount mailing.
To help us process your request, you will need to provide:
-
information about the piece you are mailing, such as size and weight,
-
a copy of the postage statement from your last mailing,
-
and a list of address data exported from CDM+/DonorWorks.
Export these fields:
You will need to export these fields from your Address Records (Reports > Membership Reports > Exports > Address Export):
-
Name (Choose the name field or fields you wish to include on your labels. Be sure the selection includes first and last names as well as any salutation you wish to include.)
-
Address Line 1
-
Address Line 2
-
Address Line 3
-
City
-
State
-
Zip
It is required that you export individual fields for the mailing address. DO NOT use combined fields for a address block, city/state/zip, or address lines.
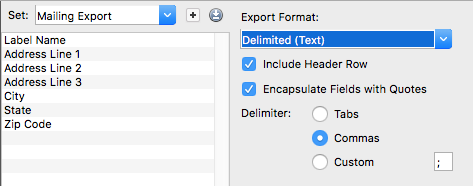
When exporting data, please enable these options:
-
Export Format: Delimited (Text)
-
Include Header Row
-
Encapsulate Fields with Quotes
-
Delimiter: Commas
Within 2-3 business days we will return these files to you:
-
360: the Postal Statement
-
msl: your Mail Sort Listing for traying your mail
-
pqr: your qualification report to be printed and taken to the Post Office with the 360
-
tpr: your tray tags.
-
a pdf of your addresses in discount order to print on your labels for the label size you specify along with all necessary postal forms and tray labels.
Upon request, we can provide an xls Microsoft Excel spreadsheet with your data in sortation order and individual address components. This file can be used to create your own mail/data merge document to print directly on envelopes or other pieces.
To use this service, you will need to create an account and log in. Once you've created an account, you can complete the request form and upload the necessary files.
Printing Giving Statements
Print the giving statements separately for Giving Unit addresses that did not certify as deliverable through CASS processing. These statements must be mailed with first class postage.

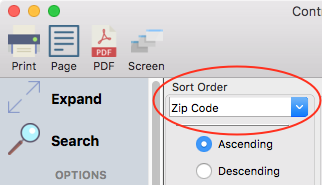
For Giving Unit addresses that are CASS certified, print the giving statements in ZIP code order.
(Optional) Place Labels on Statements
If you want your mailing to qualify for automation rates, you'll need to place the labels we sent you over top the addresses on the printed statements. This step is necessary to include the barcode we return on each piece.
If you do not need to qualify for automation rates, you can skip this step and use the addresses as printed from CDM+.
Match Pieces and Sort into Trays
The USPS Qualification Report returned with your labels contains the information you need to get the mail pieces into the proper tray. Consider this example where the user has 327 pieces to be mailed.
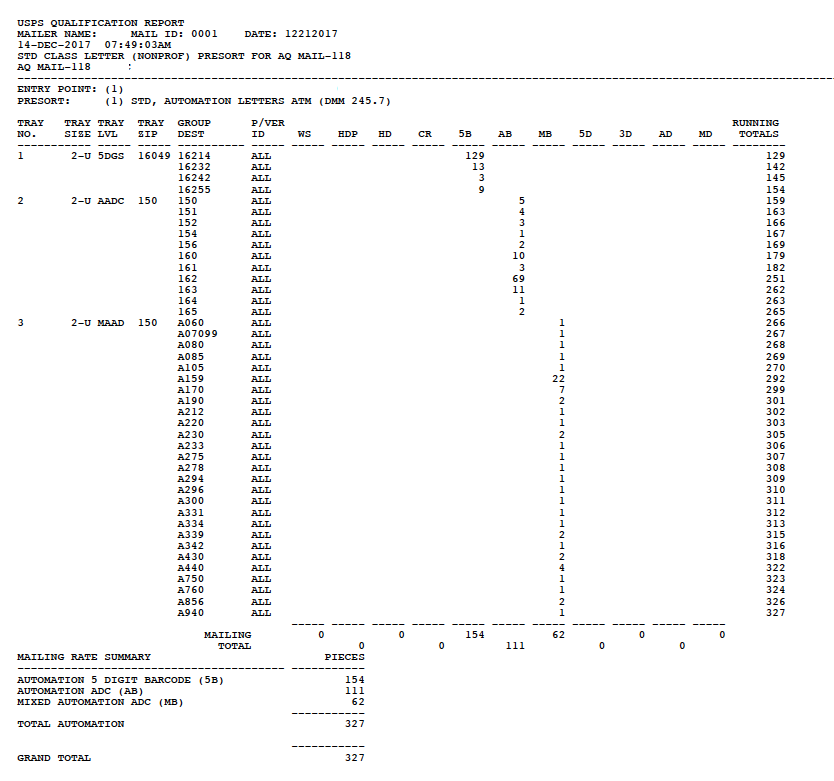
The mailing in this example will use three trays: a 5-digit tray, a tray for AADC 150, and a mixed AADC tray. The address labels returned from the discount mail sort will be in the same sequence as the qualification report. That is, all labels for ZIP code 16214 will be first, followed by labels for ZIP code 16232, and so on. The printed giving statements are in ZIP code sequence, and so statements for the same 5-digit ZIP code are printed together. The two do not match up in the same order, but because both are based on ZIP code, they are compatible.
Start at the top of the qualification report. ZIP code 16214 goes in the first tray. Giving statements for that ZIP code and the labels for that ZIP code will all be together. Pull the giving statements for that ZIP code, match them up with the labels or envelopes, and put them in the tray.
Do the same thing for the other ZIP codes in the 5-digit tray: 16232, 16242, 16255. Tray 1 is now ready to go. In the example, there should be 154 pieces in this tray.
Now we move on to the second tray, AADC 150. The first items to go in this tray are ZIP codes beginning with 150. Again, because the giving statements are in ZIP code order, these giving statements are together, as are the labels. Match the giving statements to the labels and put them in the tray.
Do the same thing for 151xx, 152xx, and the remaining 3-digit codes that go in this tray. Tray 2, when complete in this example, should contain 111 pieces.
Finally, match the statements and envelopes for the remaining pieces that go in the mixed AADC tray 3. This example should have 62 pieces in that tray.
The sequence of the pieces in each tray does not matter, but it is important that each tray contains the correct pieces.
Alternatives
One option, and possibly a better one for communication with existing donors, is to mail the giving statements using first class postage. If you have at least 500 pieces, you can send them using a first-class pre-sort to save on postage. You will need to follow the same steps as above to send your list to be first class presorted. Please indicate first class presort in your instructions when you send the list.
However, if you want to save some of the cost of first-class postage, CDM+ and DonorWorks make it easy for you to send statements to your donors by email.