
Mobile Receipts allows staff members to easily submit expenses into CDM+ Accounts Payable from any device. You can record charges to debit cards, credit cards, or invoiced bills.
Requirements
-
CDM+ 11.1 or later
-
CDM+ Mobile 2.3 or later for iOS or
-
CDM+ Mobile 2.3 or later for Android
-
CDM+ Accounting
Watch our CDM+ Mobile Receipts Webinar for a demonstration of the function and flexibility of mobile receipts.
CDM+ Mobile Receipts Presentation.key
CDM+ Mobile Receipts Presentation.pptx
CDM+ Mobile Receipt Slideshow Intro.key
Setting up a device to submit receipts
-
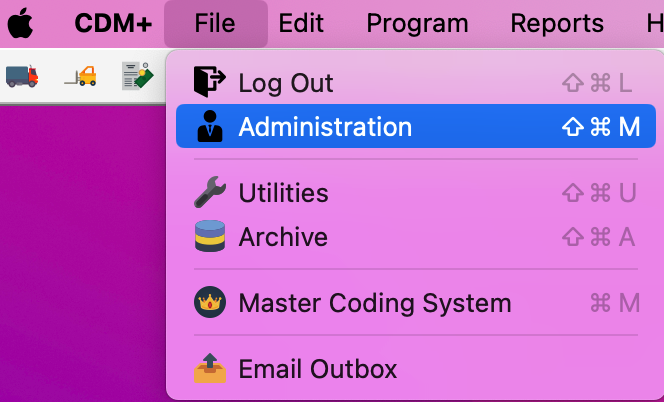
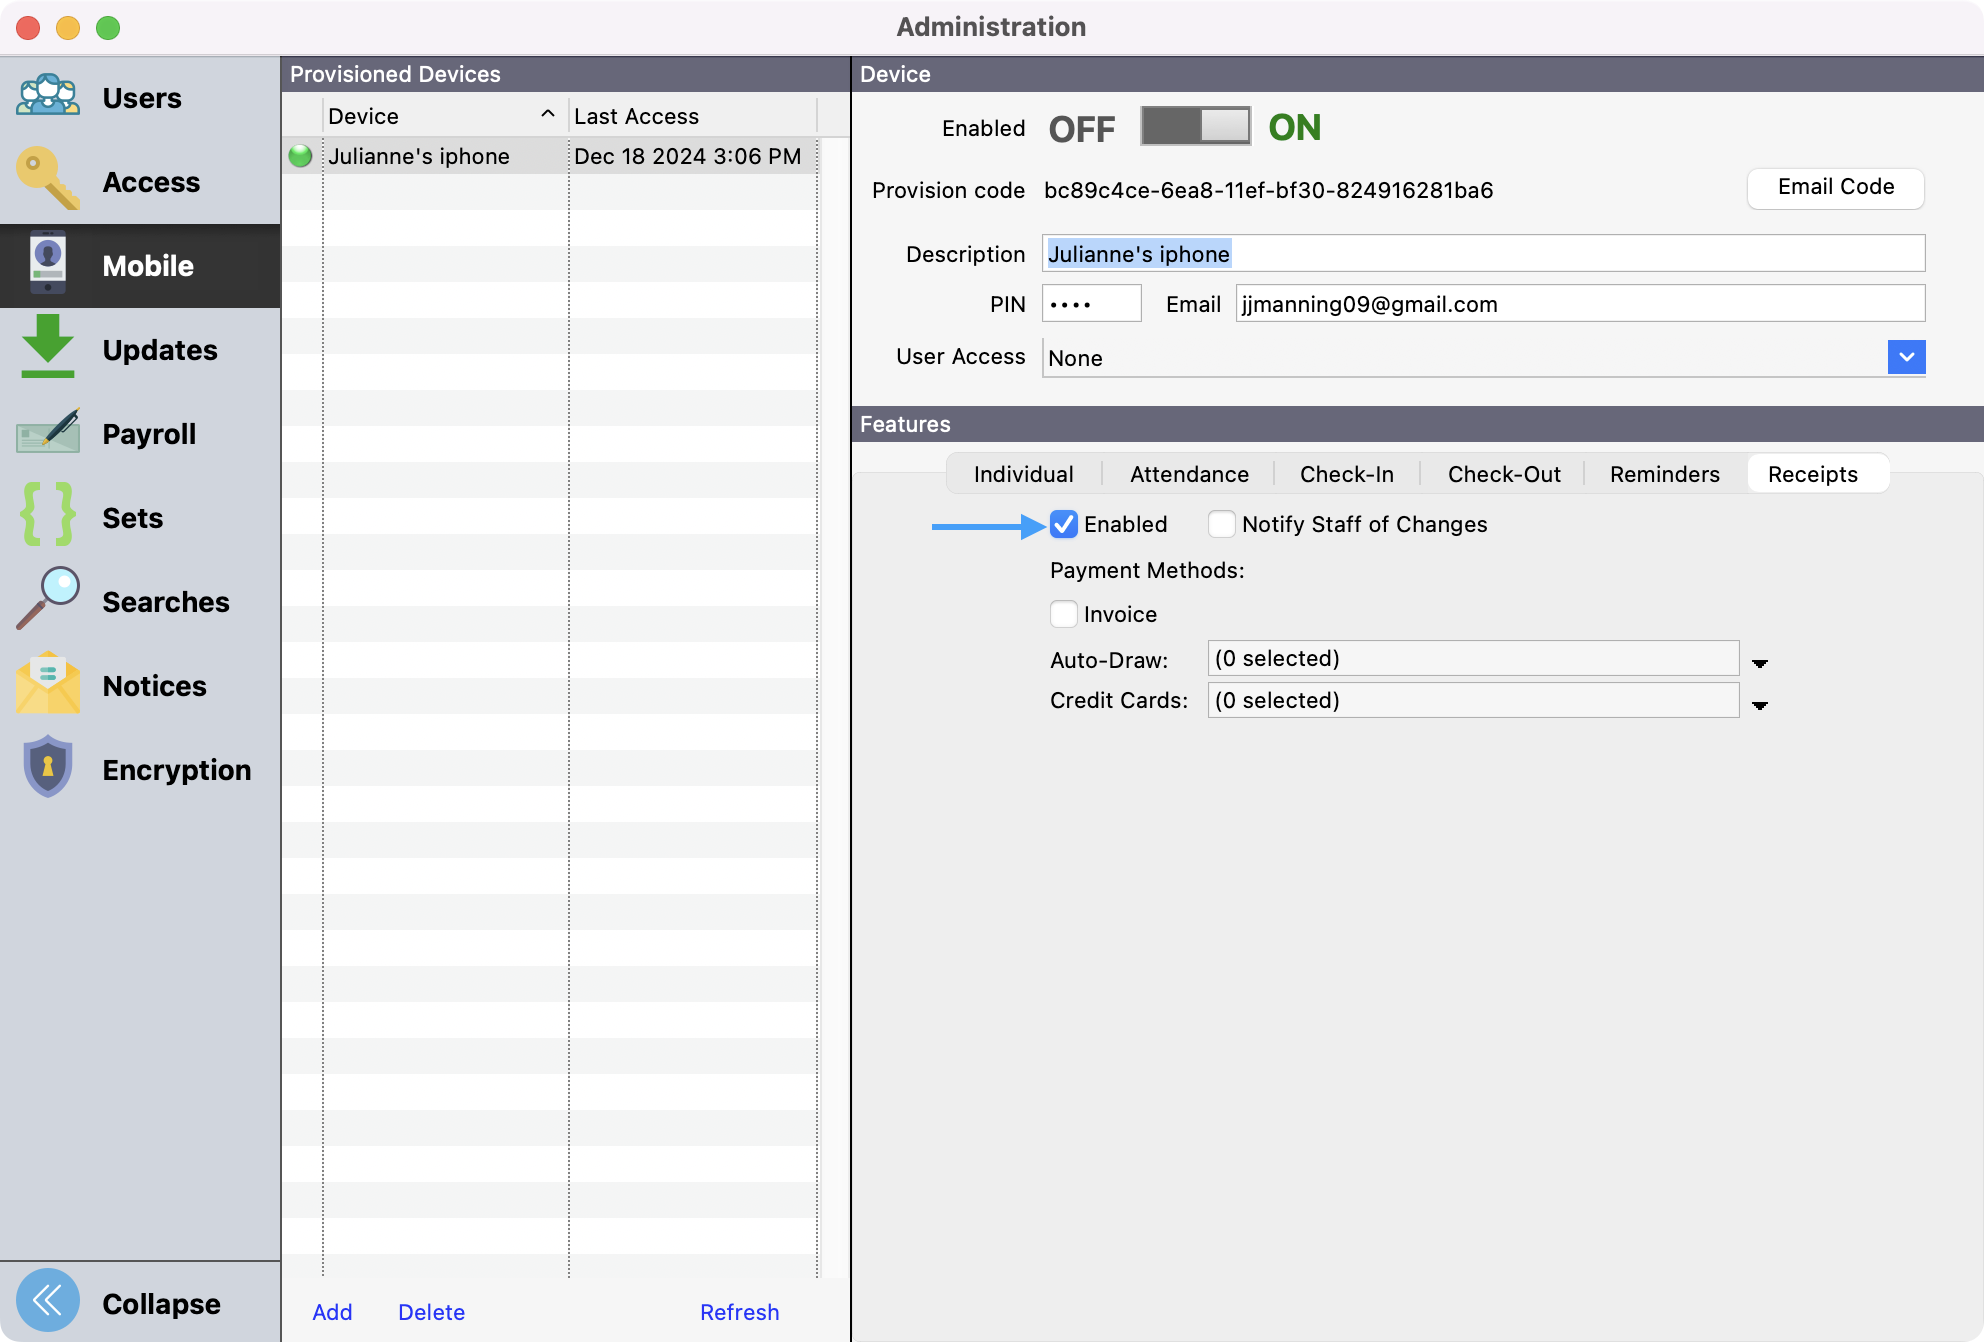
Go to File → Administration.
-
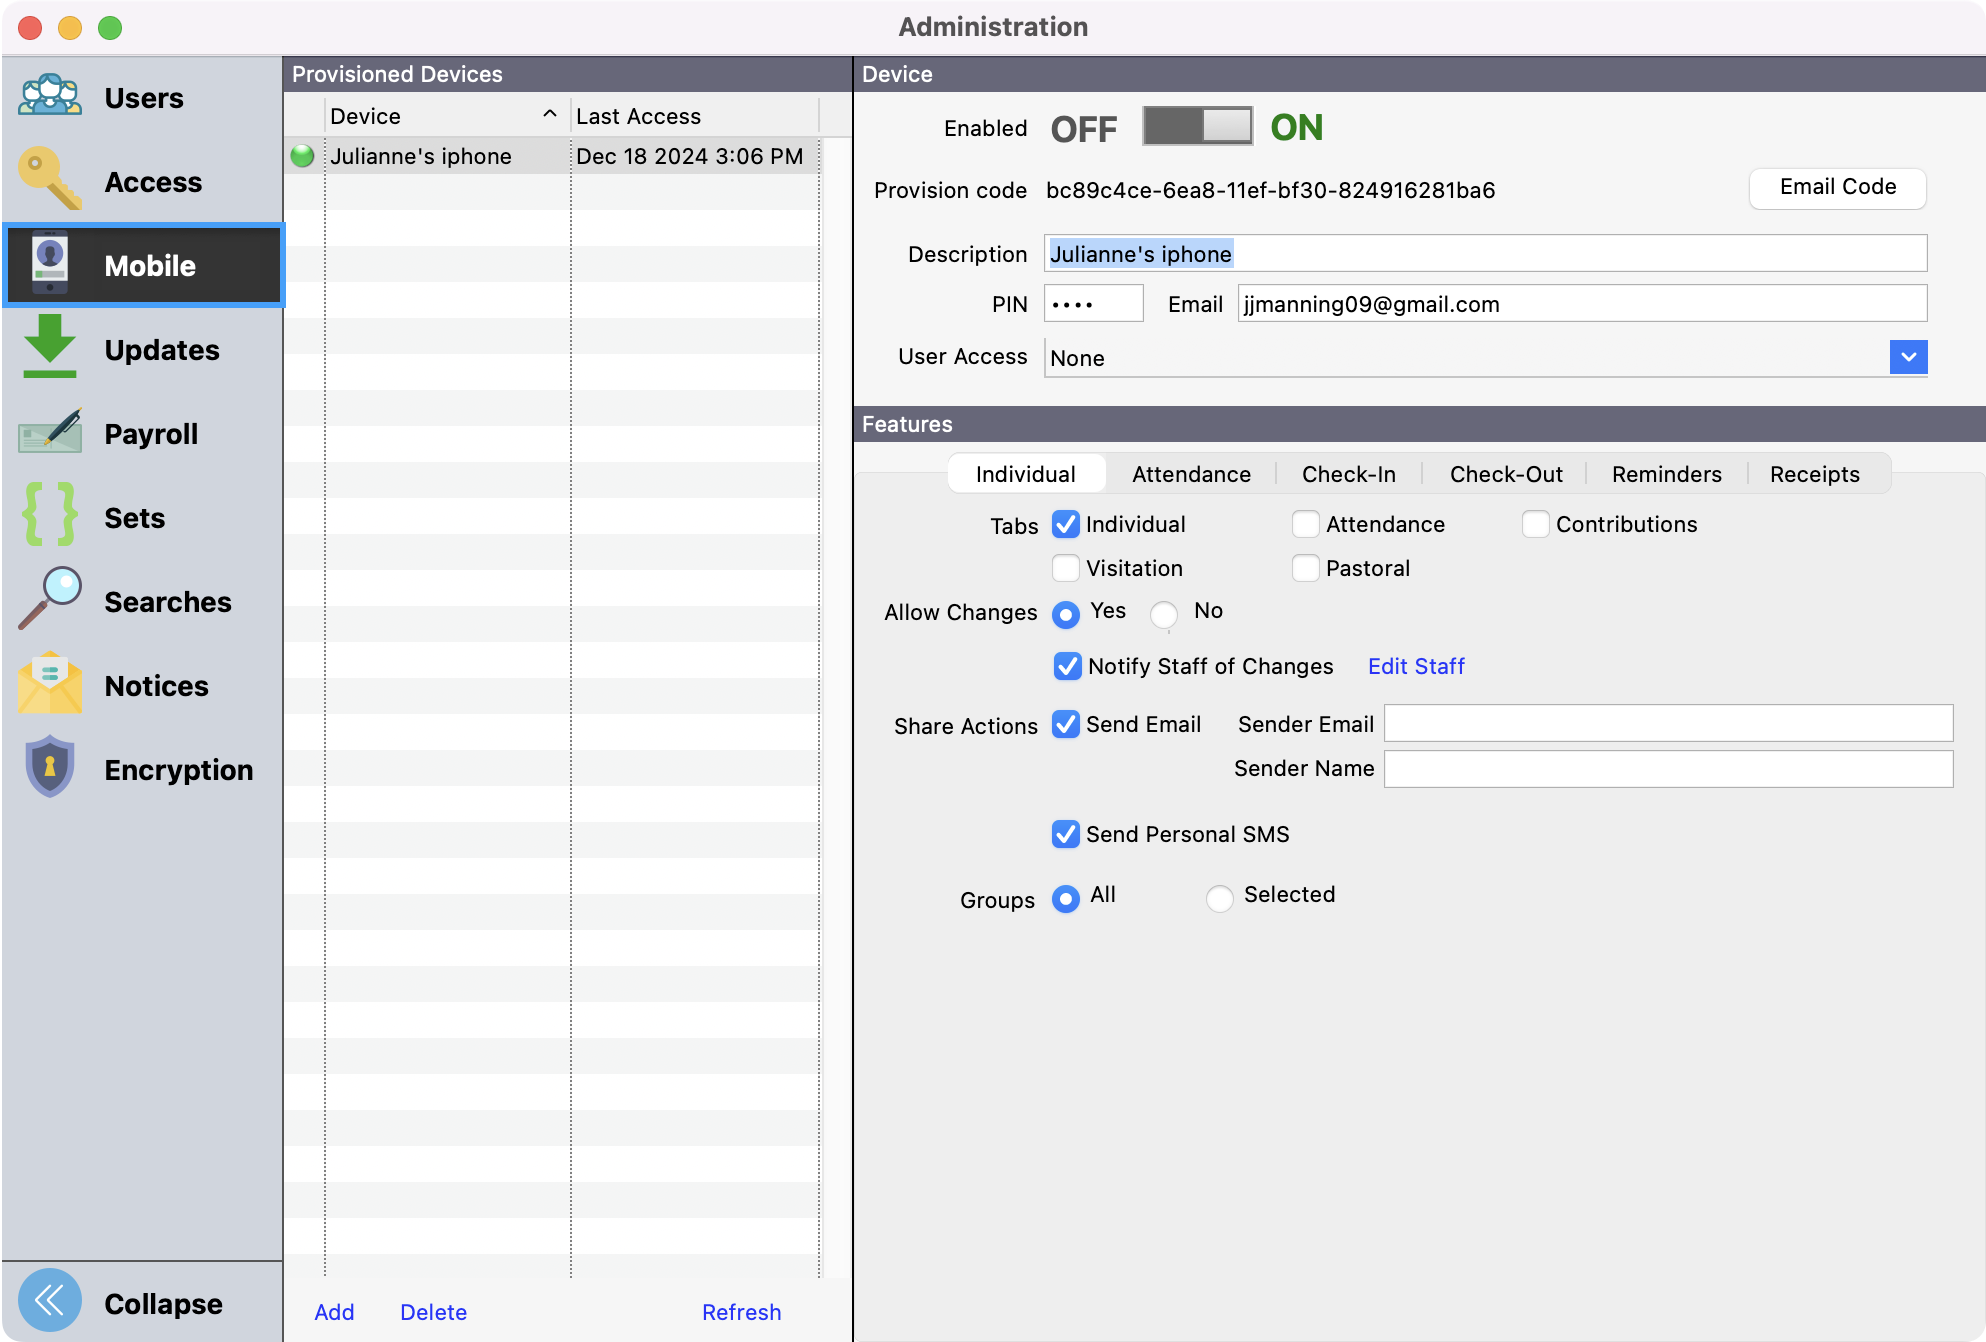
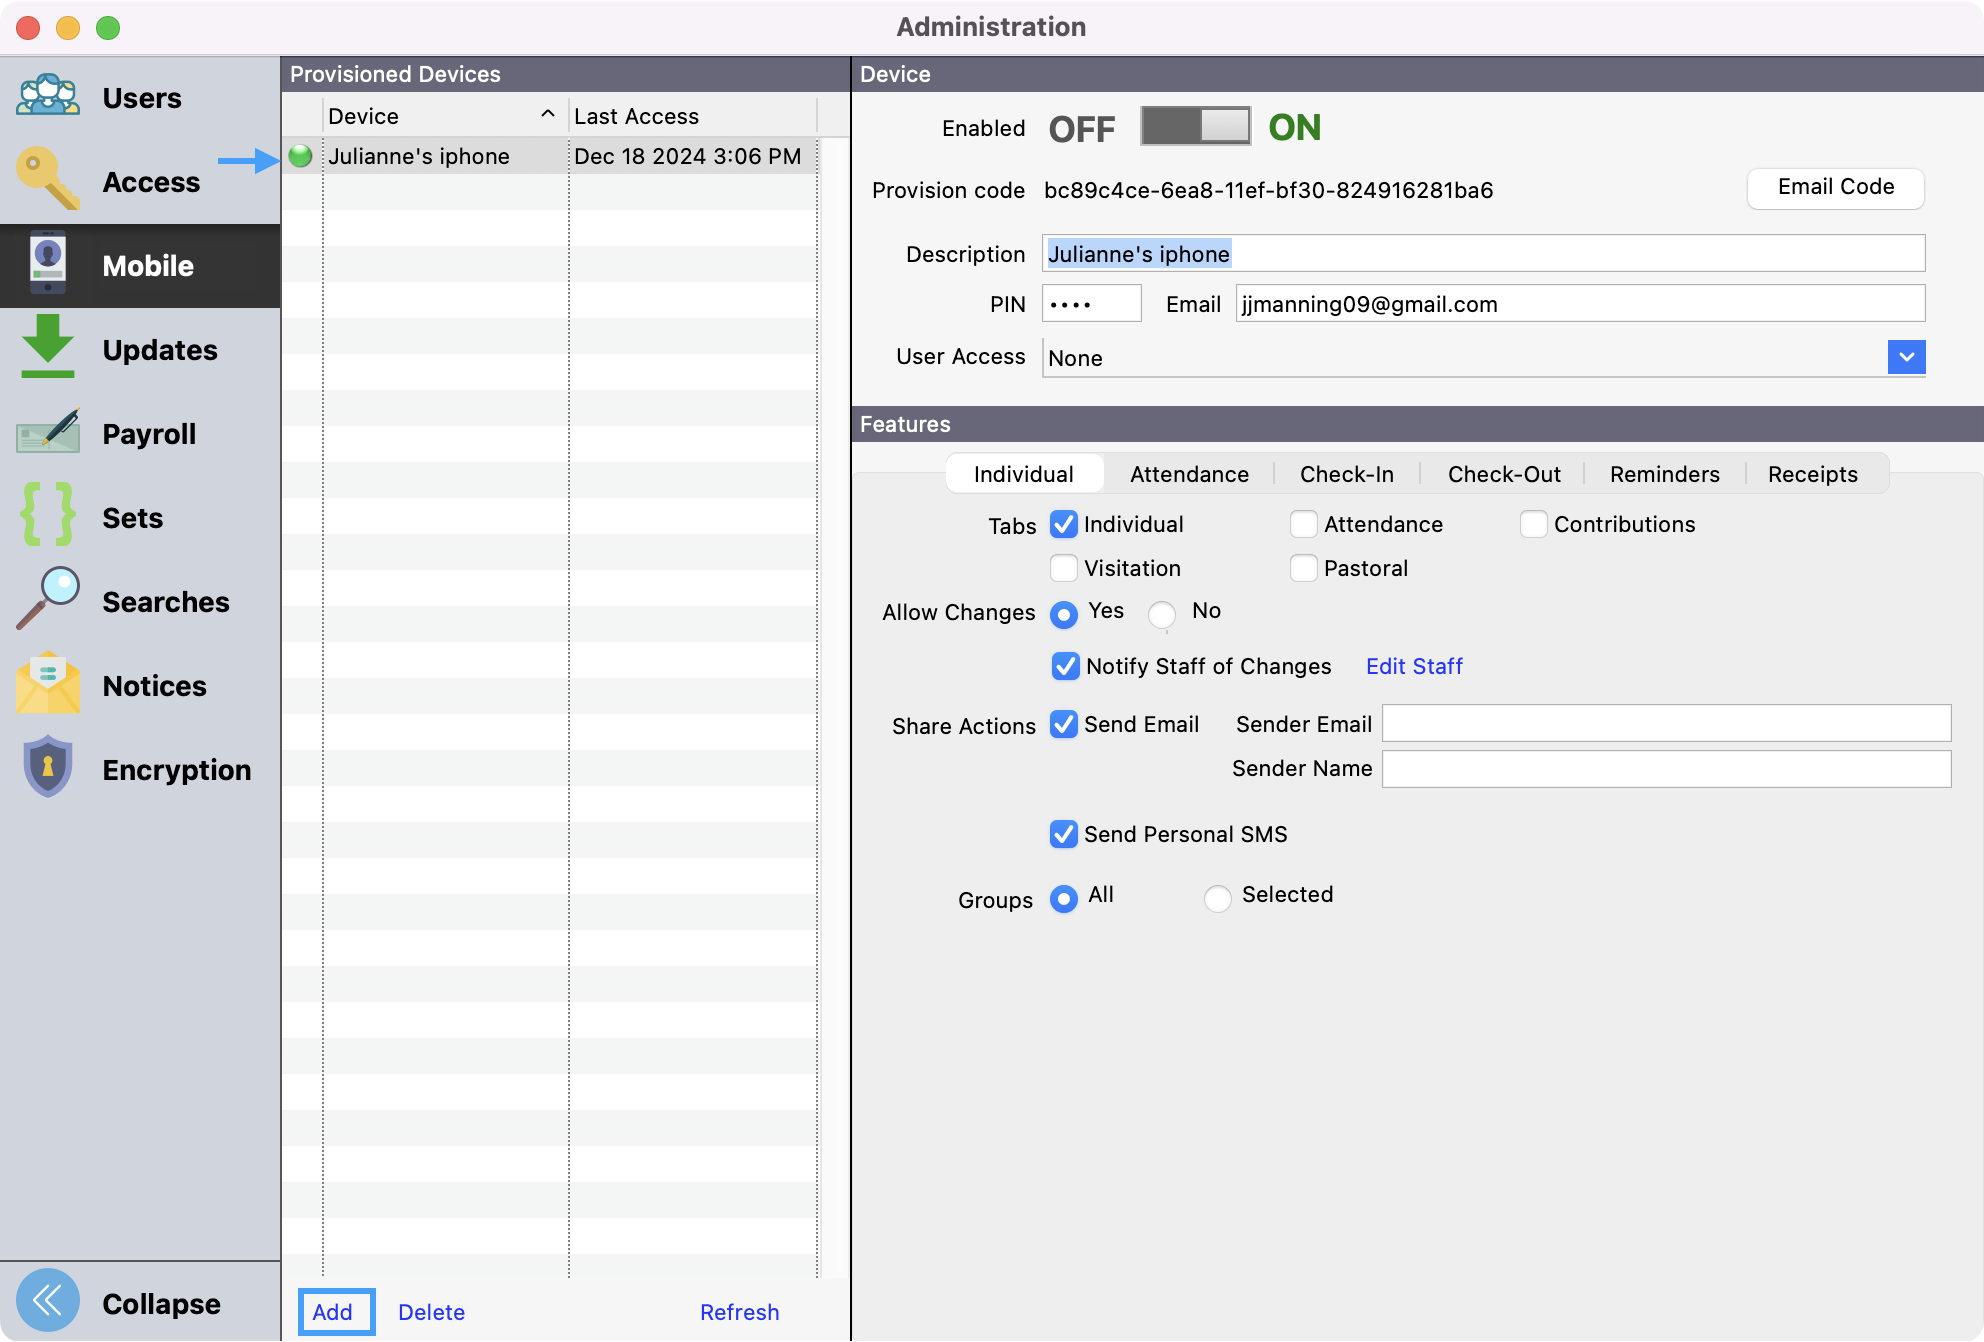
Click Mobile from the left sidebar.
-
Add or select an existing provision.
-
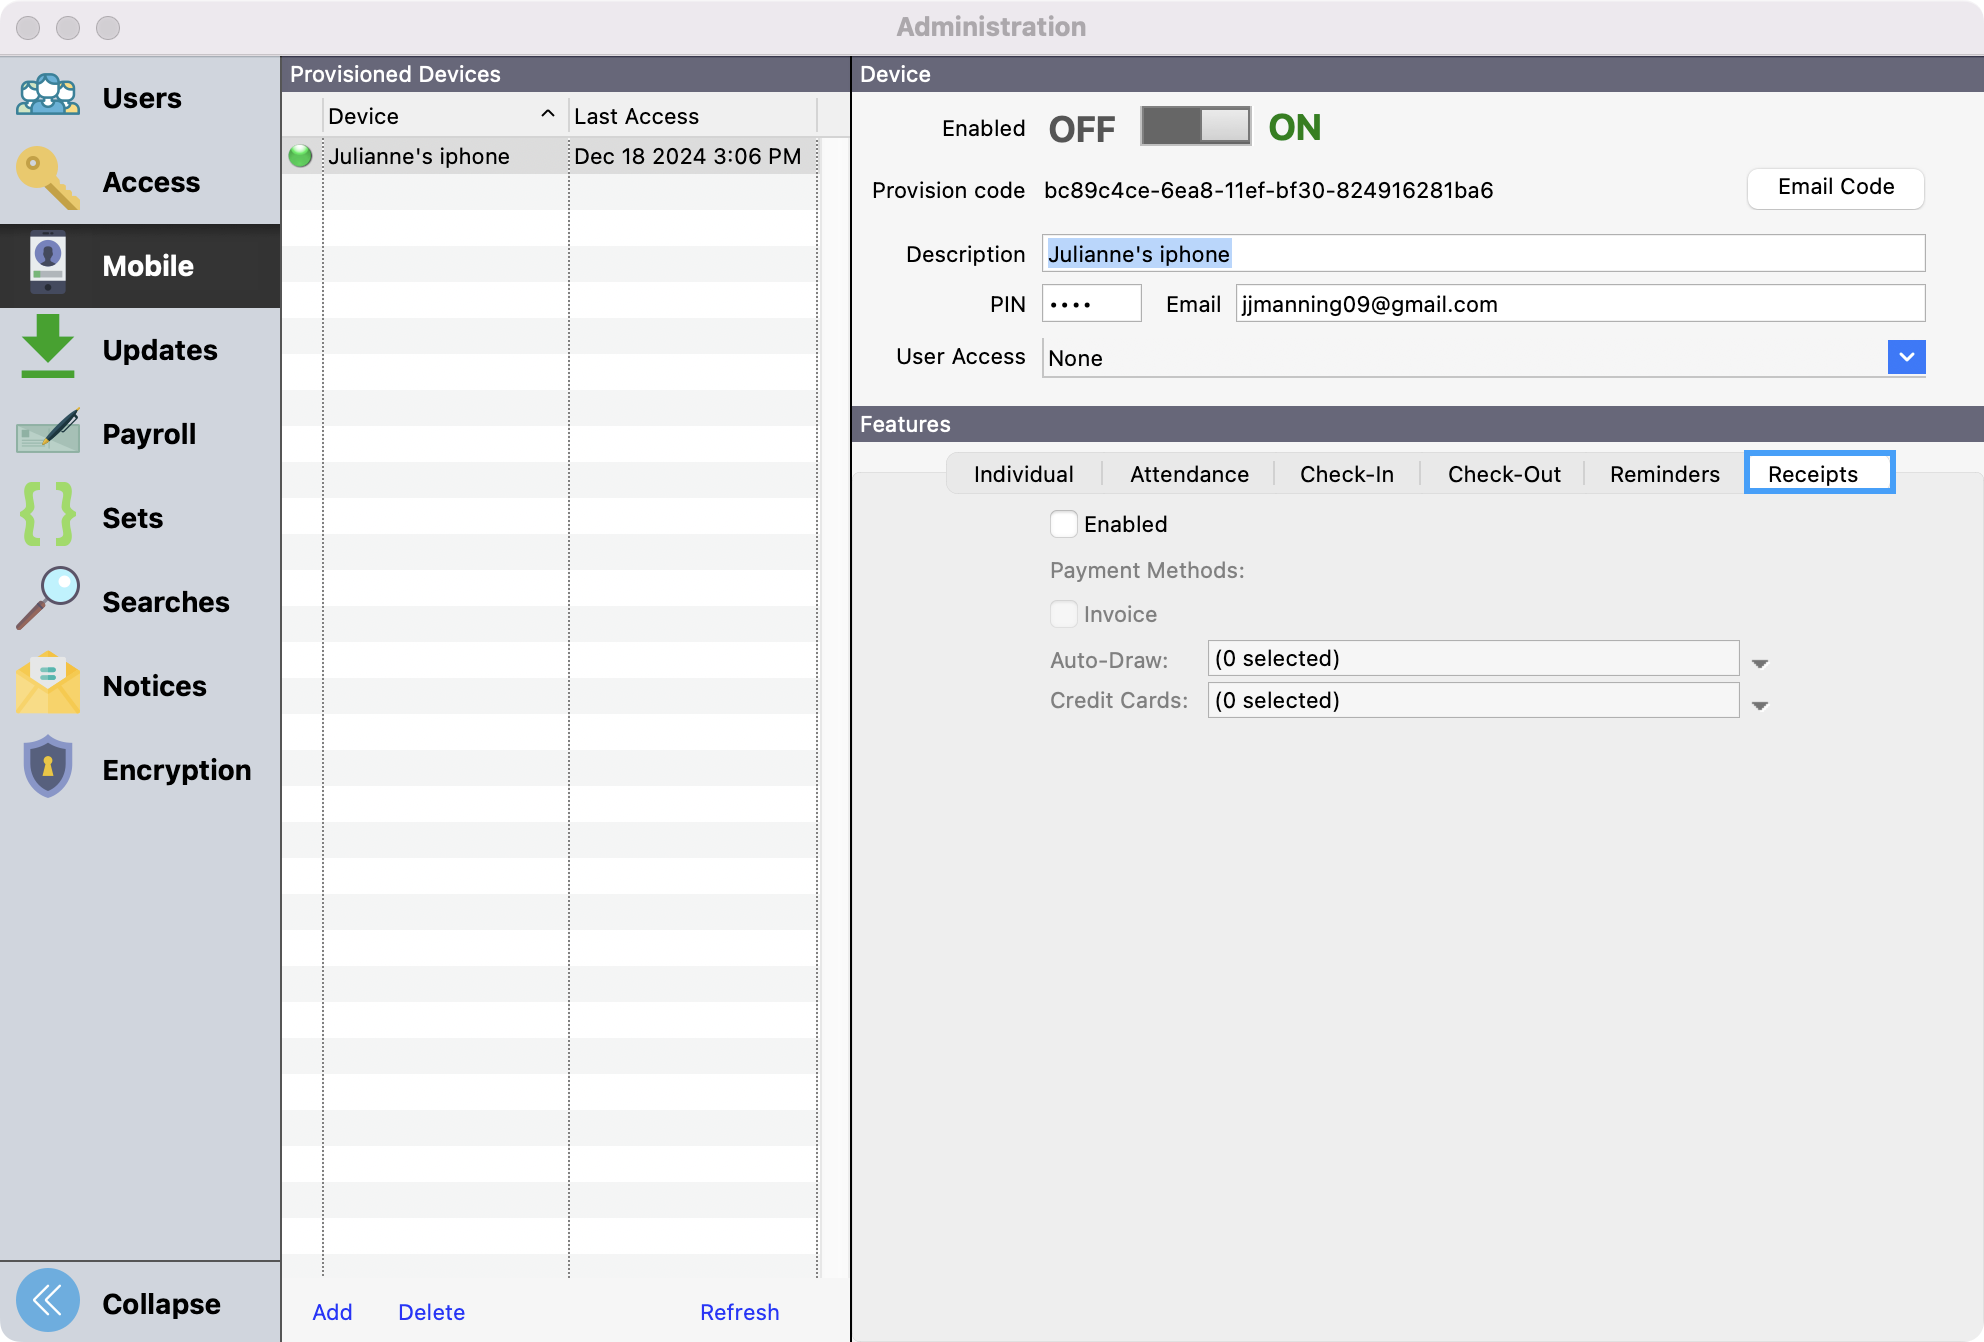
Select the Receipts tab.
-
Check Enabled.
-
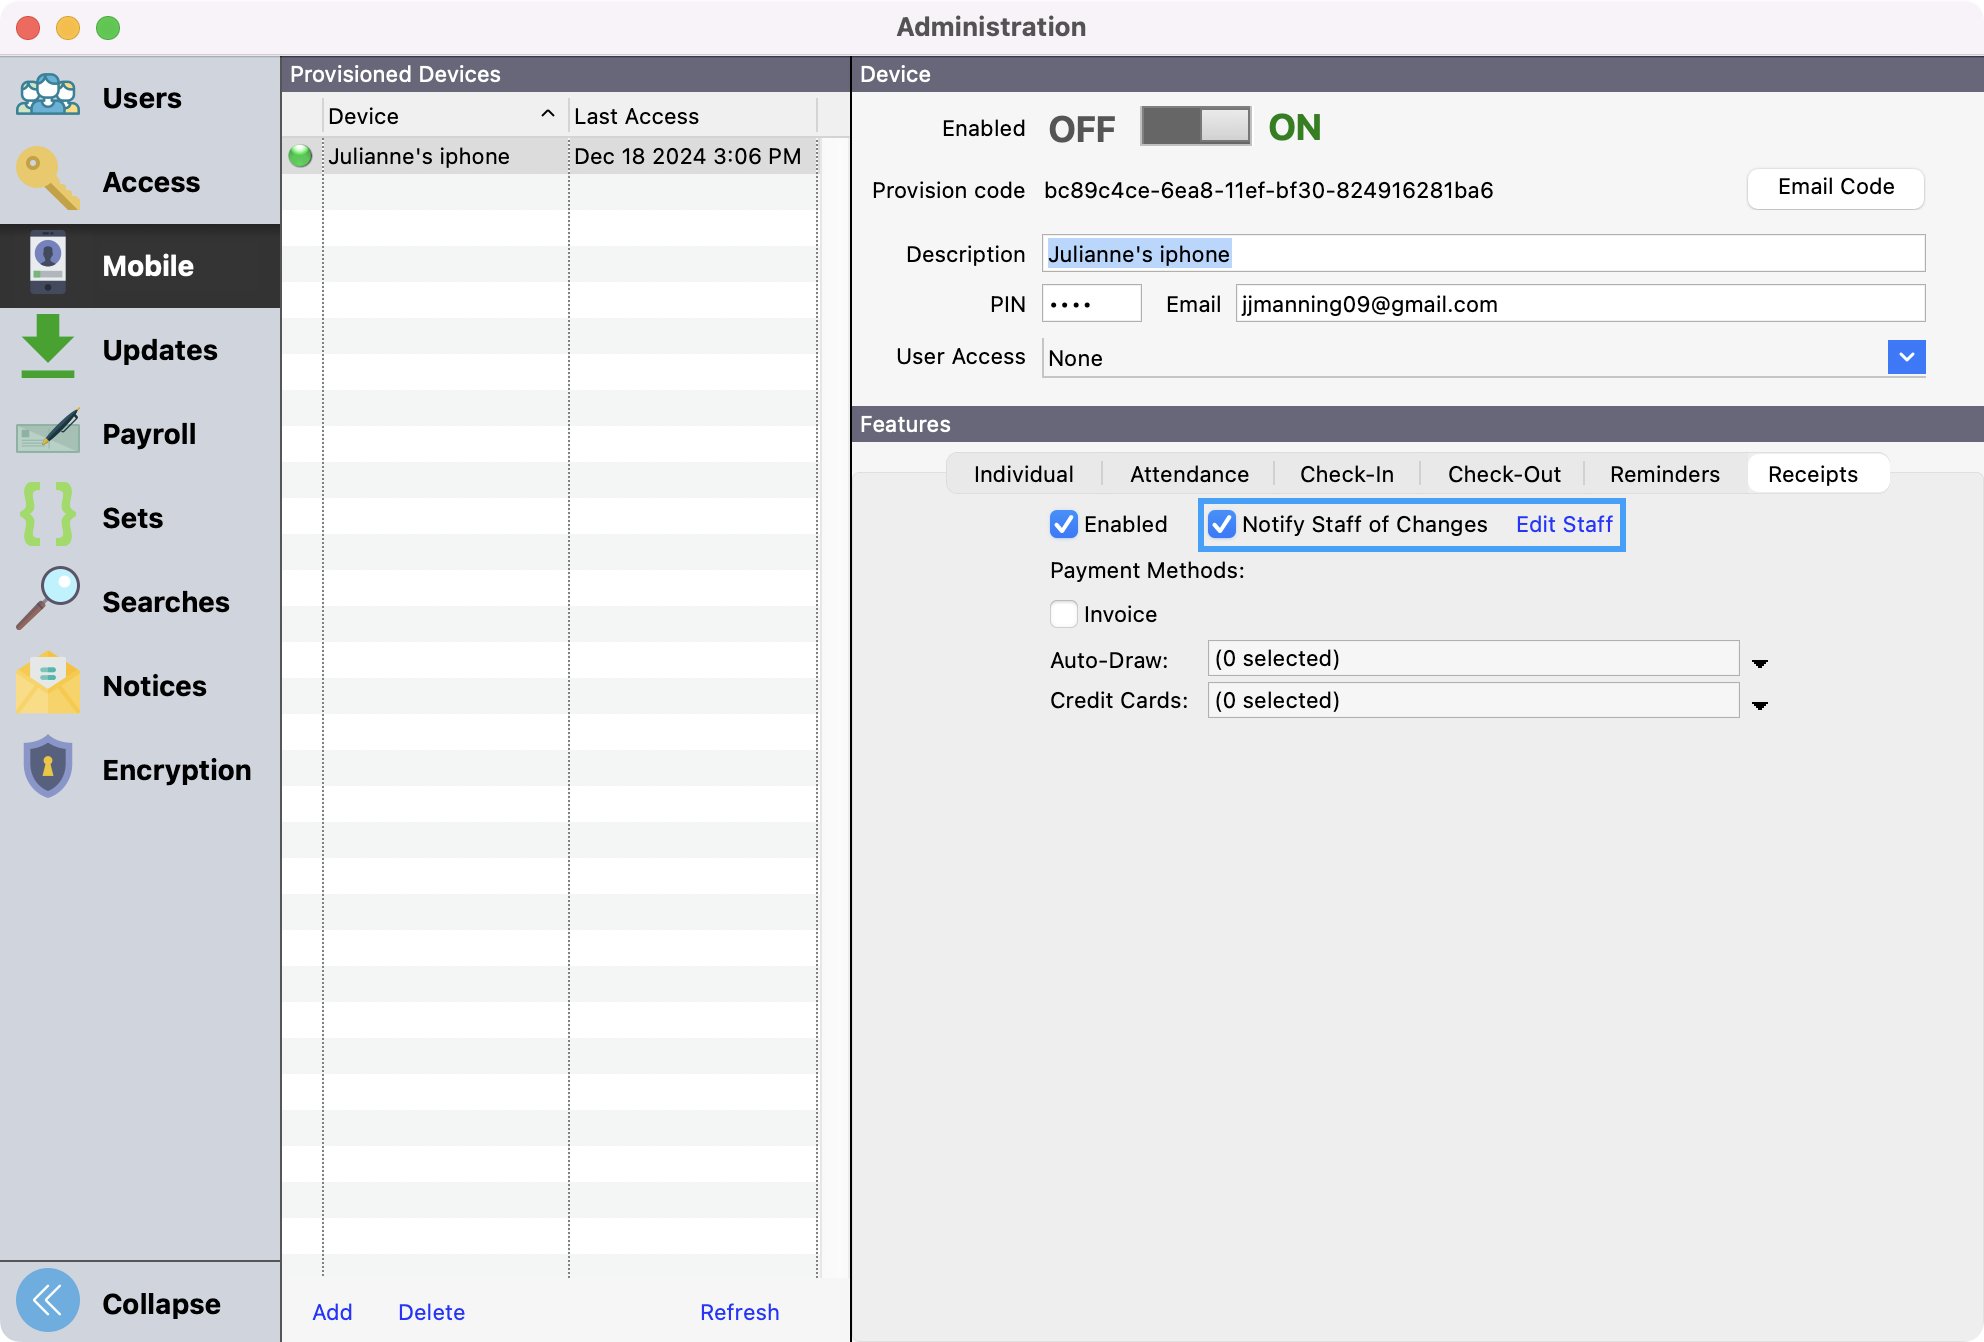
Optional If you want to receive an email when a receipt is submitted:
-
Check Notify Staff of Changes
-
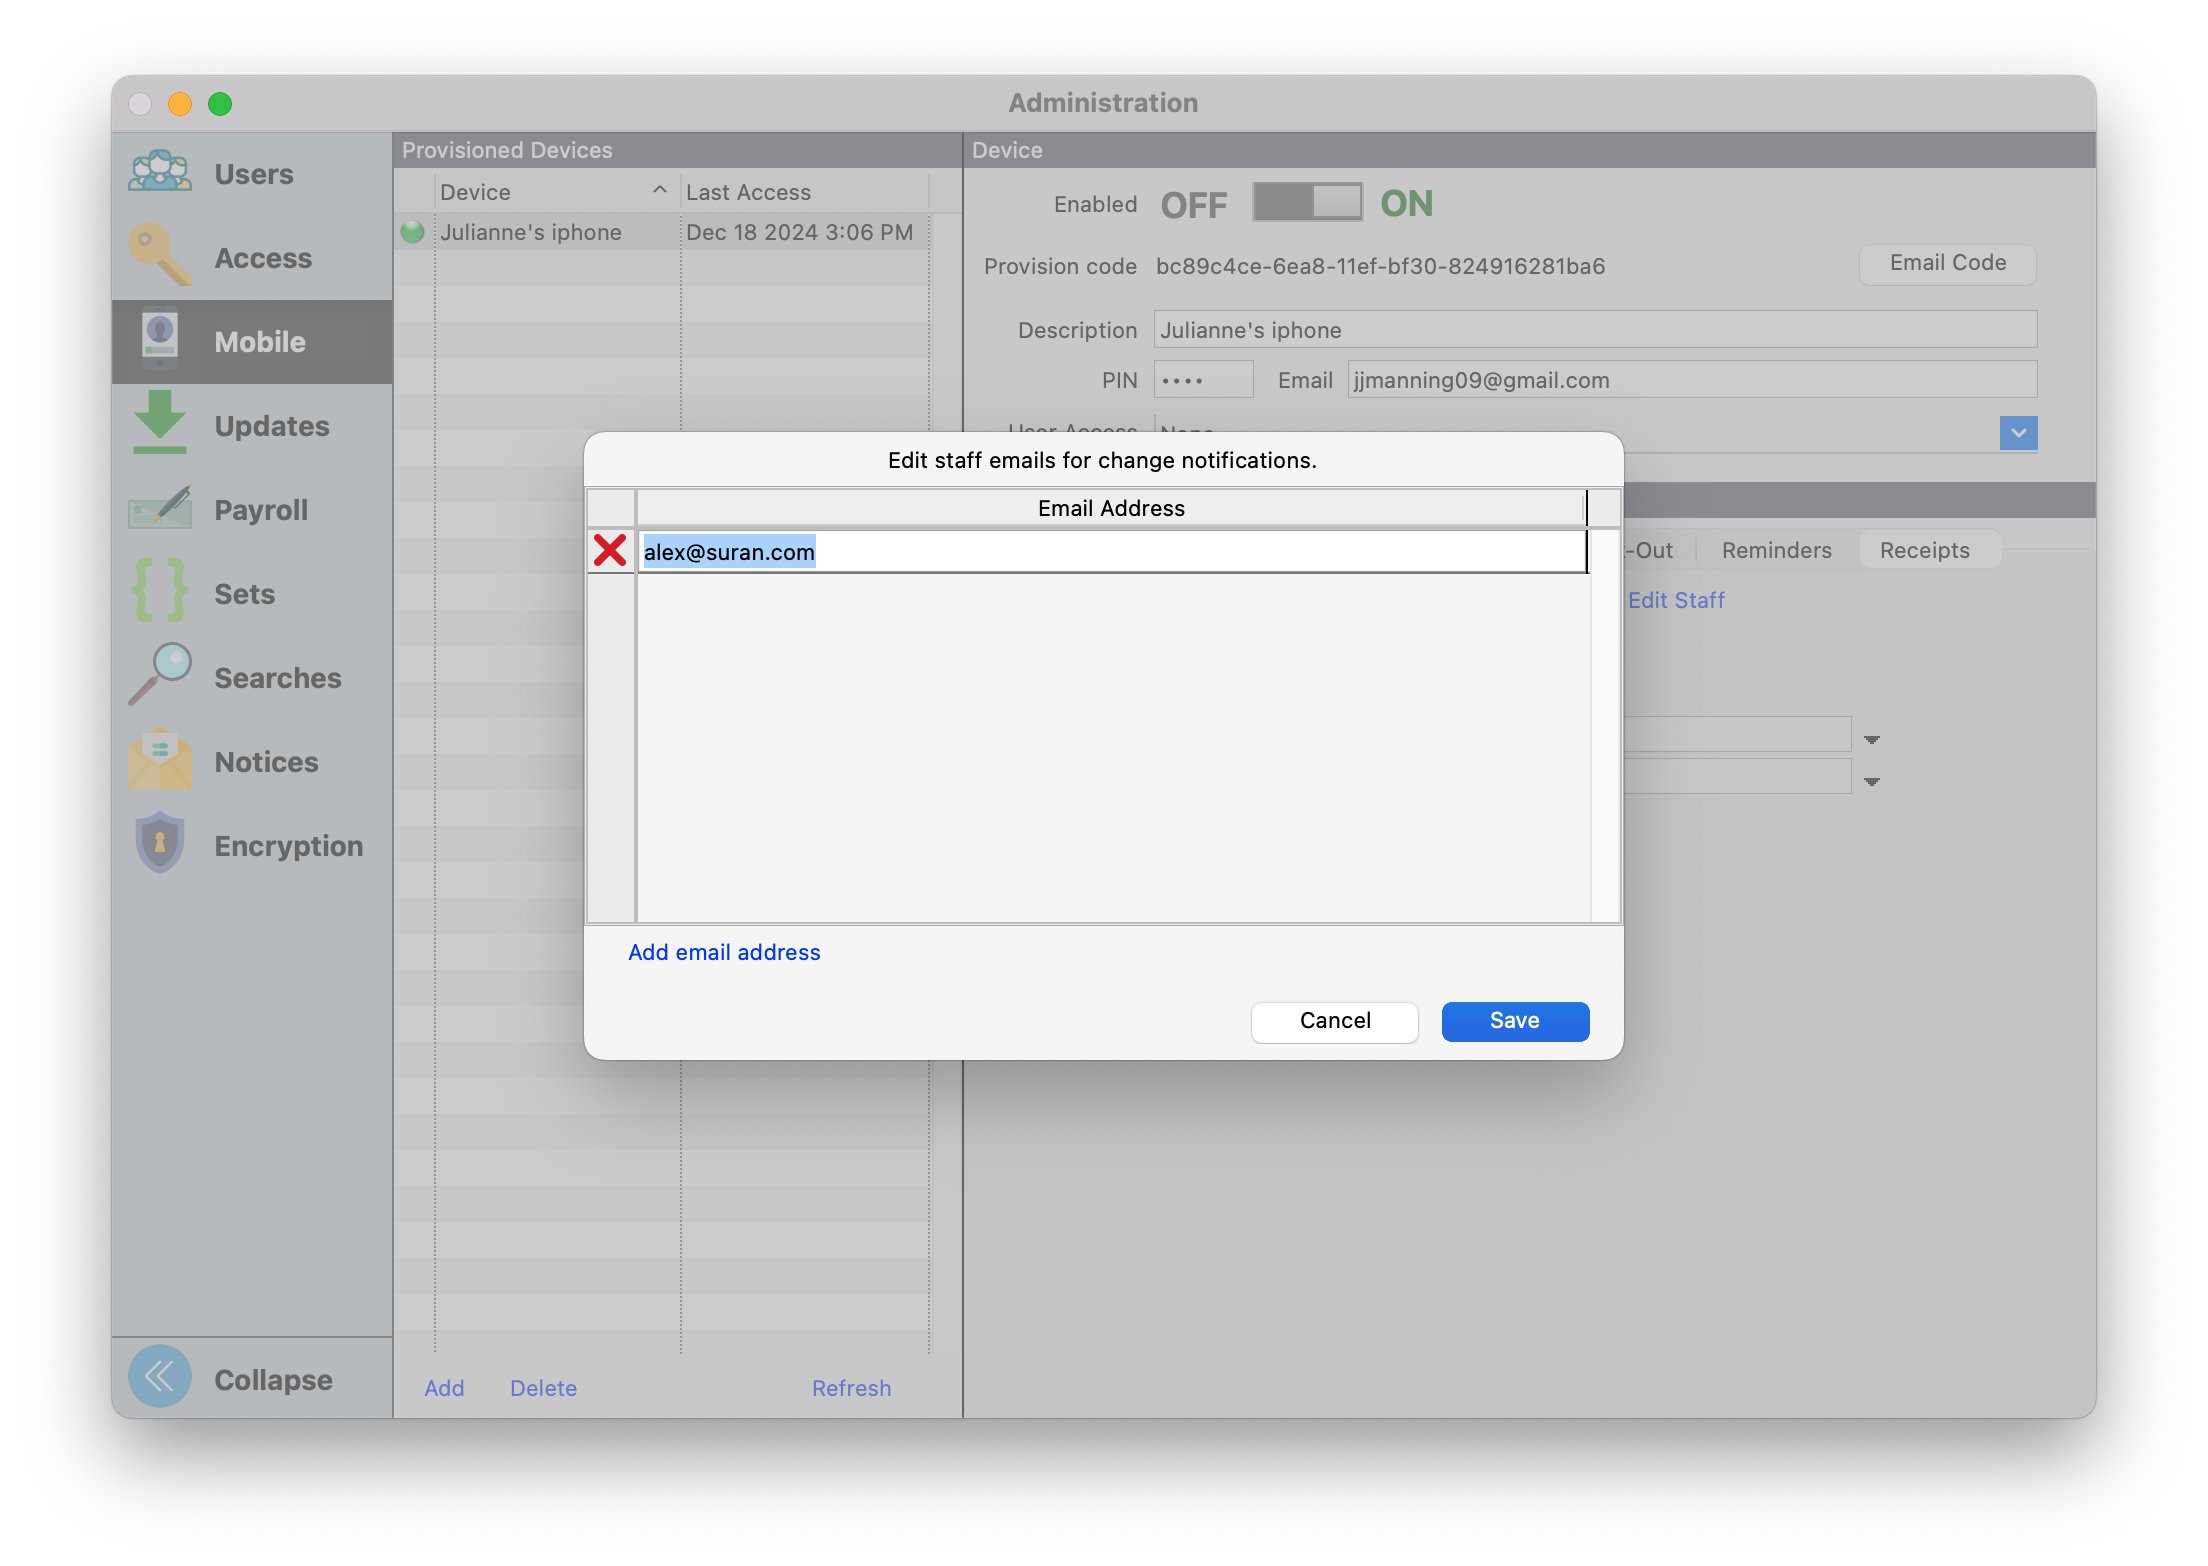
Click Edit Staff
-
Click the Add email address button to add a new line
-
Enter one staff email address per line
-
Use the red X button to remove extra addresses
-
Click Save
-
-
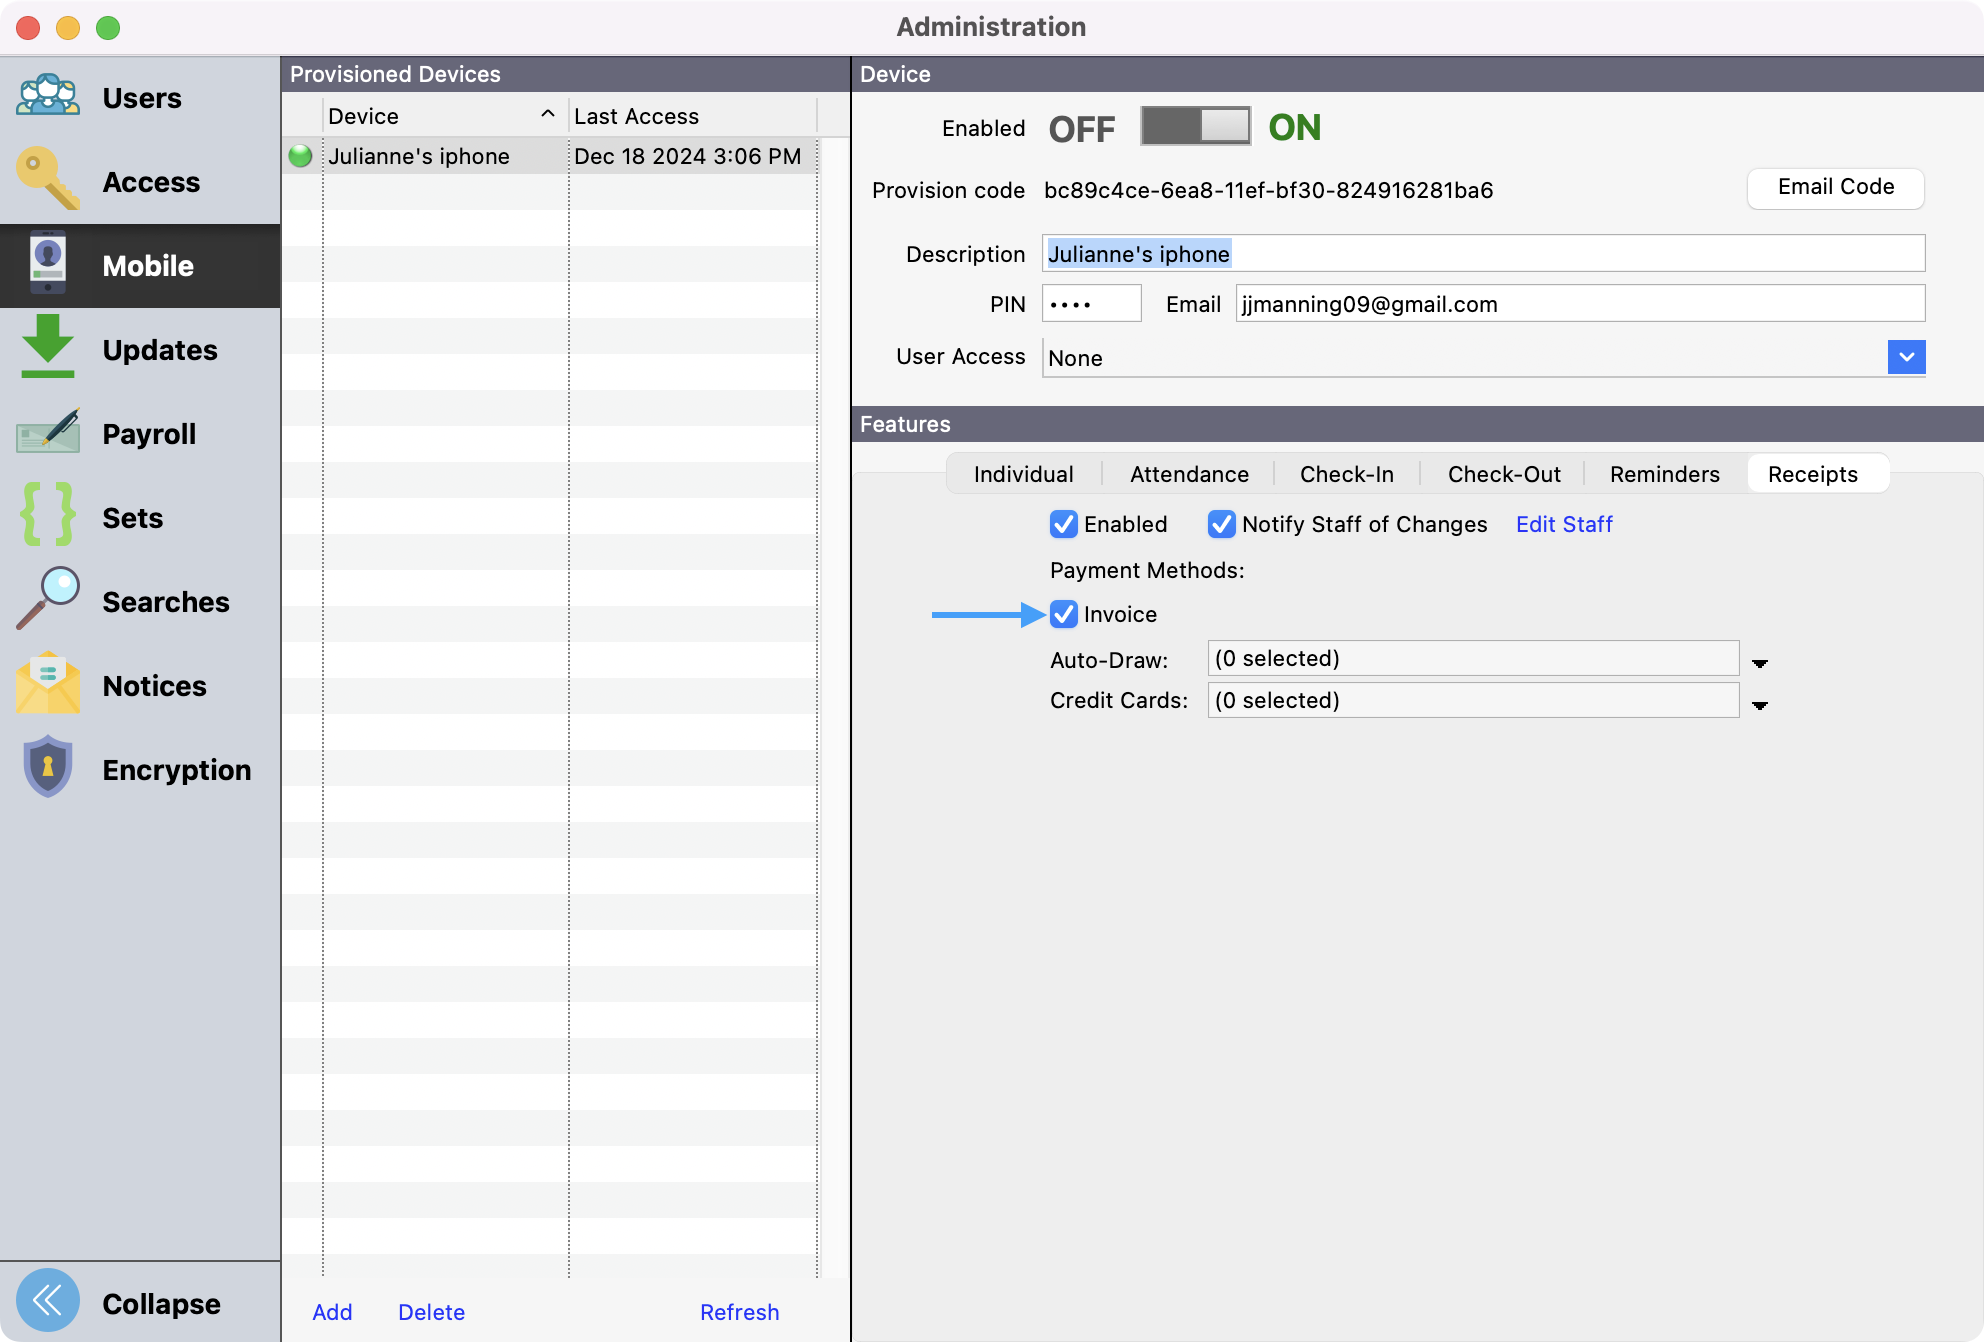
Check Invoice if this device is allowed to create receipts paid by invoice.
-
Click the down arrow and check any assets from which this device can pay an expense (for example using a debit card).
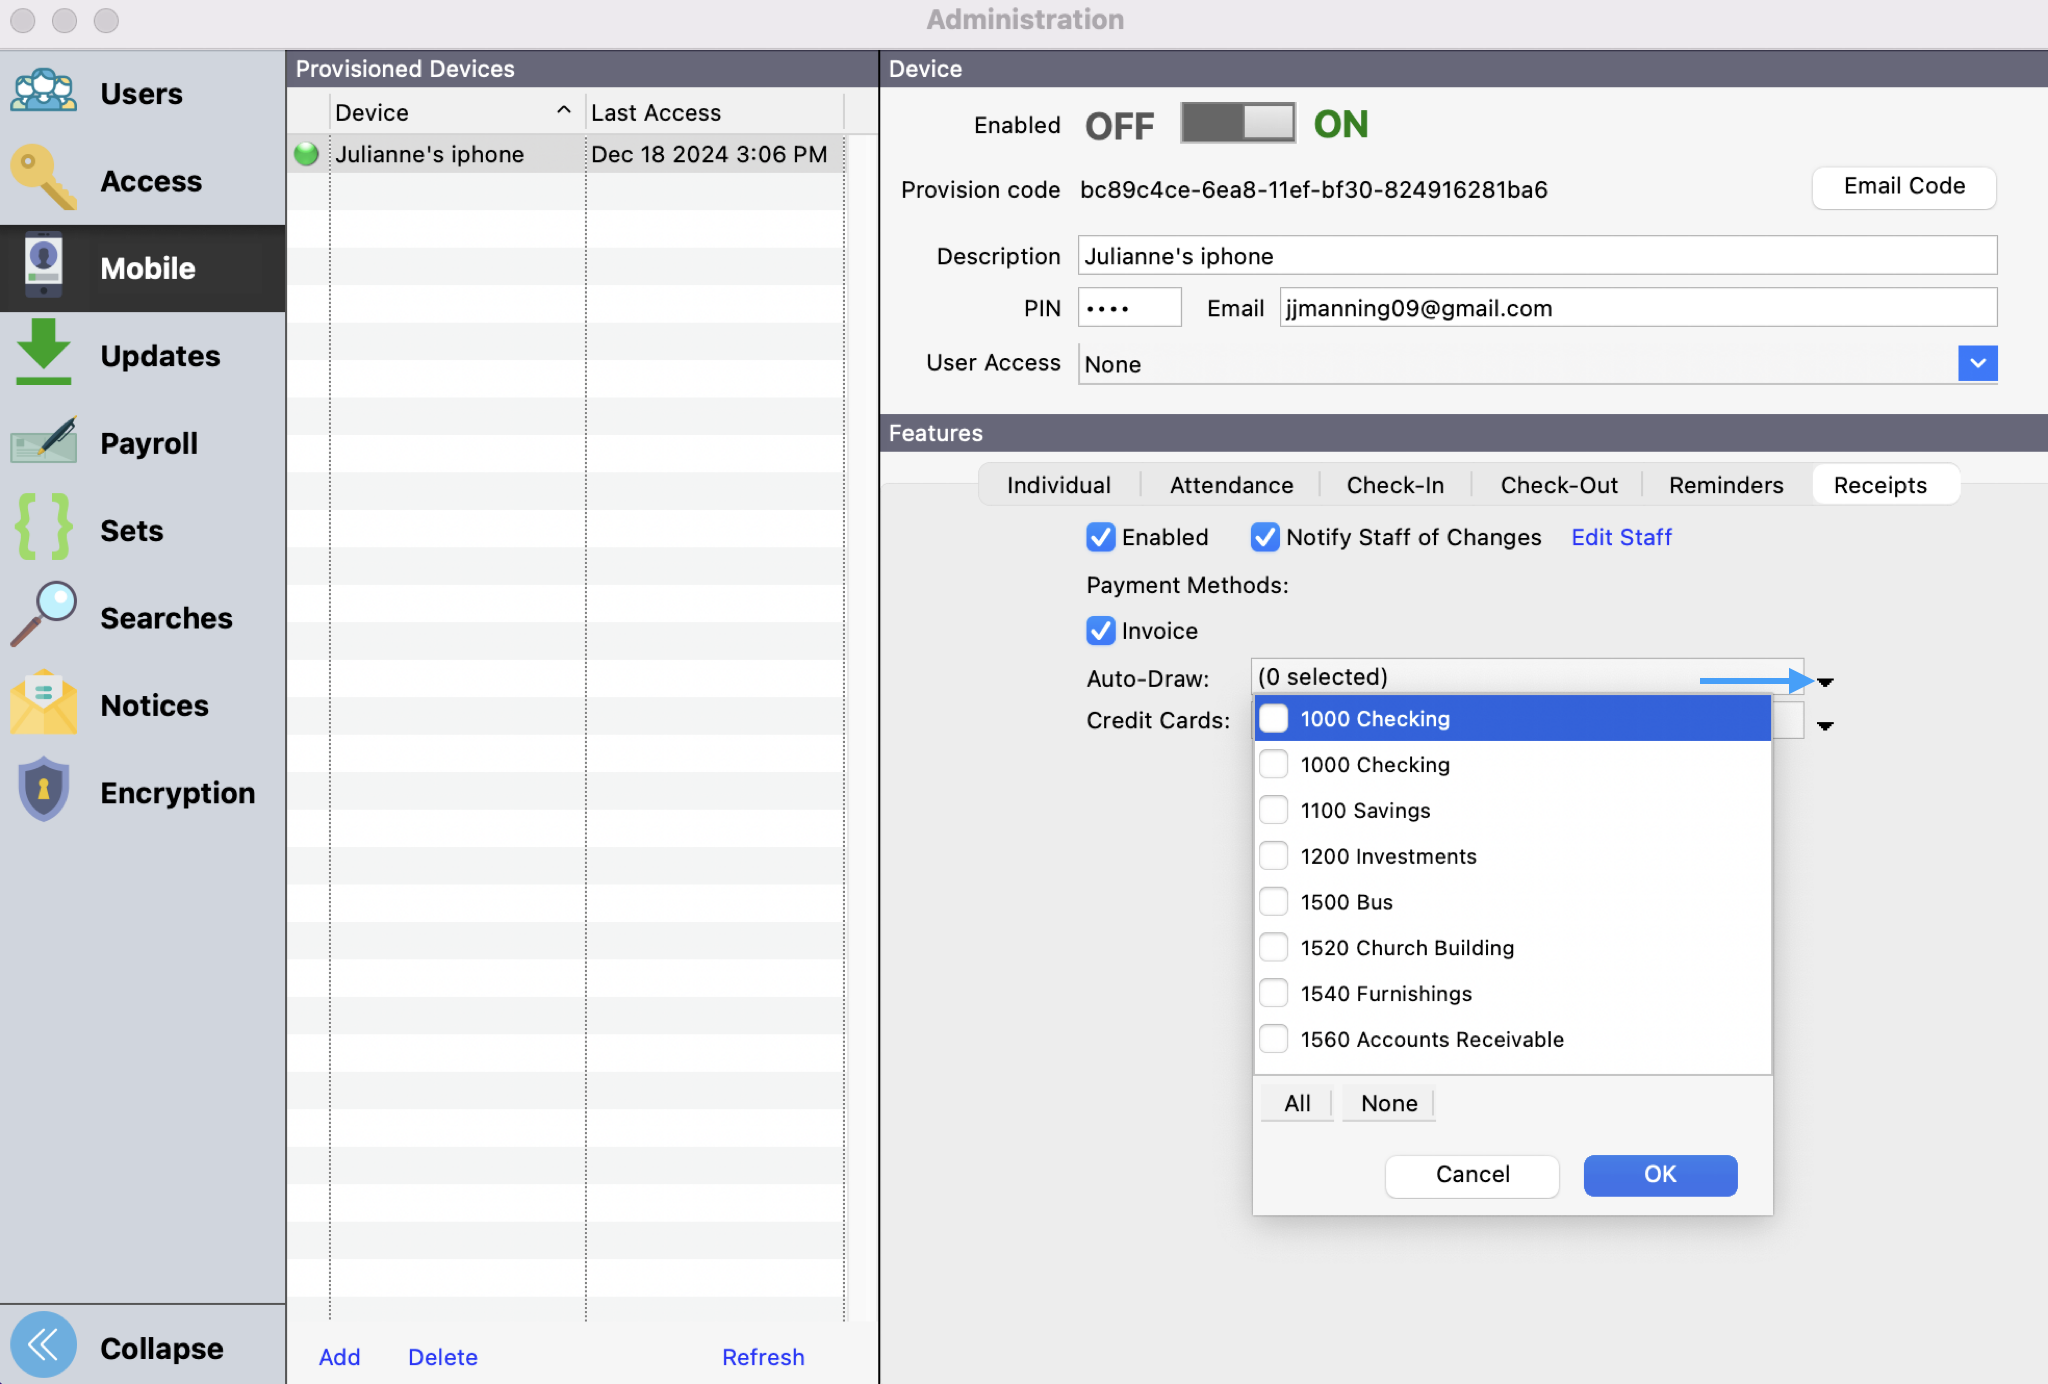
-
Click the down arrow and check any credits card from which this device can pay an expense.
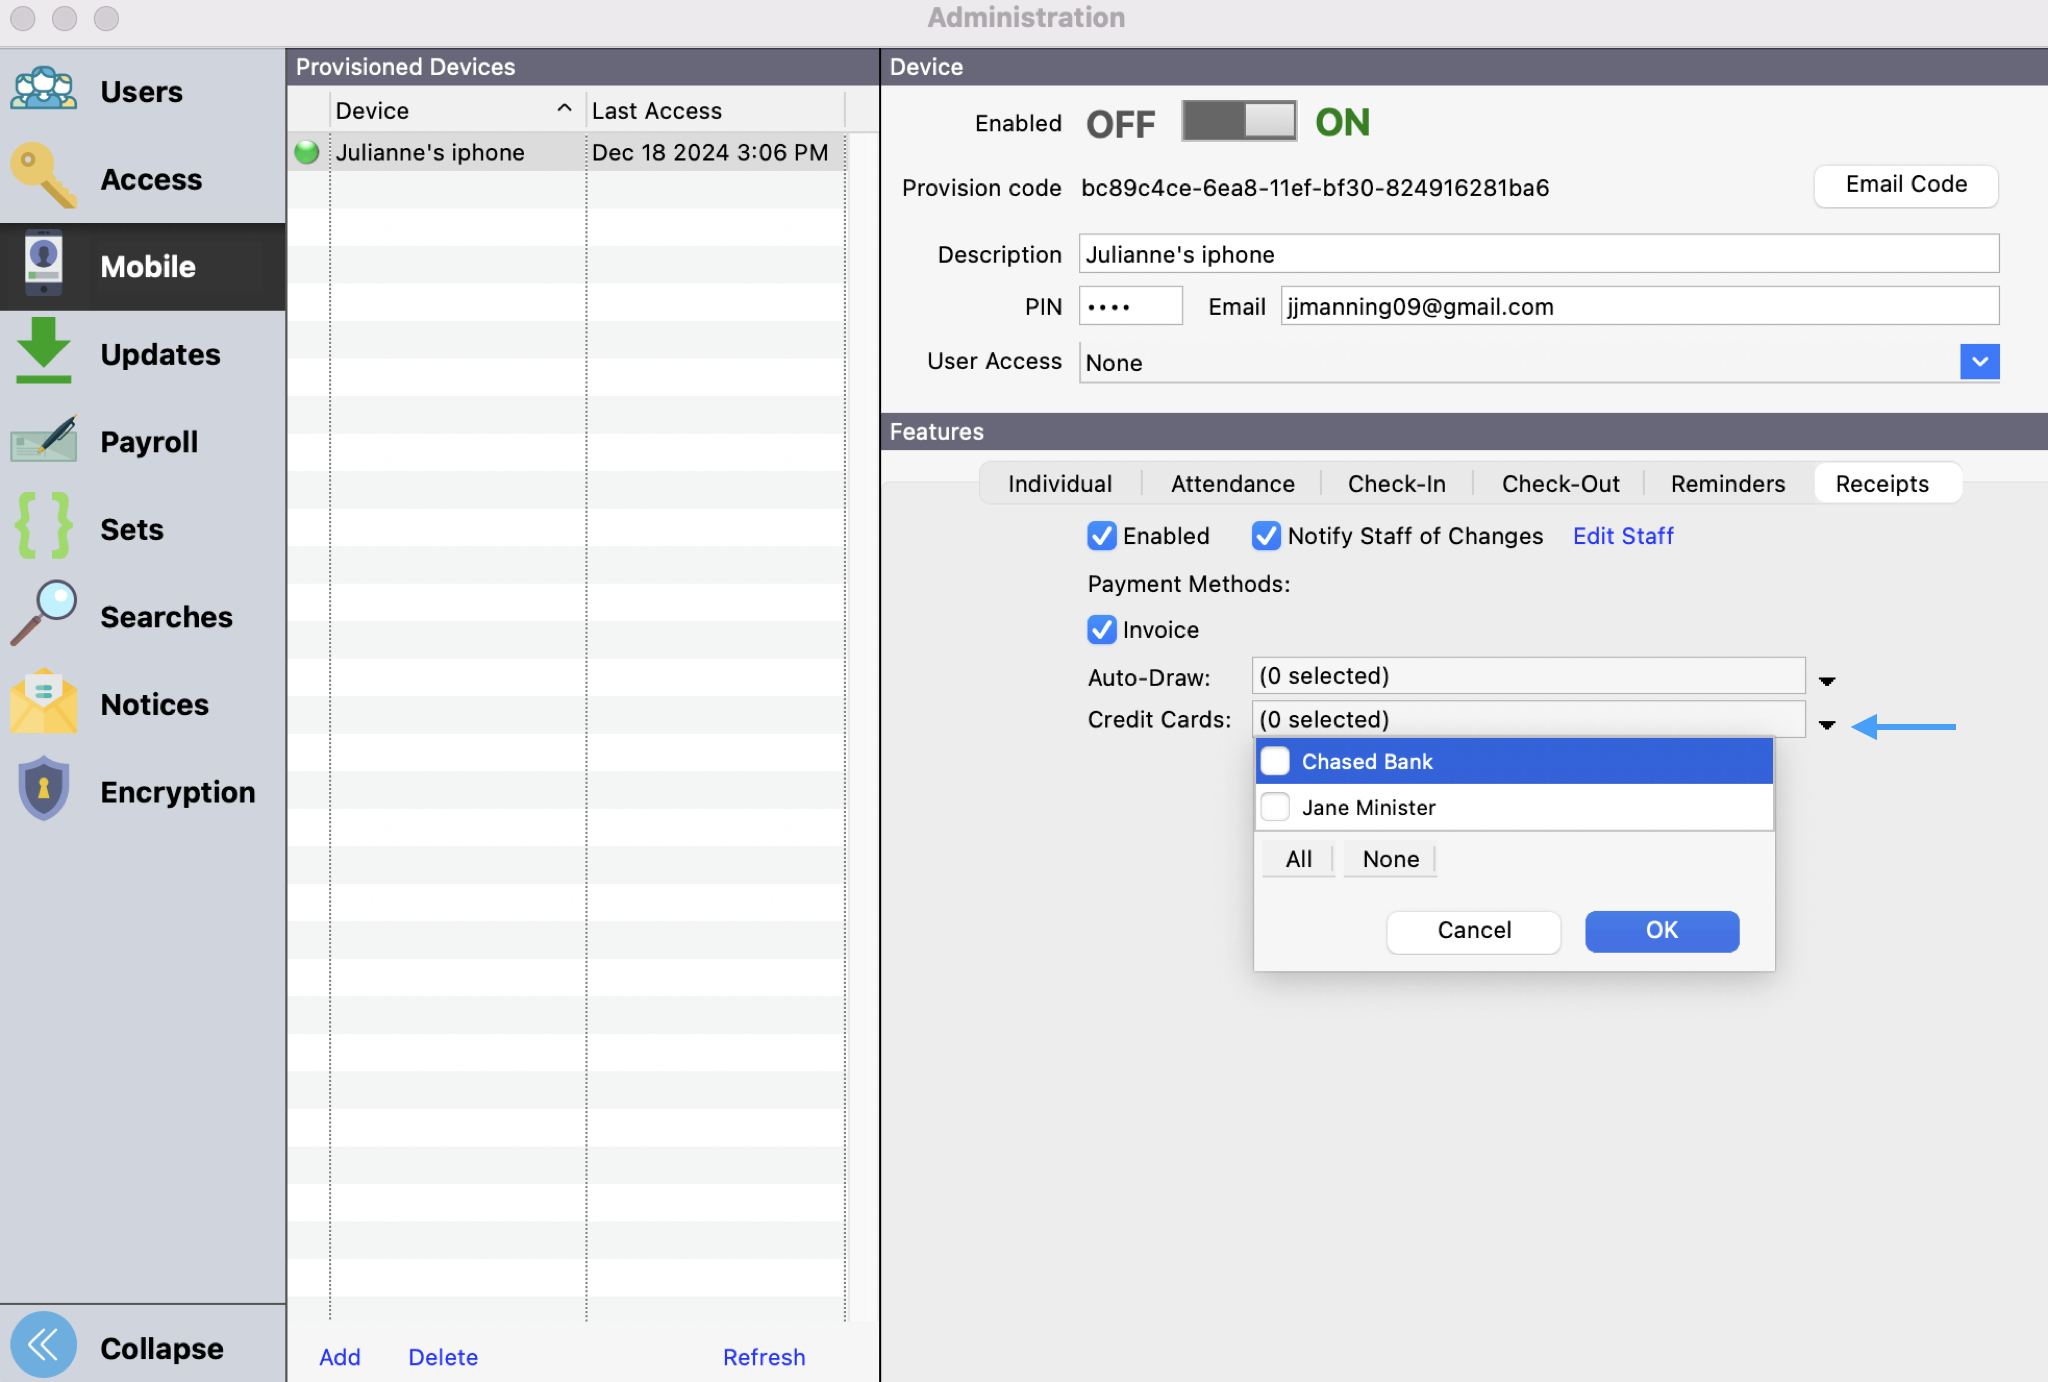
-
For a new device, email the provision code to the device's owner
Submitting a receipt from a device
Use the email you received to install CDM+ Mobile and provision your device. Click here if you need help provisioning. To submit a receipt:
-
Open CDM+ Mobile
-
Enter your PIN
-
Tab Receipts
-
Optional
-
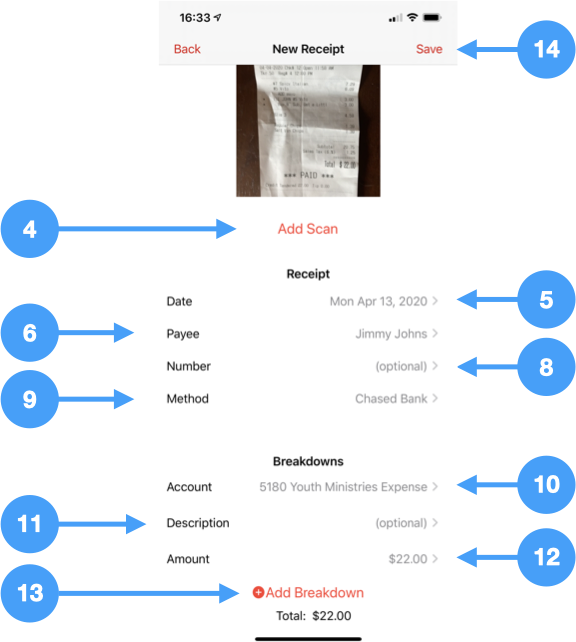
To add a scan:
-
Tap Add Scan
-
Position the receipt in the camera view
-
Tap the camera button to take a photo
-
Tap Use this image to use the photo, or
-
Tap Retake to take a new photo
-
You can repeat these steps to add additional photos of the same receipt
-
-
Optional
-
Change the Date to match the date of the expense
-
Tap Payee
-
Search or browse to select the vendor for this expense
Mobile Receipts does not yet support payees that are not available in Vendor Records in CDM+.
-
Optional
-
Tap Number to enter an invoice number
-
Tap Method and select how this expense was paid
CDM+ Mobile will recall the last payment method used when adding a new receipt.
-
The default account for the vendor will load. If no account was selected or to change the account, tap Account and search or browse to select the account for this expense
-
Optional
-
Tap Description to enter a description for this expense
-
Tap Amount and enter the amount of the expense
-
Optional
-
Tap Add Breakdown to add additional account/description/amount breakdowns for this expense
-
Tap Save to submit the receipt
Processing receipts in CDM+
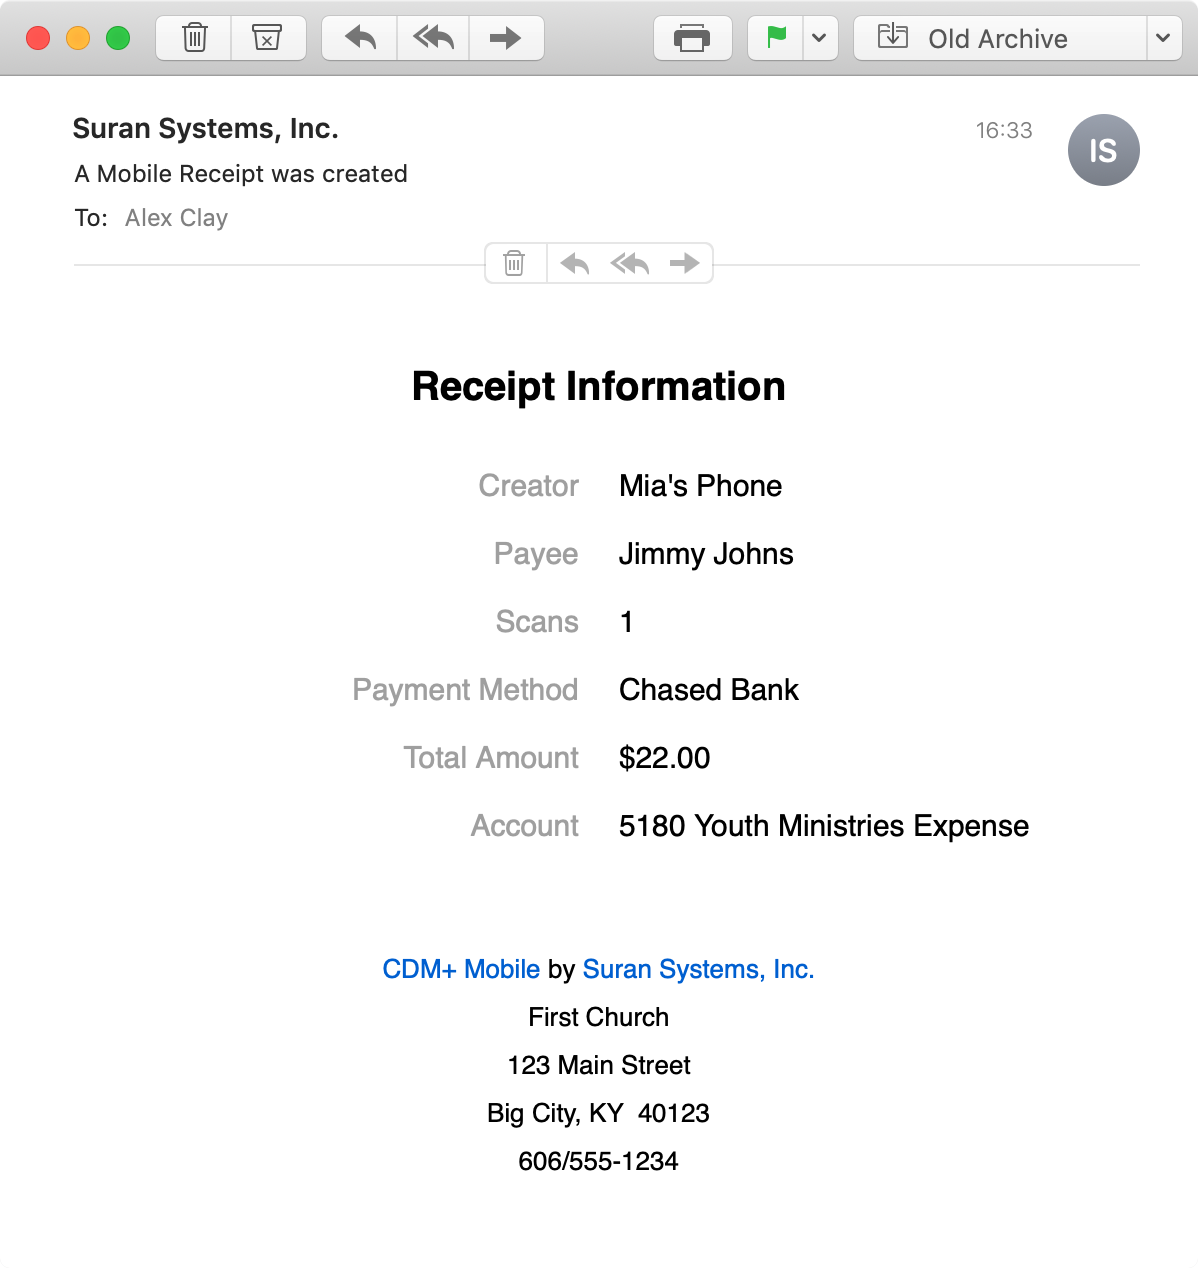
Email notification
If you enabled staff notifications, an email will be sent to the staff addresses when a mobile receipt is submitted.
Viewing invoices
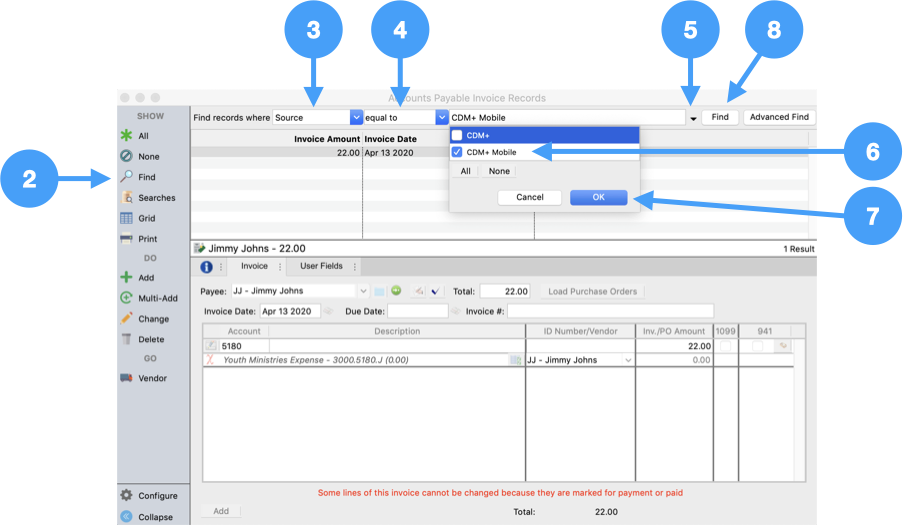
-
Go to Program → Payables → Invoice Records
-
Click Find in the sidebar
-
Set the find field to Source
-
Set the comparison to equal to
-
Click the down arrow for the criteria
-
Check CDM+ Mobile
-
Click OK
-
Click Find
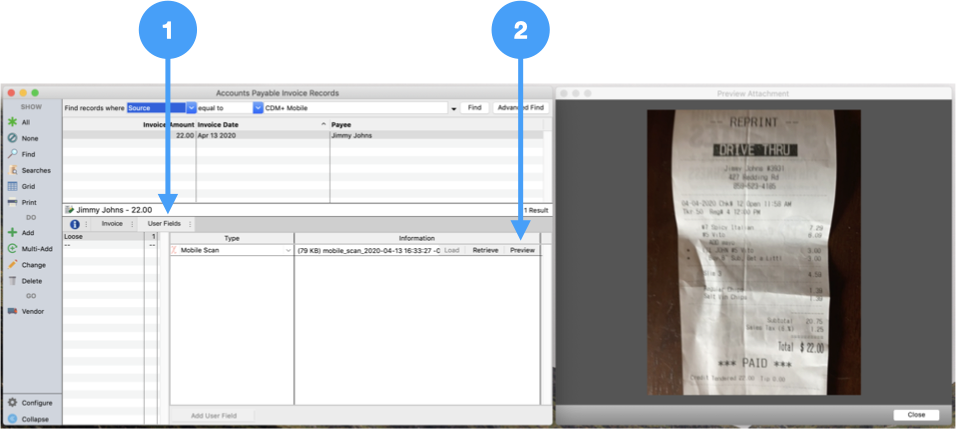
Viewing the scan
-
Click User Fields
-
Click Preview next to a Mobile Scan
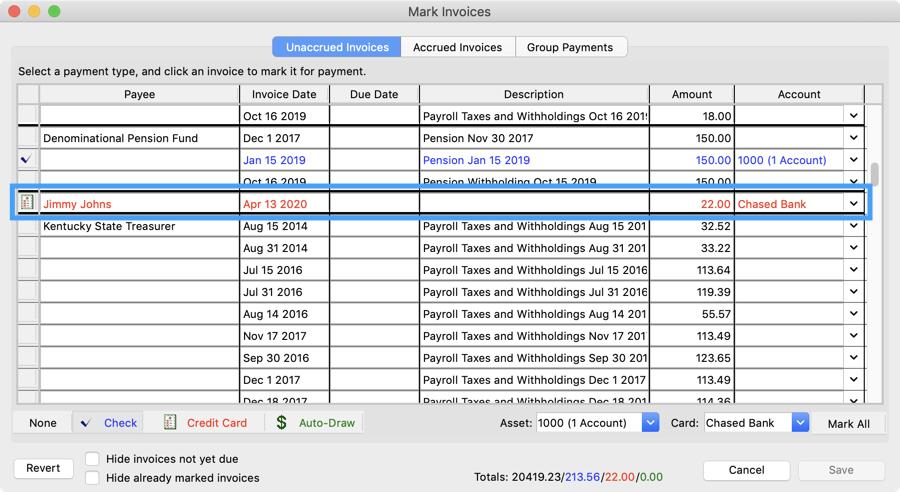
Paying invoices
Invoices created from Mobile Receipts are paid like any other invoice under Program → Payables → Mark Invoices to Pay.
Depending on the payment method selected, invoices created from Mobile Receipts will be pre-marked for payment.
|
Method |
Marked |
Uses |
|---|---|---|
|
Invoice |
|
n/a |
|
Asset |
|
Auto-draw to that asset |
|
Credit Card |
|
Credit card to that vendor |
You can adjust the payment method, asset, or credit card vendor on invoices created from Mobile Receipts just like any other invoice.
Viewing scans after posting
After paying an invoice created from Mobile Receipts you can view the scan.
-
Go to Program → Ledger → Ledger Entries
-
Find the posted payment
-
Click AP Invoice in the sidebar
-
Follow the steps above for viewing a scan
Staff reimbursement
Mobile Receipts can easily be used for staff reimbursement.
Accounting setup
-
Create a liability account for staff reimbursement or use a general Accounts Payable liability
-
Create a vendor record for each staff person to be reimbursed
-
Mark the vendor as a Credit Card and choose the liability from step 1
Mobile provision setup
-
Provision the staff person's device(s) for Mobile Receipts
-
Enable their vendor as an accepted credit card payment method
Filing receipts for reimbursement
Direct staff to choose themselves as the payment method when reporting receipts.
Reimbursing staff
-
Post invoices created from Mobile Receipts
-
Open Mark Invoices to Pay
-
Click the Accrued tab
-
The reimbursement will appear as accrued invoices to the staff person's vendor
-
Cut a check to reimburse these expenses