Provisioning a Device for a CDM+ Database
In order to connect to your own CDM+ database using CDM+ Mobile, your CDM+ administrator will need to provision your device in the CDM+ desktop software.
Provisioning Provides Security and Customization
Pairs a device with your CDM+ database
Ensures the device gets to the right data and only to the right data
Allows you to customize a device for only certain features (such as Attendance entry for specific classes, Pastor's access to Visitation and Pastoral notes, youth minister's phone to send texts to youth group, tablets set up for self Check-In, tablets used as kiosks for barcode attendance)
Allows you to remotely disable a device provisioned to access your CDM+ data
These instructions apply ONLY to CDM+ users who are enrolled in the CDM+ Data Hosting service. If you are not currently using the Suran Systems, Inc. hosting service, please contact the CDM+ Sales Department (877-891-4236) for more information.
Login to CDM+ on your desktop or laptop computer.
Go to File > Administration > Mobile. If you do not have access to this window, contact your CDM+ administrator.
Adding a Device
Click the small "+" sign at the bottom left corner under Provisioned Devices to add a provision.
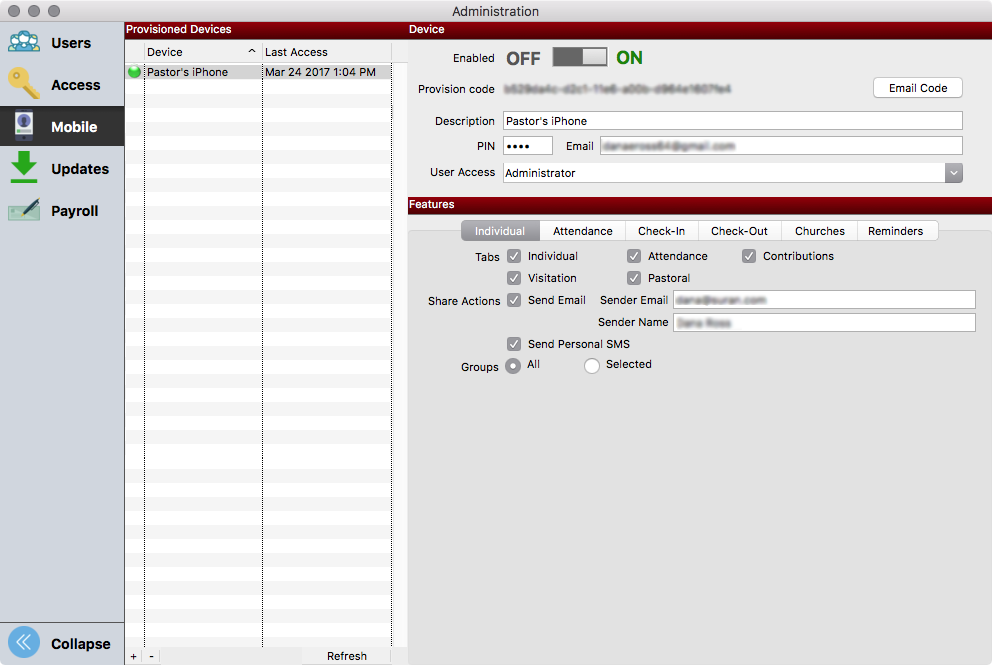
Type in a description for the new mobile device. Click OK.
In the Device section of the window:
Enter any four numbers as the 4-digit PIN number for this device (use only numerals; no letters or special characters). Be certain to share the PIN with the users of the device. It will not be included in the provisioning email.
Enter an email address that the user will be able to access on this mobile device in the Email field.
[Optionally] Choose the User Access setting from the drop list. If you don't have Access Settingsdefined on the Users pane of the Administration window, you may leave the User Access as Noneand manually choose permissions for this user.
Setting CDM+ Mobile Features on a Device
In the Features section of the window, there are tabs for each of the sub-apps or features in CDM+ Mobile. Note that the Individual and Attendance features are only available if you have the Membership/Attendance program in your CDM+ desktop software suite. Likewise, you must have the Check-In/Check-Out program in your CDM+ suite to use Mobile Check-In or Check-Out features. If you wish to add programs to your CDM+ suite, please contact the Sales Department at 877-891-4236.
Individual Tab
Decide which tabs in the Individual sub-app the user of this device will be able to access: Individual (personal info including photos) and/or Attendance, Contributions, Visitation, and/or Pastoral records. Check the appropriate boxes.
Checking Attendance here will allow the device user to see an individual's attendance history, not take attendance. The ability to take attendance is controlled on the attendance tab, which is described below.
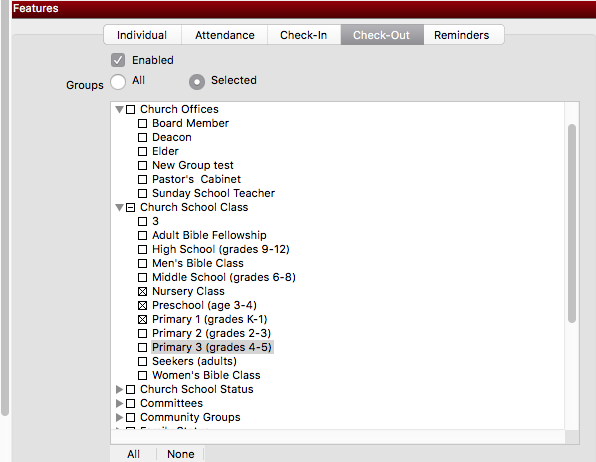
To limit which Groups the user of the device will be able to view, on the Attendance tab choose a radio button for Groups -- the options are All groups or Selected groups. If you wish to limit the Groups this user can access, choose Selected for a list of available types of Groups, and click the arrow to the left of the Group Type for an expanded list of available Groups of that type (if you wish to drill down to enable the device for only a specific class). For example, a device being used only for CDM+ Mobile Attendance in the Primary Sunday School wing, might have just the three primary classes checked under Sunday School Class code type, as shown below. This would limit the available Individual information to just members of those classes.
There is a special group called All Individuals. This group will display every individual record unless the record is marked Do Not Print. We recommend that you only allow access to this group from devices that are being provisioned for use by authorized personnel.
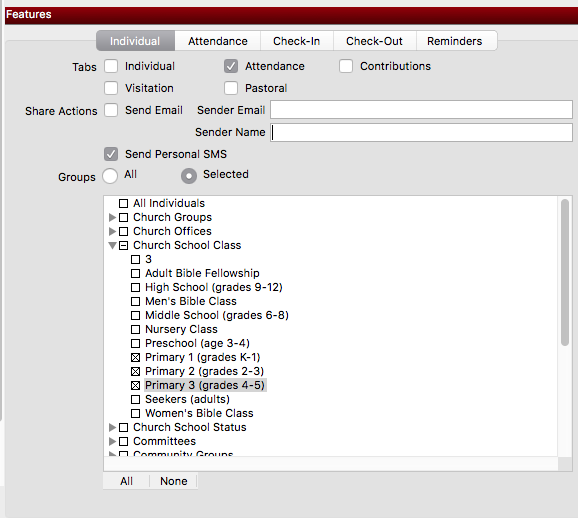
If this device will be used to send emails, check the Send Email box and enter both the Sender Email address and Sender Name.

Personal SMS (for use with Smartphones only) -- If this device will be used to send Personal SMS text messages to Individuals or Groups in your CDM+ Database, check the box next to Personal SMS.
Personal SMS text messages sent from CDM+ Mobile will be sent using the device owners' cell phone plan, appearing as "from" that person's telephone number and subject to sender's carrier restrictions, if applicable.
Attendance tab
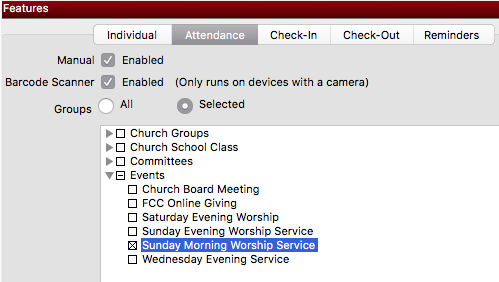
Choose to enable either or both Manual attendance entry or attendance entry using the Barcode Scanner (requires a device with a camera).
Select the Groups for which the user of the device will be able to enter Attendance on this device.
Check-In tab
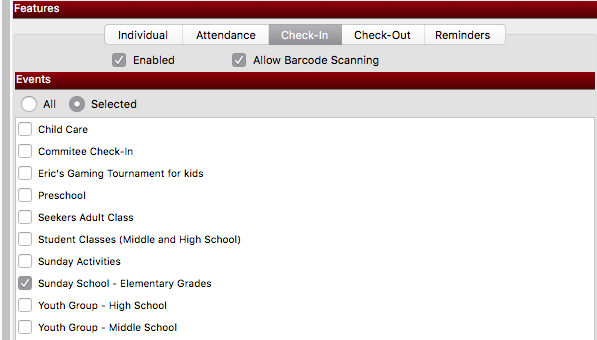
Decide whether this device is Enabled to run Check-In or not (by default, this is false).
Indicate whether this device can check people in using Barcode Scanning (requires a device with a camera).
Select the Groups for which the user of the device will be able to run Check-In.
Check-Out tab
Decide whether this device is Enabled to run Check-Out.
Select the Groups for which the user of the device will be able to perform Check-Out.
Reminders Tab
Choose which, if any, Reminders should be visible to the person using this device.

Device Pane of the CDM+ Mobile Setup Window
Enable the device by sliding the slider at the top of the window from OFF to ON.

If at any time you no longer want this device to be able to access your CDM+ database through CDM+ Mobile, simply move this switch from ON to OFF.
On the Enabled Device, Enter the Provision Code
Each device you add in CDM+ has a unique Provision Code. The CDM+ administrator may copy the provisioning code to a text document, by right-clicking on the provisioning code to copy it to the clipboard. Paste the code into a text or document file and save for later access.
The simplest way to provision a device for CDM+ Mobile is to email the code to the address you entered in the Device section of the Mobile window.
Verify that the information is correct and click E-Mail Code button. The user will receive an email with the Provisioning Code.

Have the user open the email containing their provisioning code on their device.
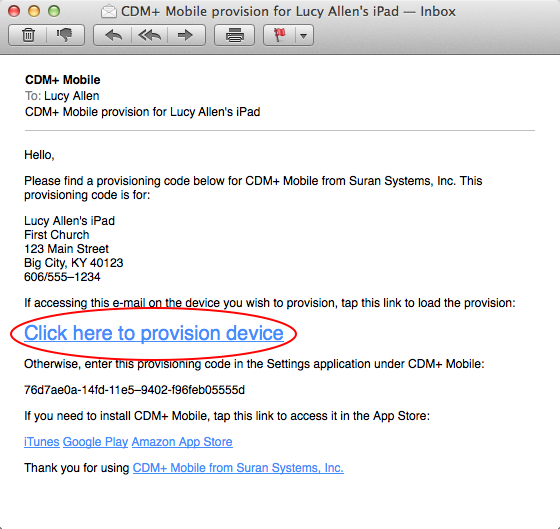
The user needs to access the email on the device that the provision is for. Then all they need to do to finish setting up the device is:
Tap the "Click here to provision device" link in the body of the email.
The next time the user logs into CDM+ Mobile on the device, he/she will use the PIN you set up in CDM+ Administration, and CDM+ Mobile will connect to the actual CDM+ database instead of to demo data.
A provisioning code can only be used by one device.
If a person has multiple devices, such as a phone and a tablet, with which he/she wants to use CDM+ Mobile, follow the steps above to set up each device separately with a unique provisioning code.
If a person has a provisioned device and replaces it with a new device, follow the steps for Transferring a Provisioning Code.
