
Before we begin processing W-2's, we need to ensure that specific areas in CDM+ Payroll are properly set up. These areas include:
-
Payroll Payer Records
-
Deduction Setup
-
Employee Records Setup and Housing Allowance Pay Item
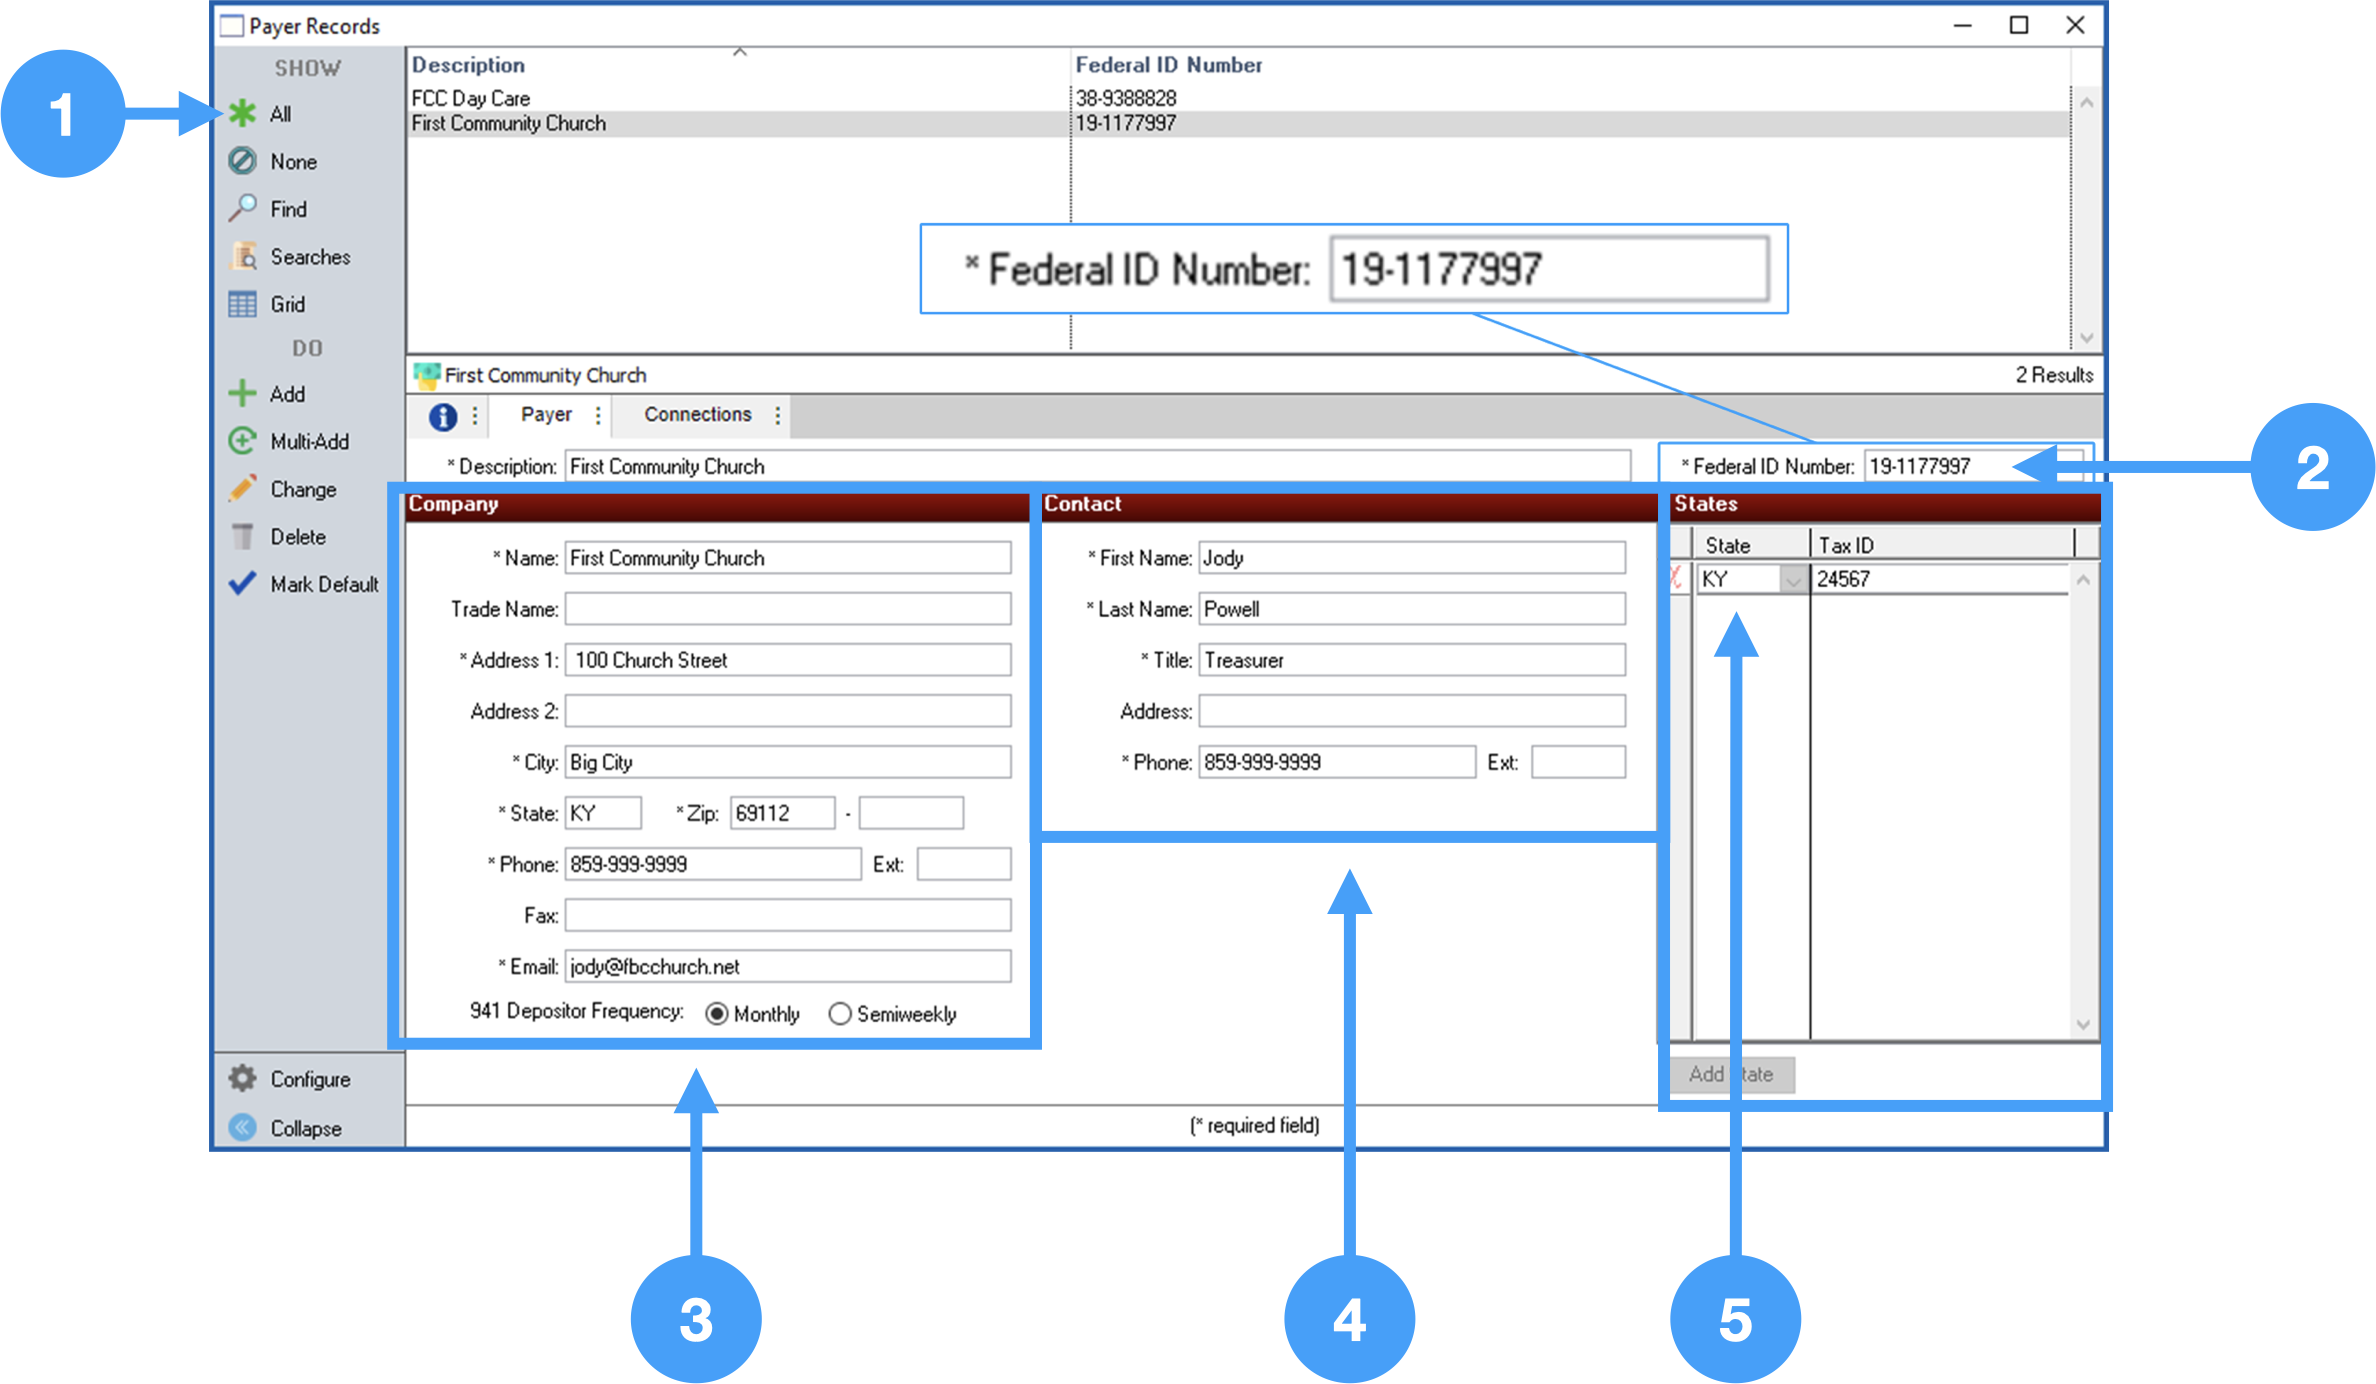
Review Payer Records
Program → Payroll → Payer Records
-
Click All in the lefthand sidebar to see all of the created payer records. Select the one used to create this past year's payroll.
-
Ensure the Federal ID Number is correct.
-
Review Company information and make sure it is correct.
-
Review Contact information and ensure that it is correct. This can also be updated in Aatrix Forms Viewer, but it will not be updated in CDM+.
This information can be updated in the Aatrix Forms Viewer, however, this does not update the information in CDM+.
Also, ensure that the proper 941 Depository Frequency is selected. If you file a Schedule B form, then select 'Semiweekly'. In our example, the church does not file a Schedule B so 'Monthly' is selected.
-
Ensure a State is selected and the State's Tax ID is correct.
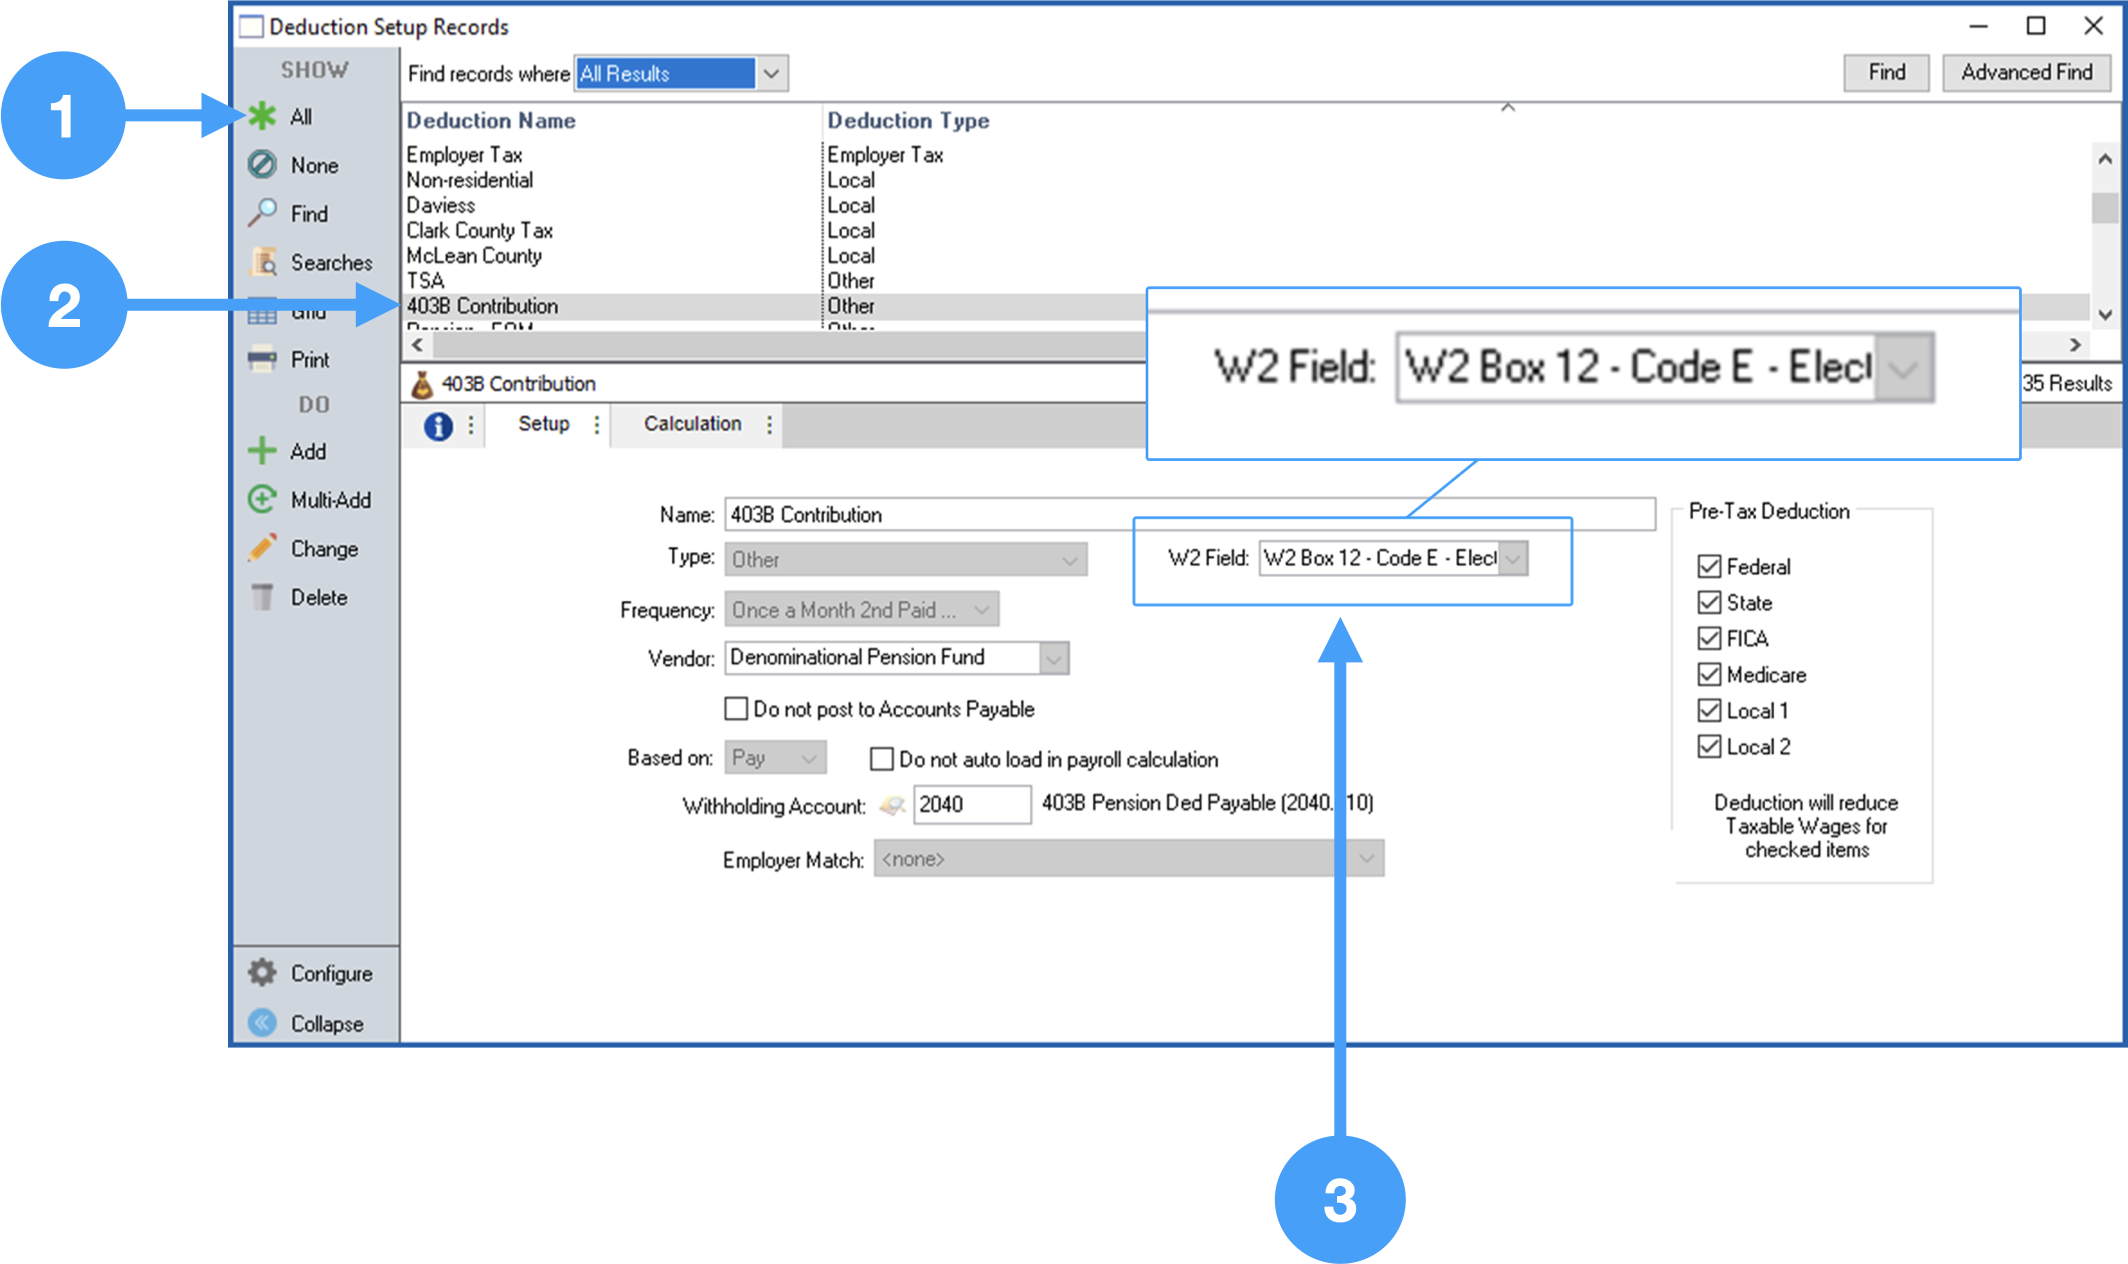
Review Deductions
Example: 403-B Deductions to be printed on W-2's
Program → Payroll → Deduction Setup Records
Select the 403-B deduction in the Results list.
-
Select All
-
Select the '403-B Deduction' in the Results List.
-
Ensure the W-2 Field is correct for any deductions that will show on W-2s.
You can perform a simple search to find a specific deduction, by clicking on the Find option in the lefthand sidebar.
Example: Local Tax Setups
Select the Local Tax deduction in the Results list.
-
Ensure the Tax Form field is set to 'Local Withholding'.
-
Ensure the correct local tax account number is correct.
-
Ensure the correct Local Type is selected.
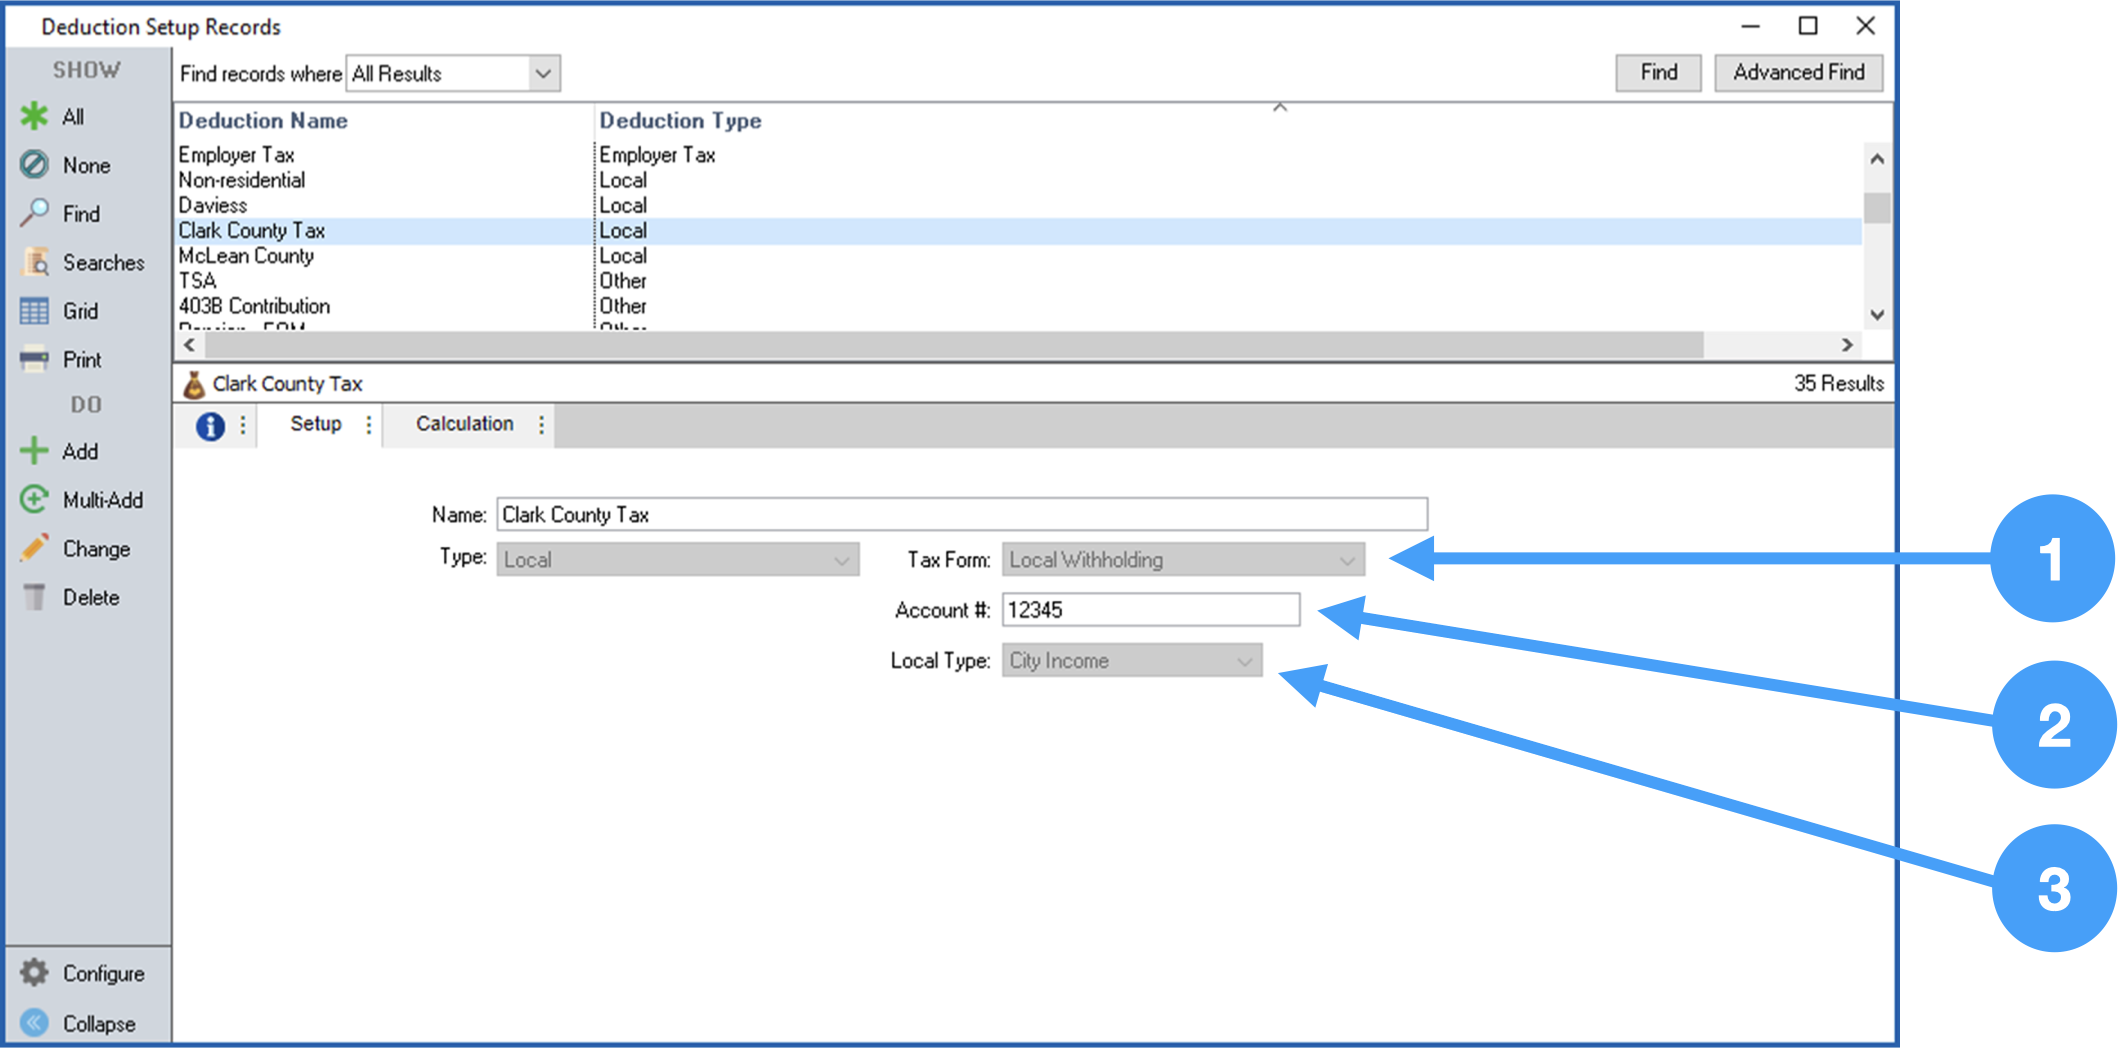
Review all deductions that will be reported on your W-2's to ensure that the W-2 field has the appropriate option selected. Contact a Tax Professional if you are unsure of the appropriate selection.
Review Employee Record Setup
Program → Payroll → Employee Records
-
Select an employee to review.
-
Select the Setup tab.
-
Review the information under the W-2 section of the Employee Records Setup tab. For example, if an employee is contributing to a retirement plan, then the checkbox labeled 'Retirement Plan' must be checked. Also, if there are employees who have elected to receive electronic W-2's, then the checkbox labeled 'Electronic W2 Only' must be checked.
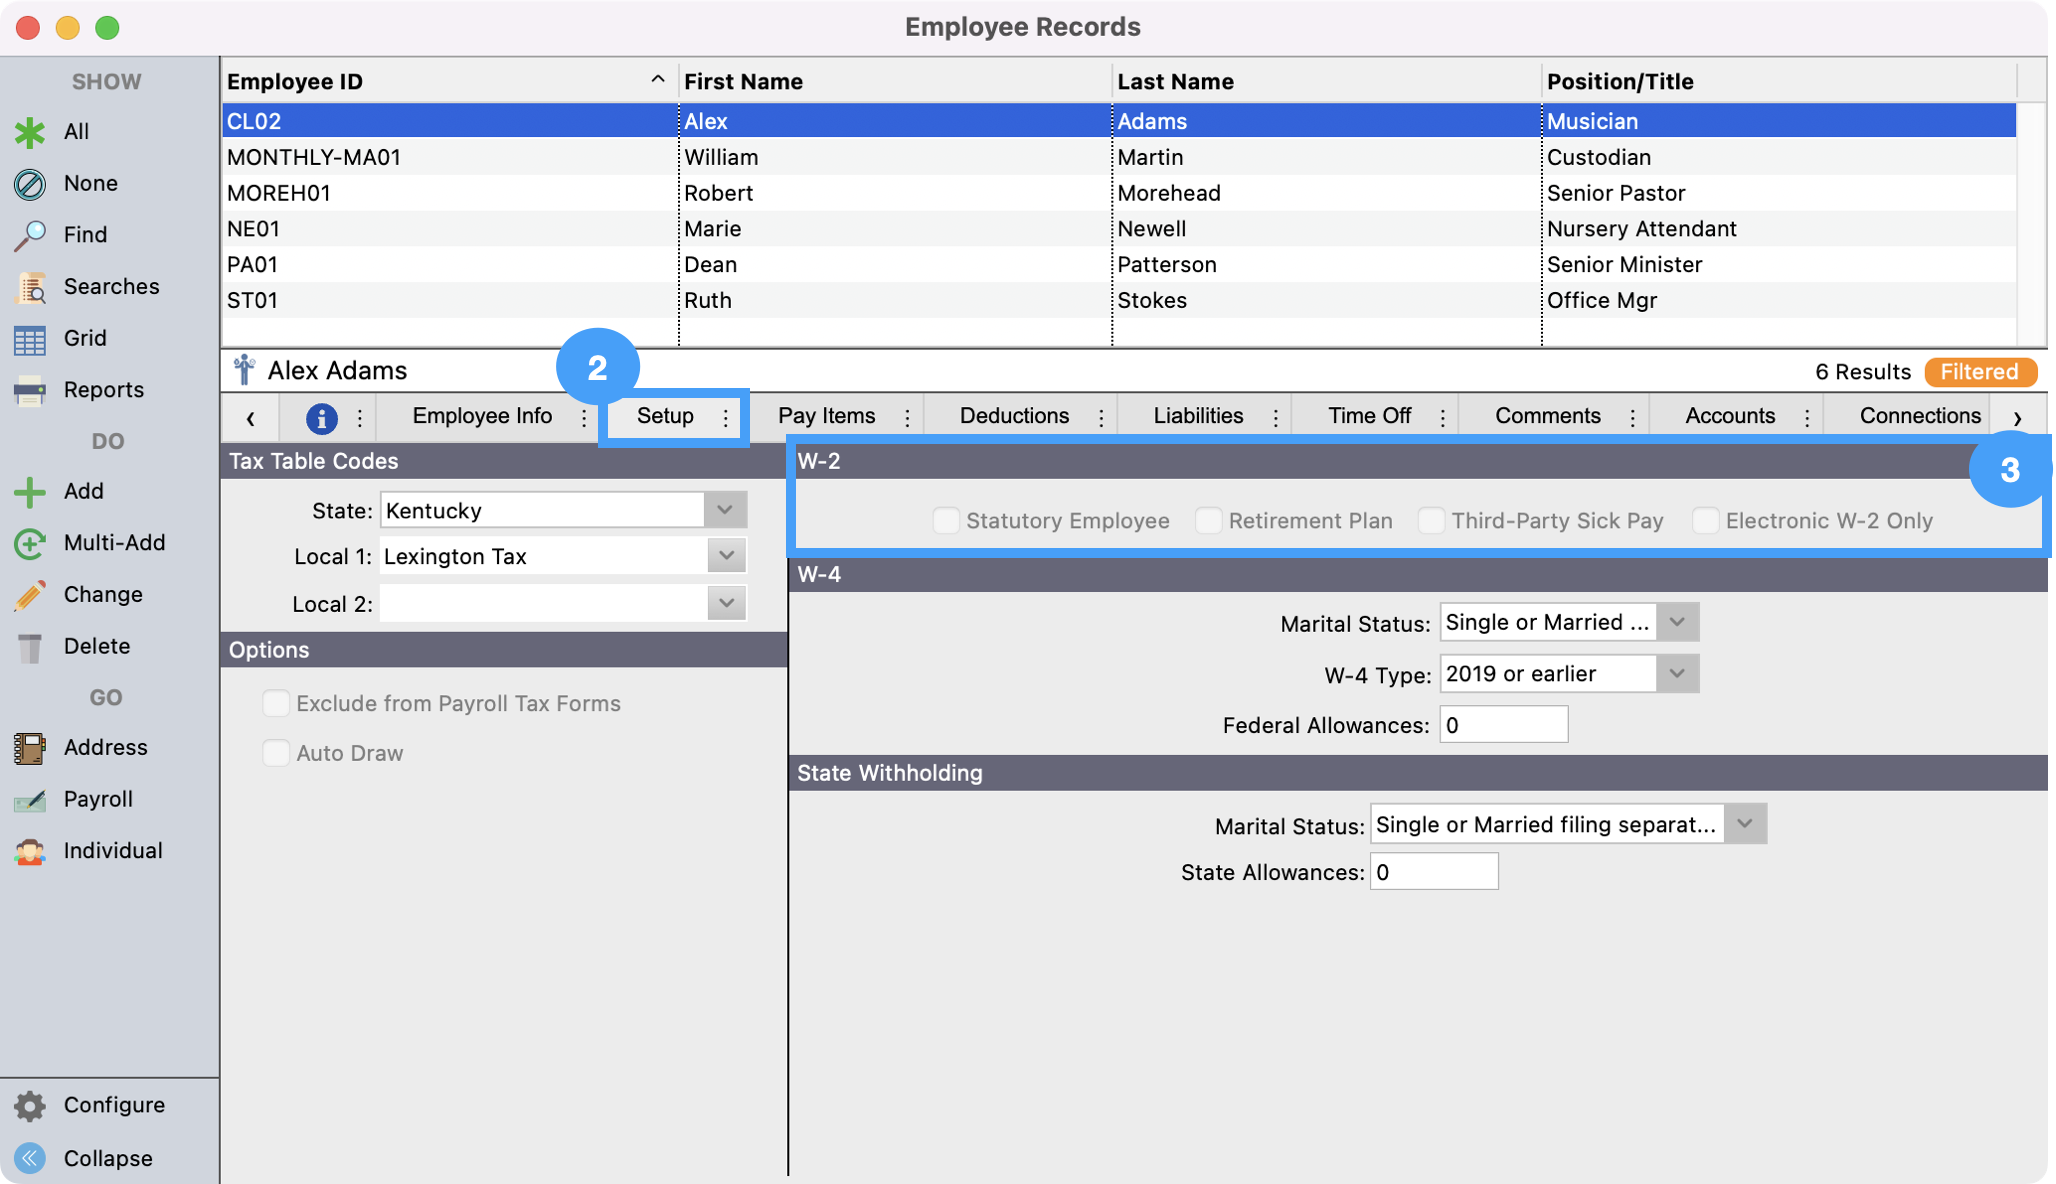
The Electronic W2 Only option requires that you have signed authorization forms for each employee electing to receive electronic W-2's only. NOTE: NO paper W-2's are generated when this is selected.
-
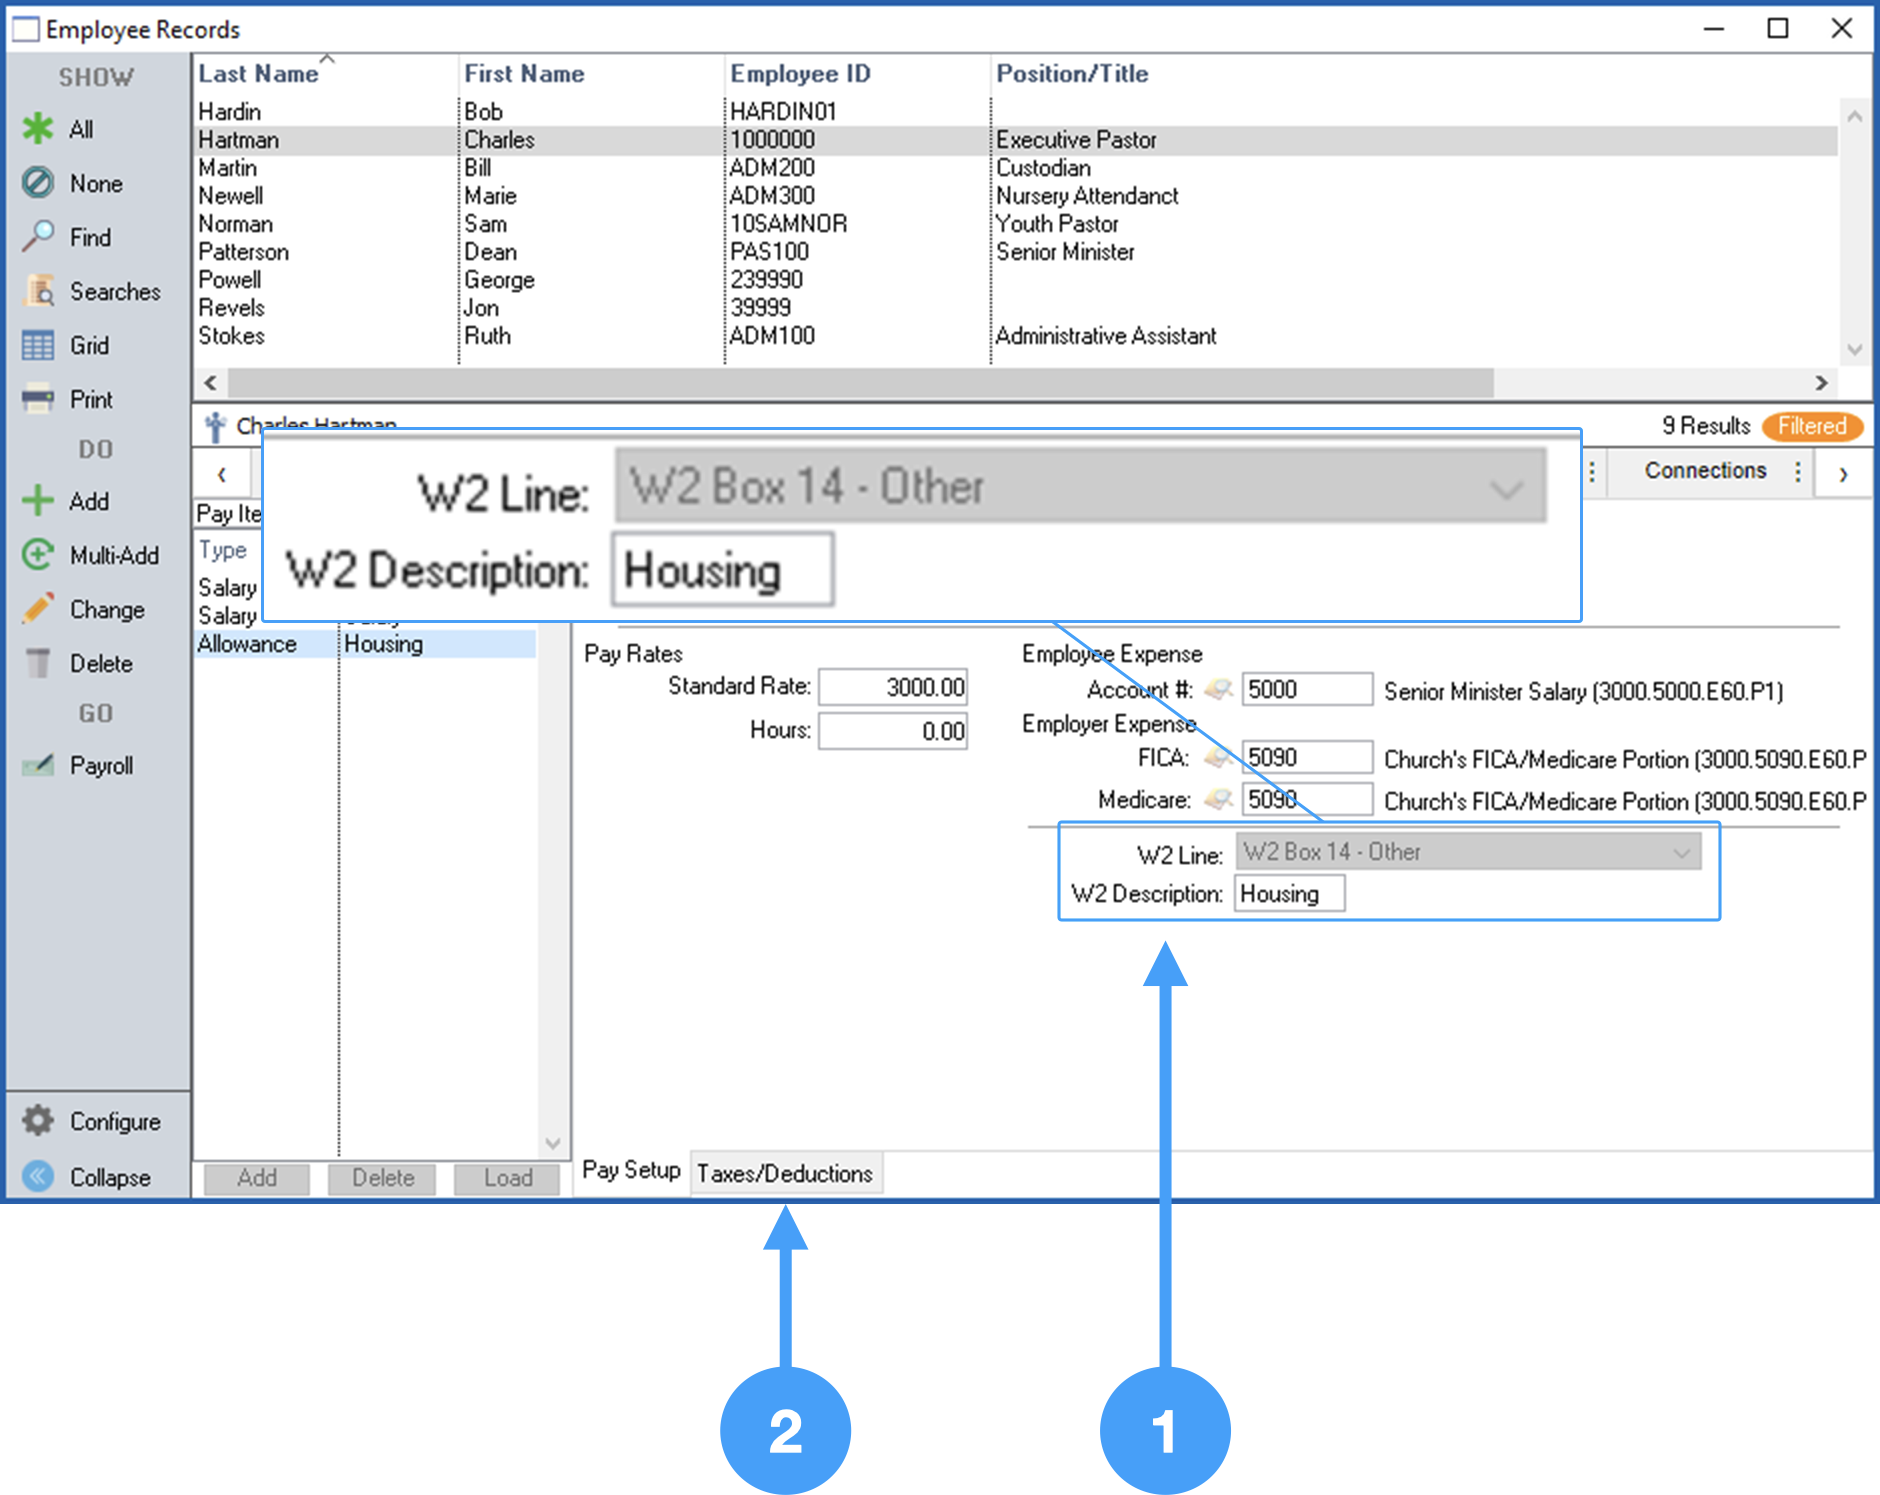
Now, let's look at the Housing Allowance Pay Item. Click on the Pay Items tab.

Review Employee Record Housing Allowance Pay Item W-2 Field Setup
-
Ensure that the W-2 Line for the Housing Allowance is set to 'W2 Box 14 - Other' and the W2 Description reads 'Housing'.
-
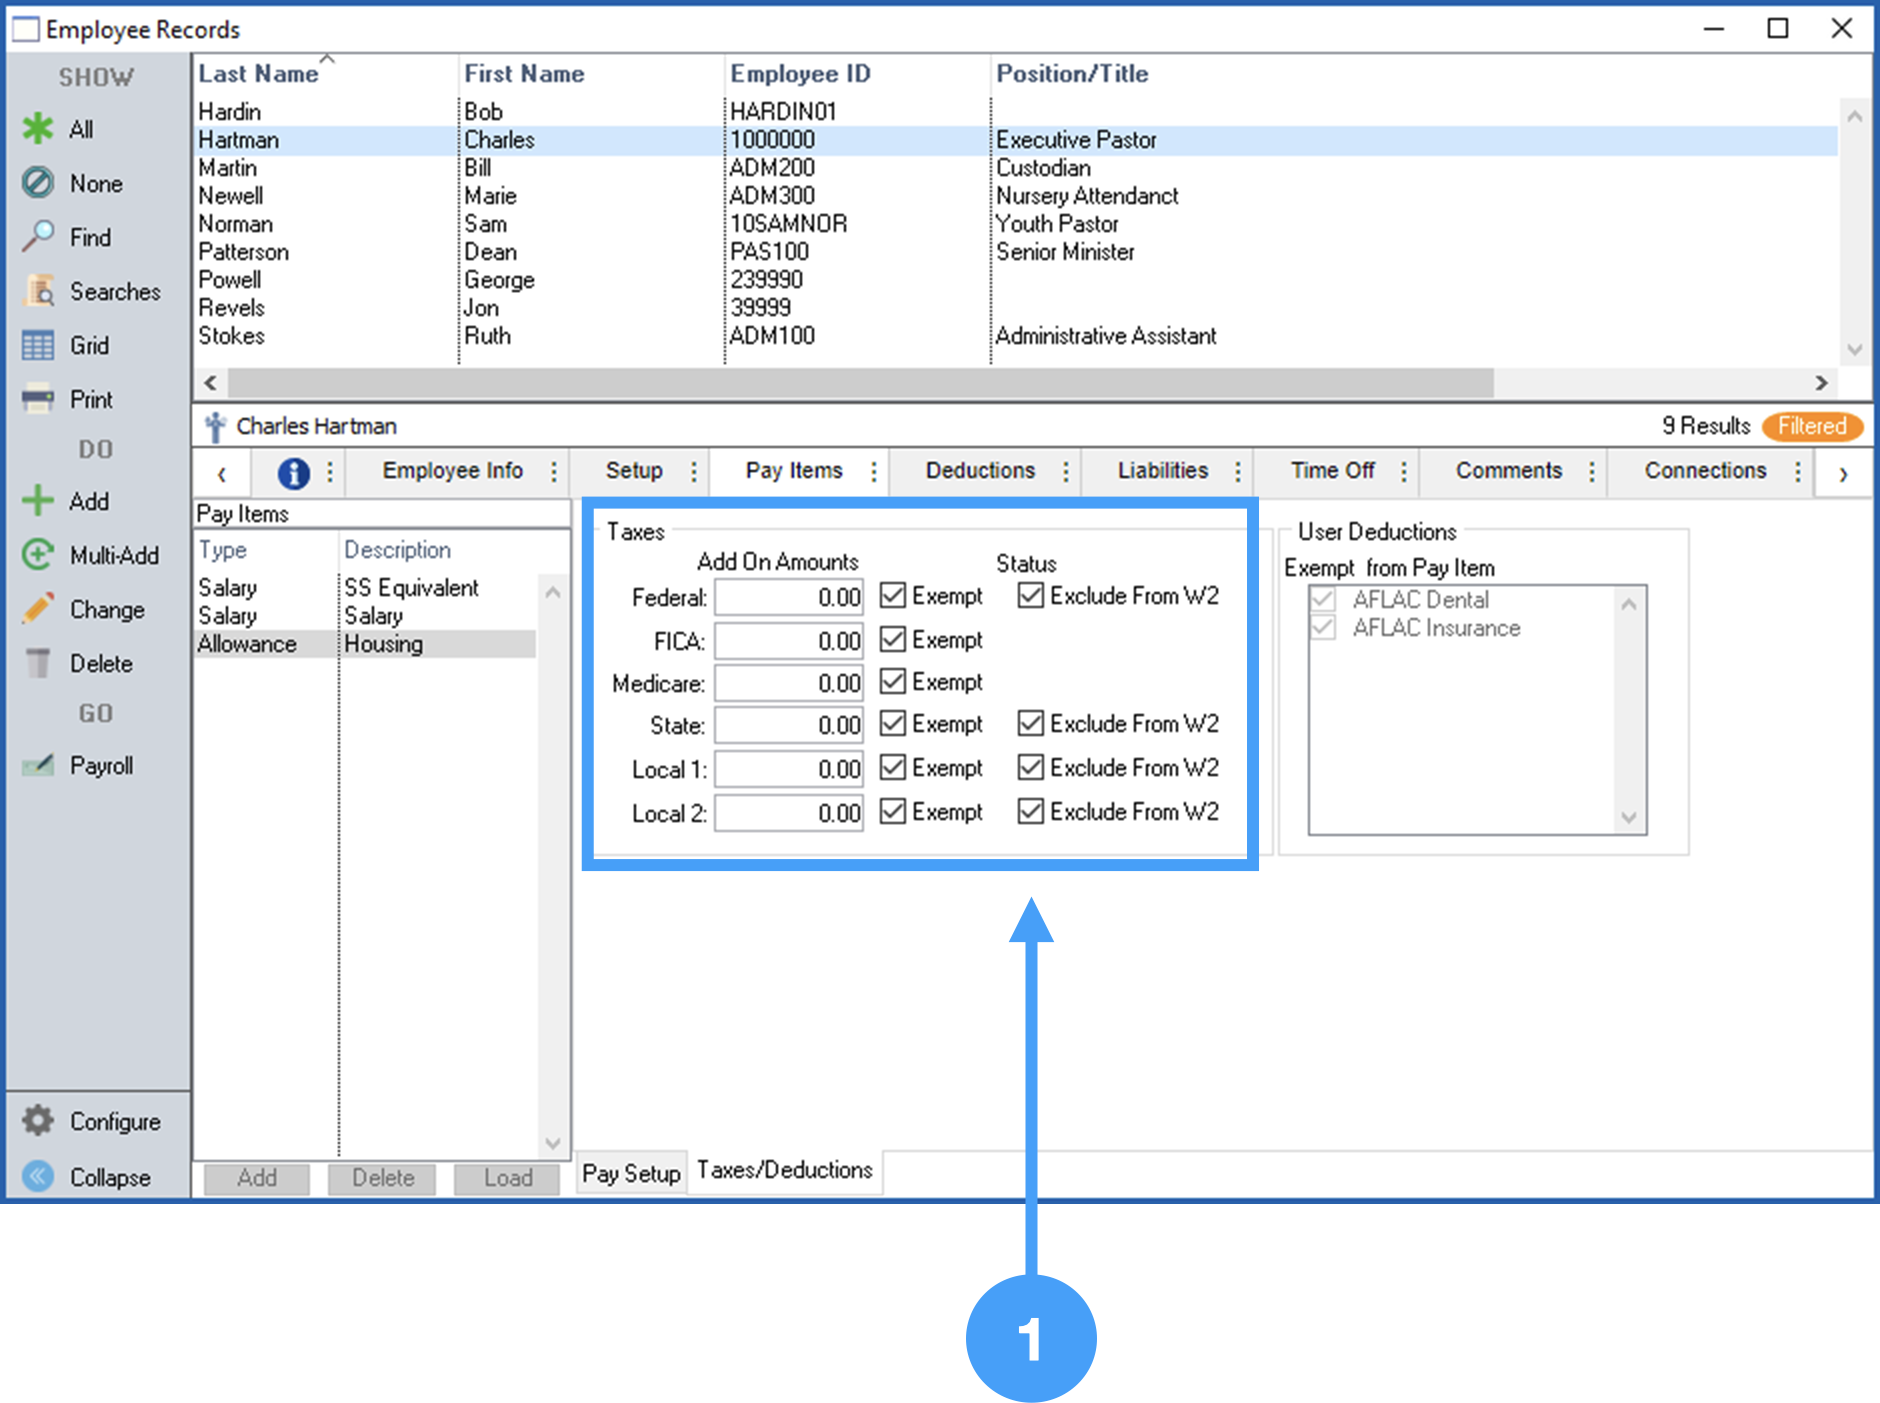
Click on the Taxes/Deduction tab.
Review Employee Record Housing Allowance Pay Item Setup
-
Ensure all Tax Items are set to 'Exempt' and all of the checkboxes for 'Exclude from W-2' under Status are checked.
Ensuring that the checkboxes under Status are checked is critical. If these checkboxes are not checked, then the Housing Allowance will be included in Box 1 of the W-2 and Box 14 which will overstate your income in Box 1.
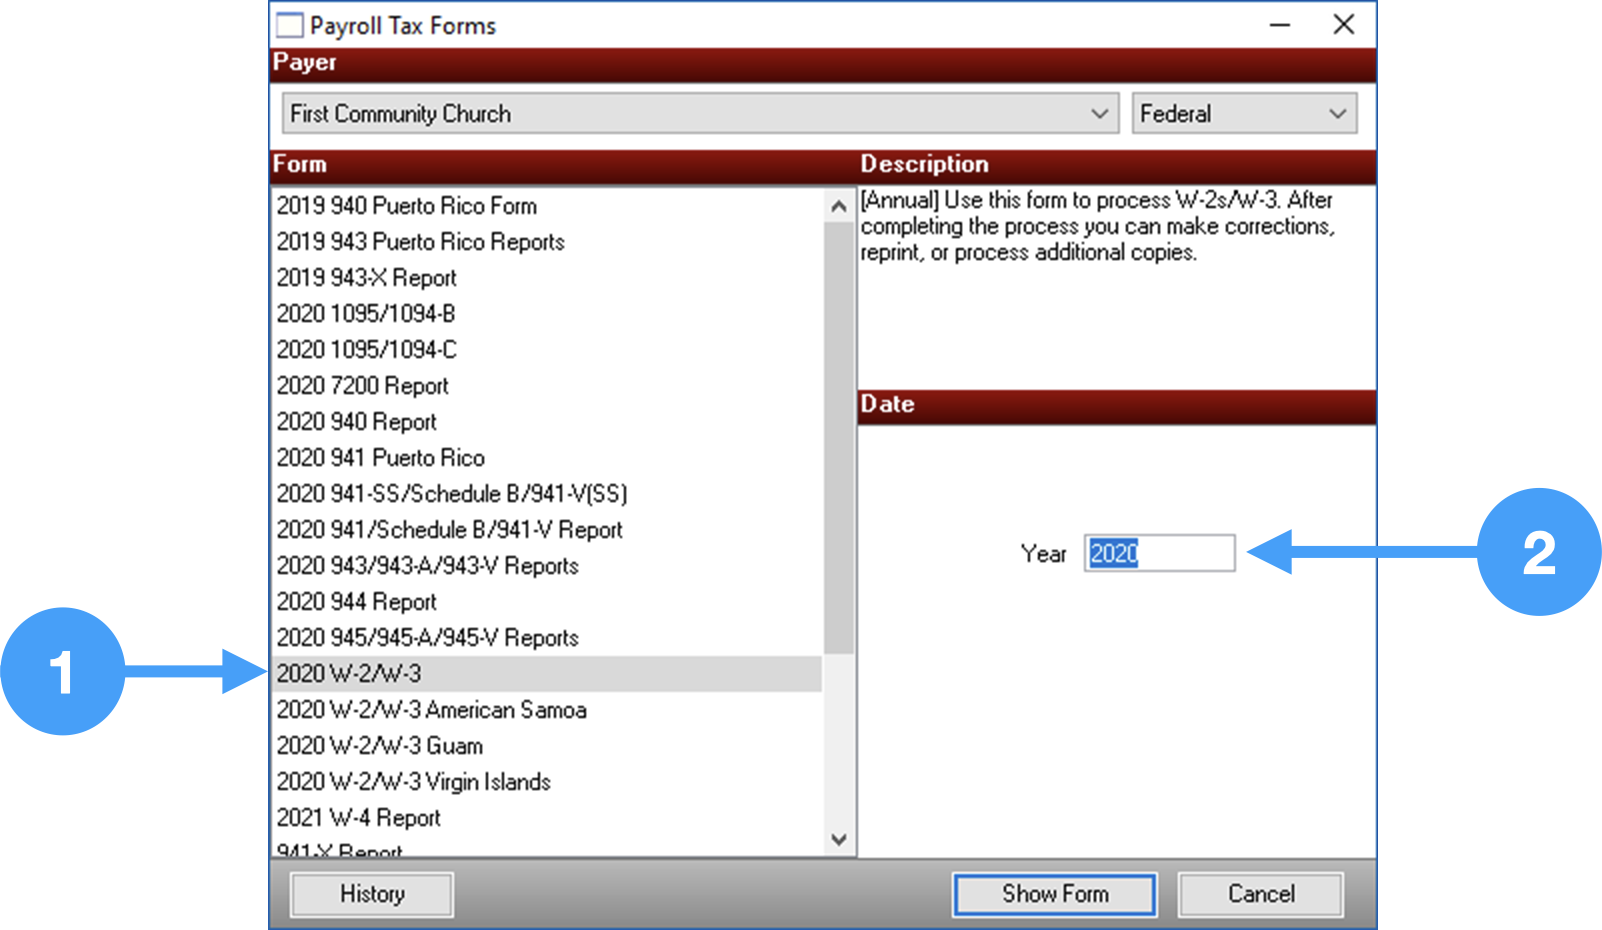
Begin the W-2 Process
With the above items reviewed, we are ready to begin the processing of this year's W-2's.
Reports → Payroll Reports → Payroll Tax Forms
-
Select the past year's W-2/W-3.
-
Enter 'the past year' in the Year field.
Start the Setup Process
-
The first window gives you the following options:
-
Test drive the W-2/W-3 Wizard with only the first 25 employees
-
Test drive with all of your employees, or
-
Start processing your W-2/W-3's. This is the option we'll select.
-
-
Click Next to move to the next window.

Company Federal Employer Identification Number (FEIN)
-
Verify the Company FEIN is correct. If it isn't, you can correct it here.
-
Click Next to move to the next window.
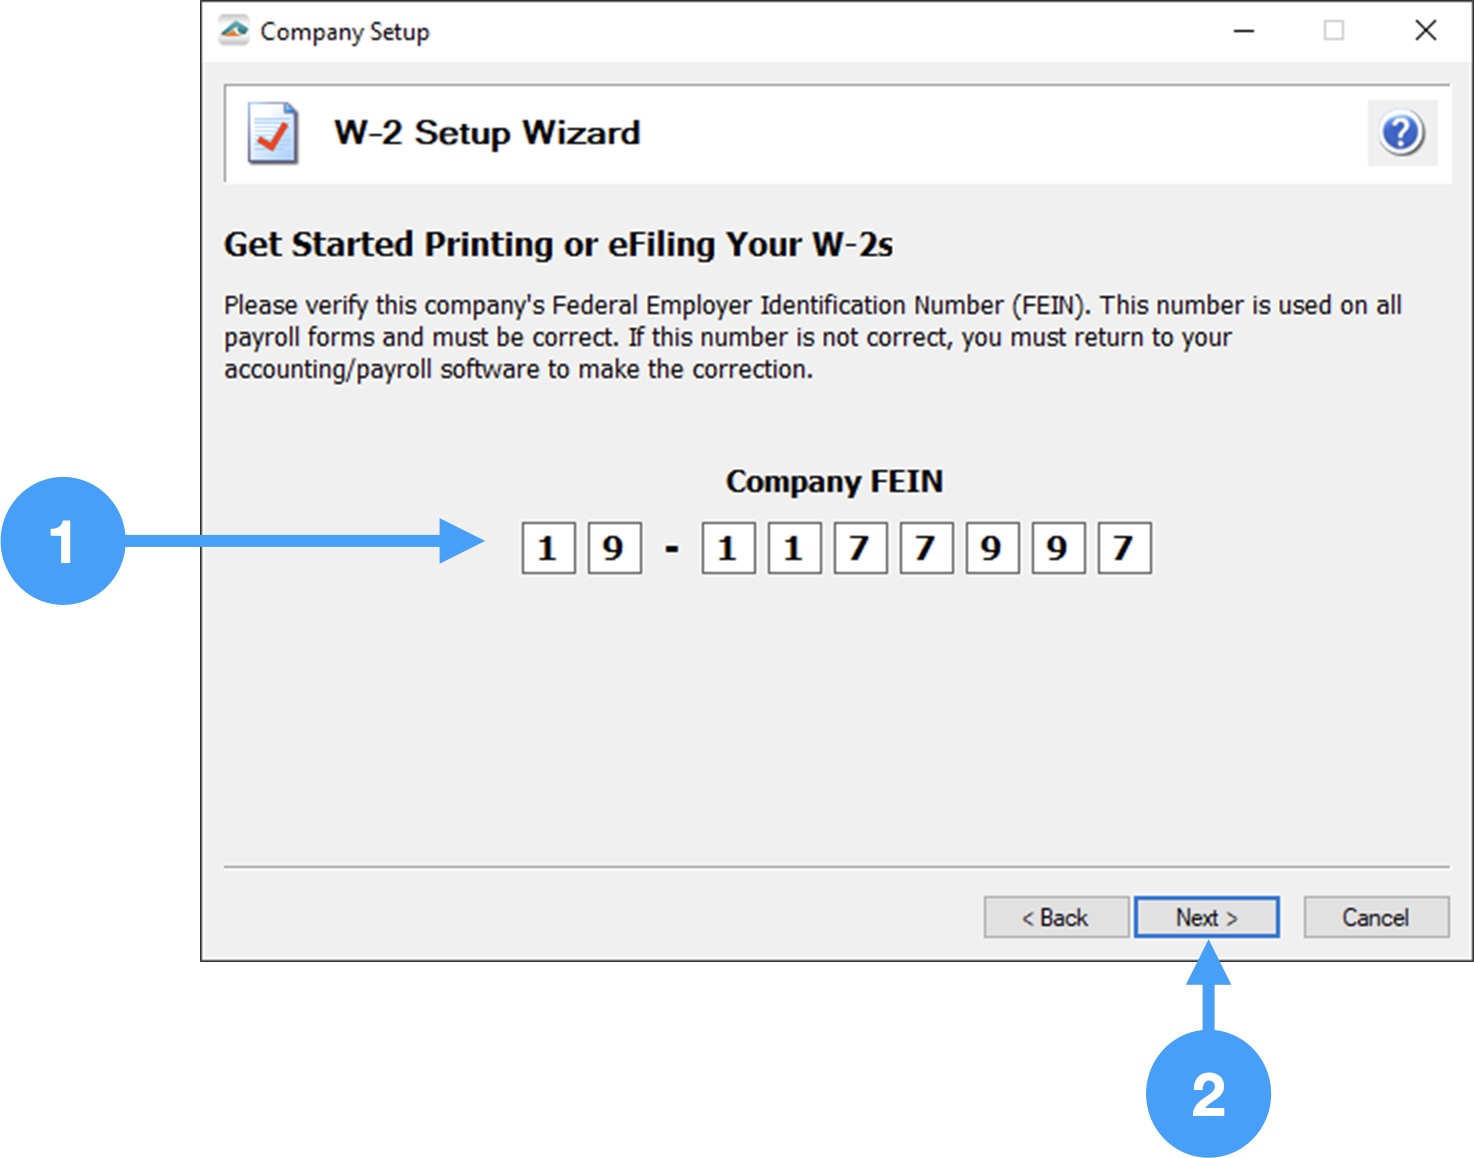
Any changes made in the Setup Wizard will not be reflected in CDM+.
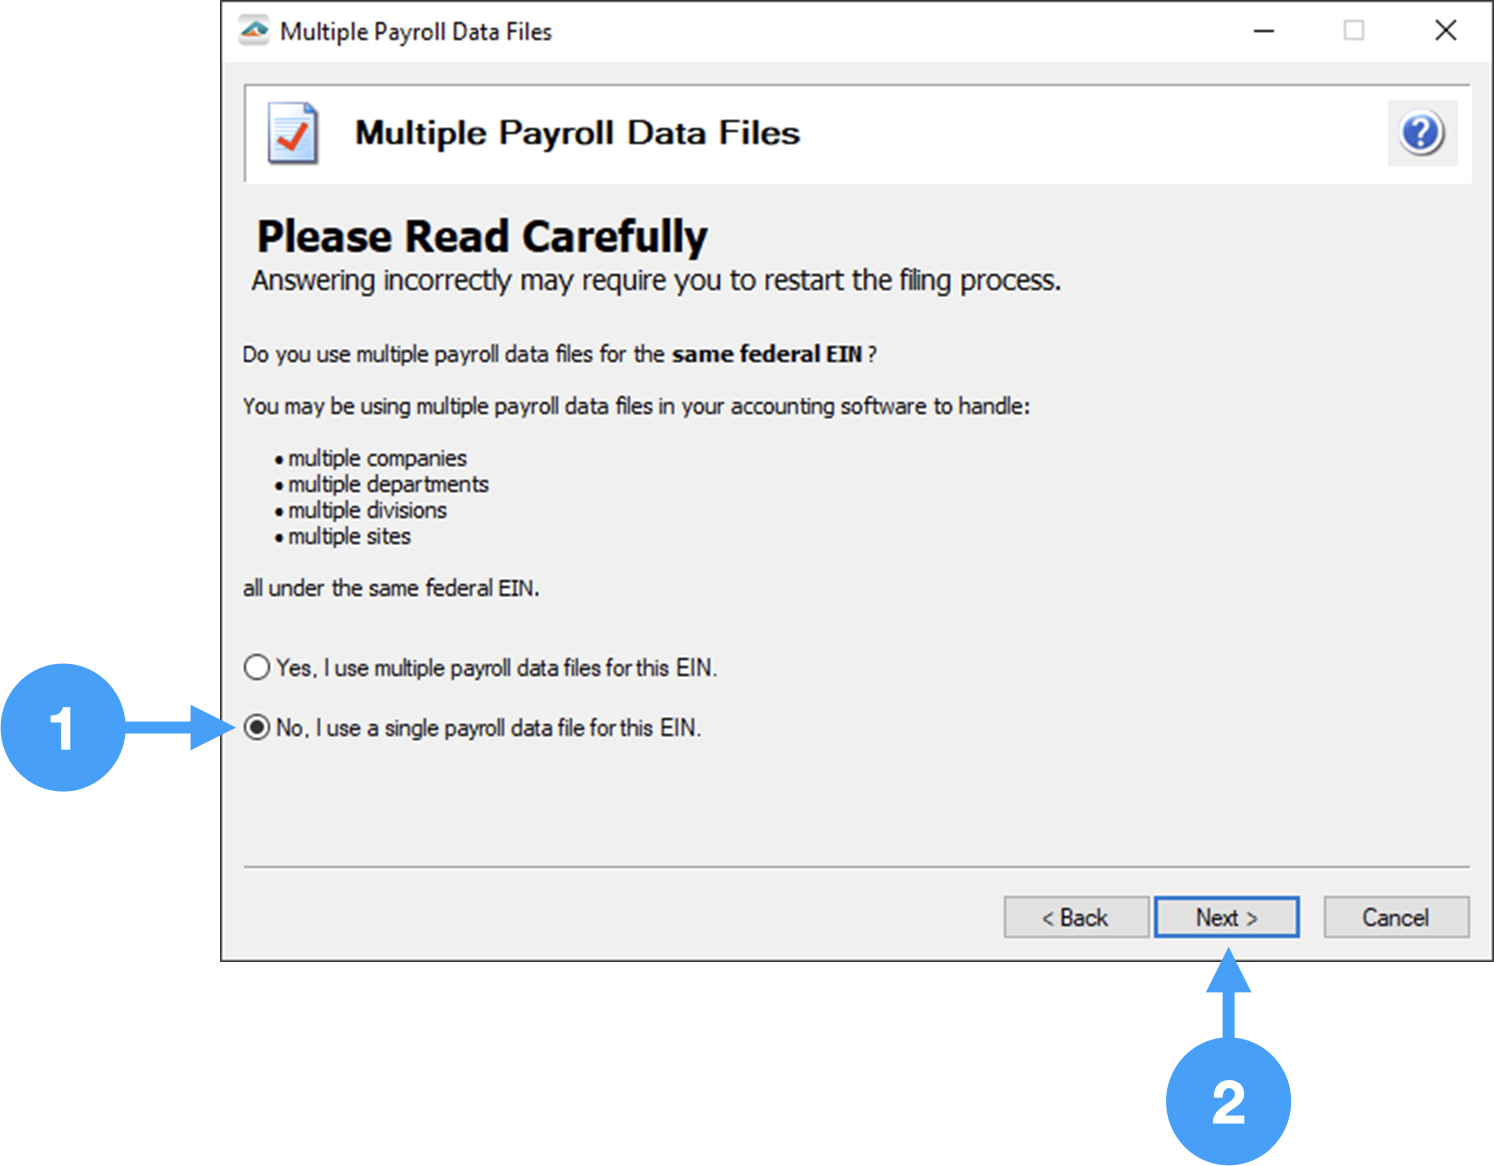
Multiple or Single Data Files
-
There are situations where an organization may have two or more databases for the same FEIN number. In those cases, you need to select 'Yes, I use multiple payroll data files from the EIN.' However, in our case, we're using only one database so we'll select 'No, I use a single payroll data file for the EIN.'
-
Click Next to move to the next window.
Review Company Information
-
Review all of the information on this screen. This information is included on the W-2/W-3s so it must be accurate and complete.
-
When you are satisfied that the information is correct, click Next to move to the next window.
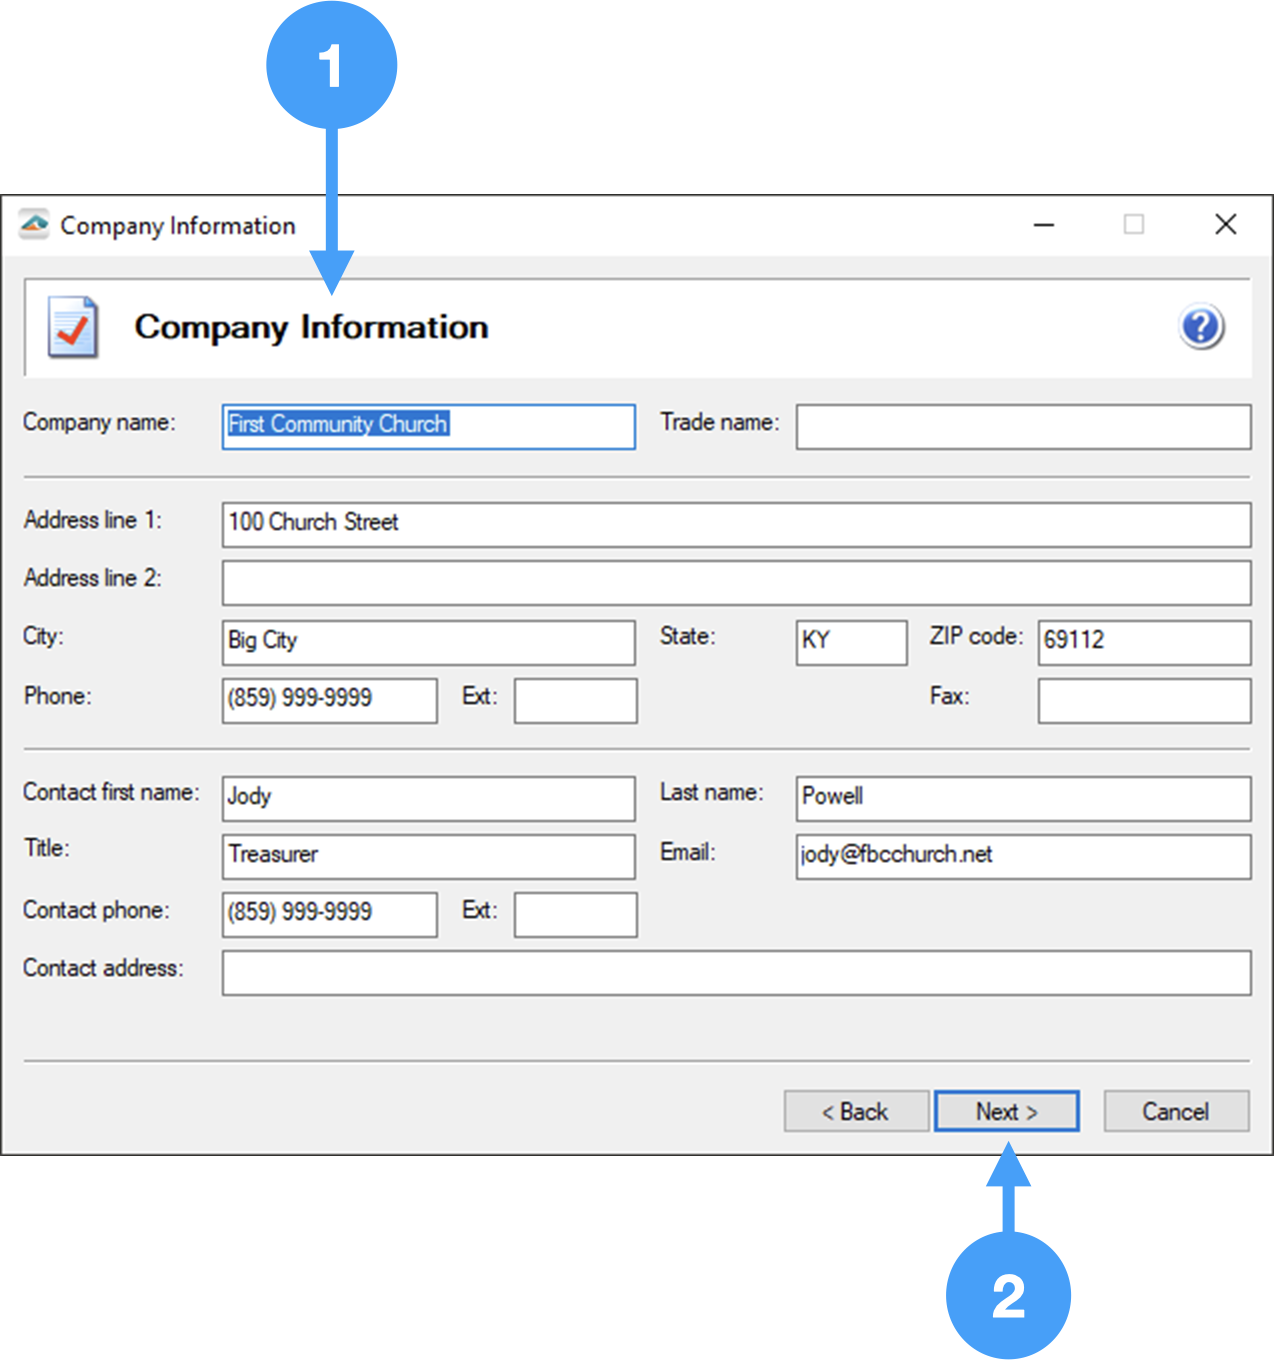
You can make changes in this window, but these changes will not be reflected in CDM+. To update your payroll information in CDM+, you need to go to Payer Records.
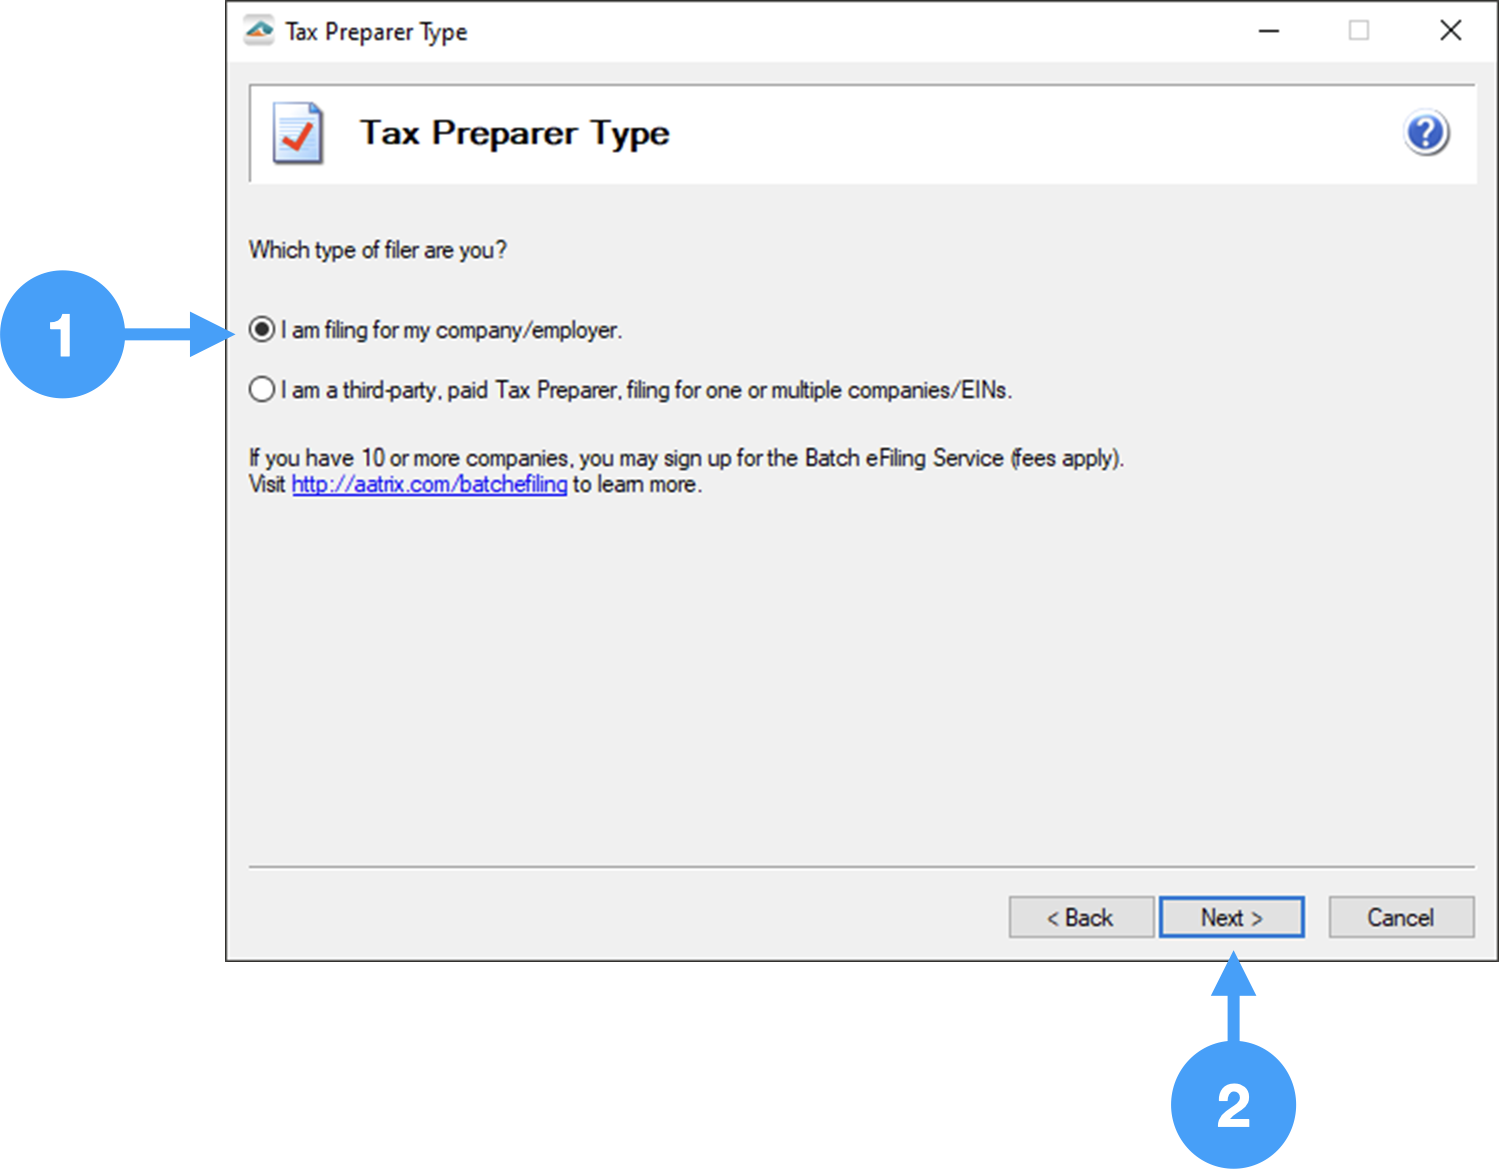
Identify Tax Payer Type
-
Since you are filing the W-2's for your church or organization, select the first radio button.
-
Click Next to continue to the next window.
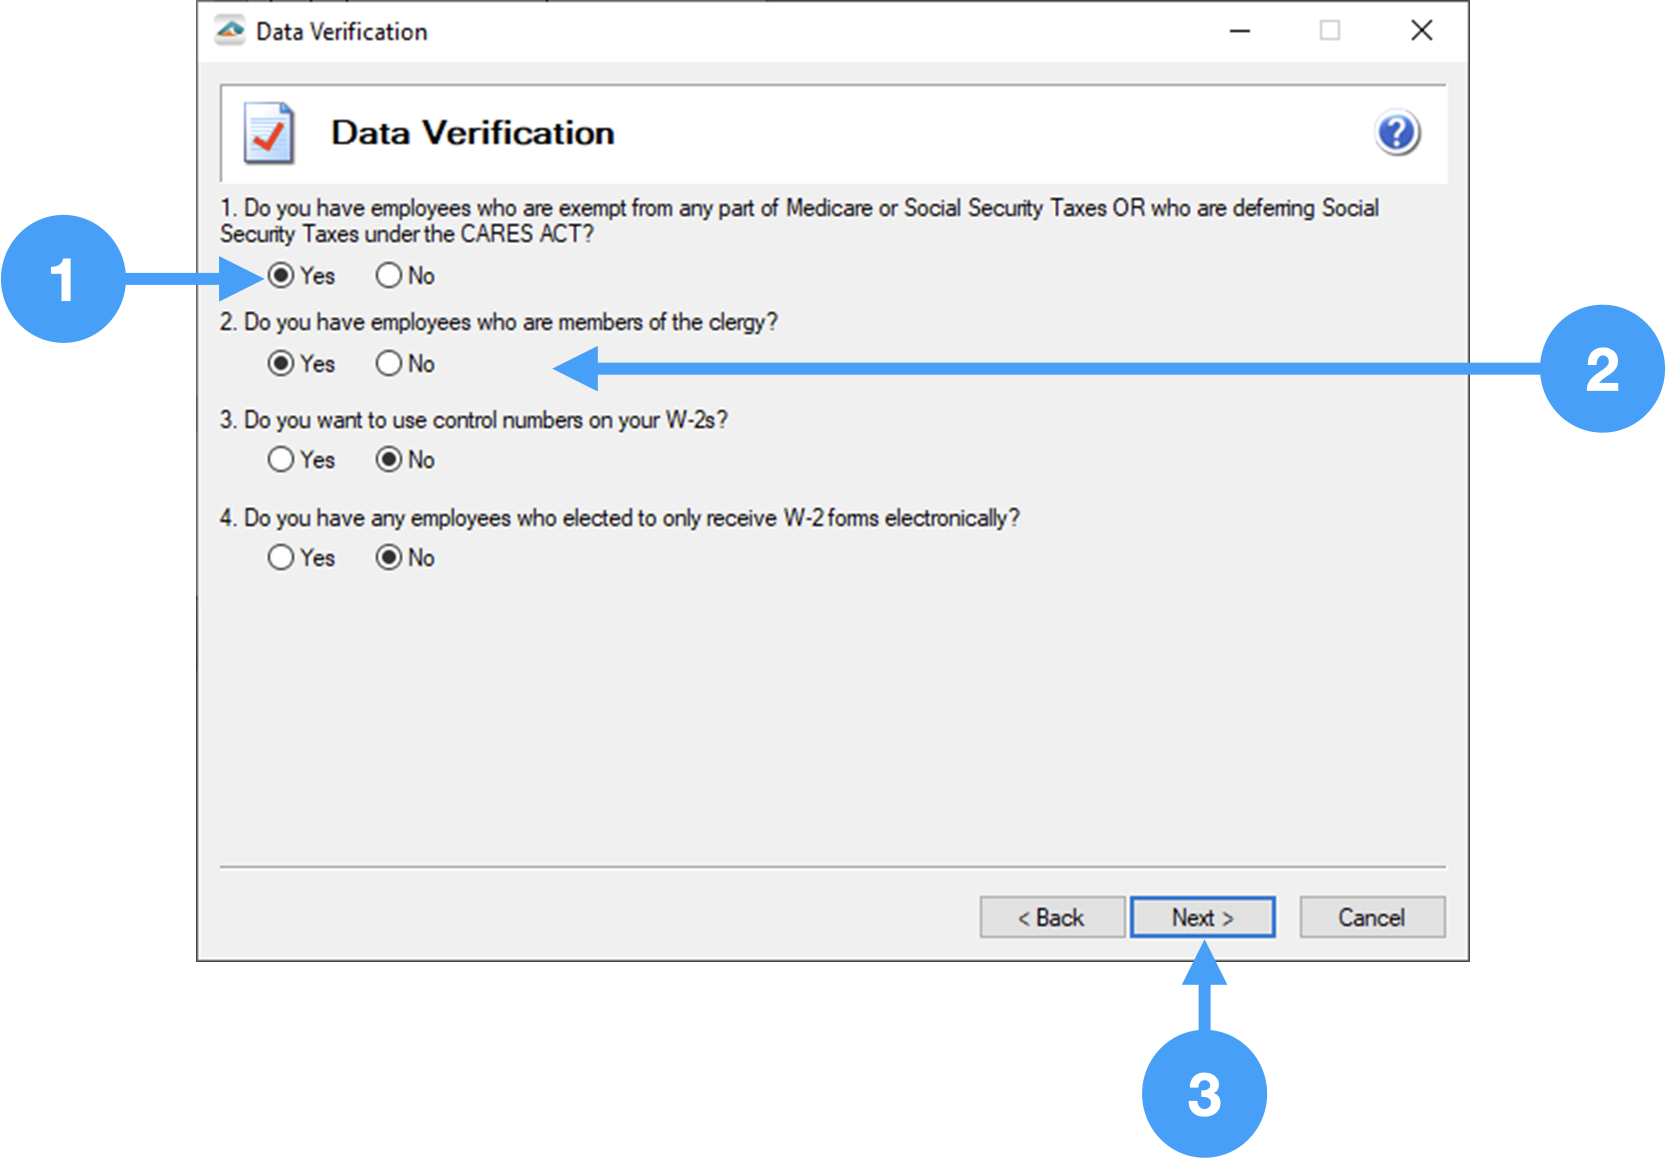
Data Verification Setup
It is important that the responses to questions 1 and 2 are 'Yes'. Failure to select Yes for questions 1 and 2, will force you to quit the verification process and go back through the Setup Wizard. This is because the verifier of the Aatrix Forms Viewer will perceive an error since no FICA/Medicare taxes were withheld.
-
The first item MUST be set to 'Yes'. Marking this item as 'No' will keep you from completing the Data Verification process.
-
The second item MUST also be set to 'Yes' to ensure that you can complete the Data Verification process.
-
Click Next to continue to the next window.
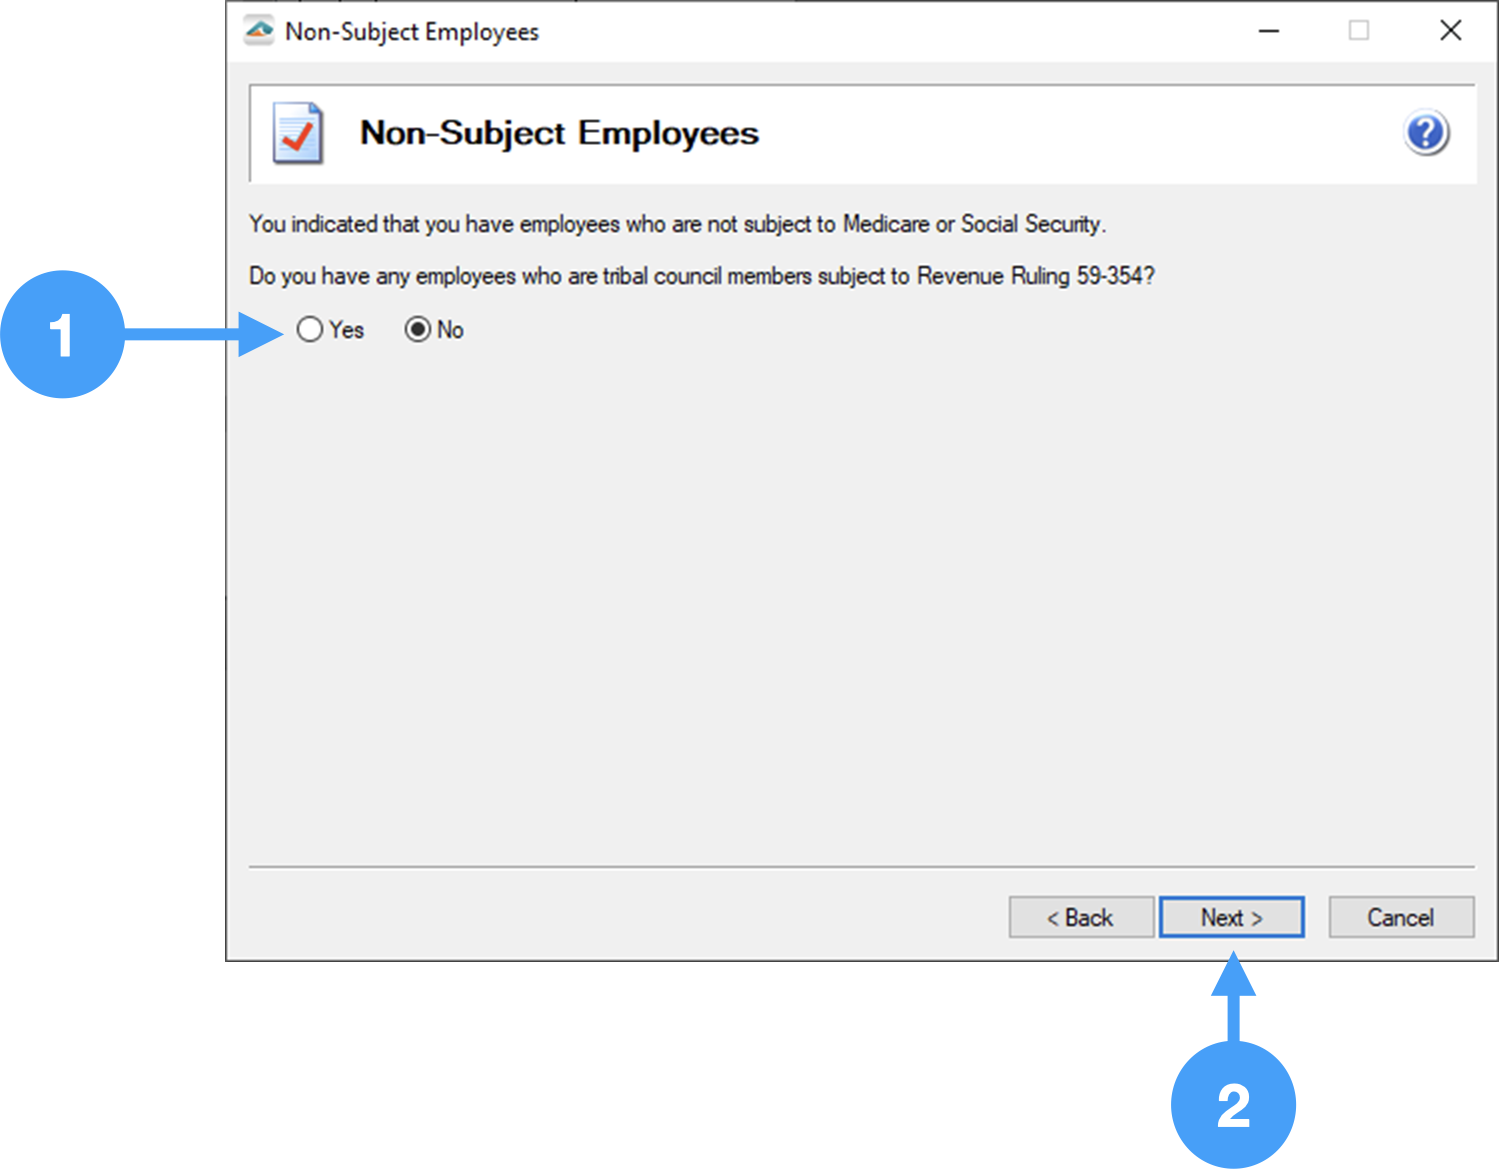
Non-Subject Employees
-
Select 'No' for this item. If you do have any employees who are tribal council members, then select 'Yes'.
-
Click Next to continue to the next window.
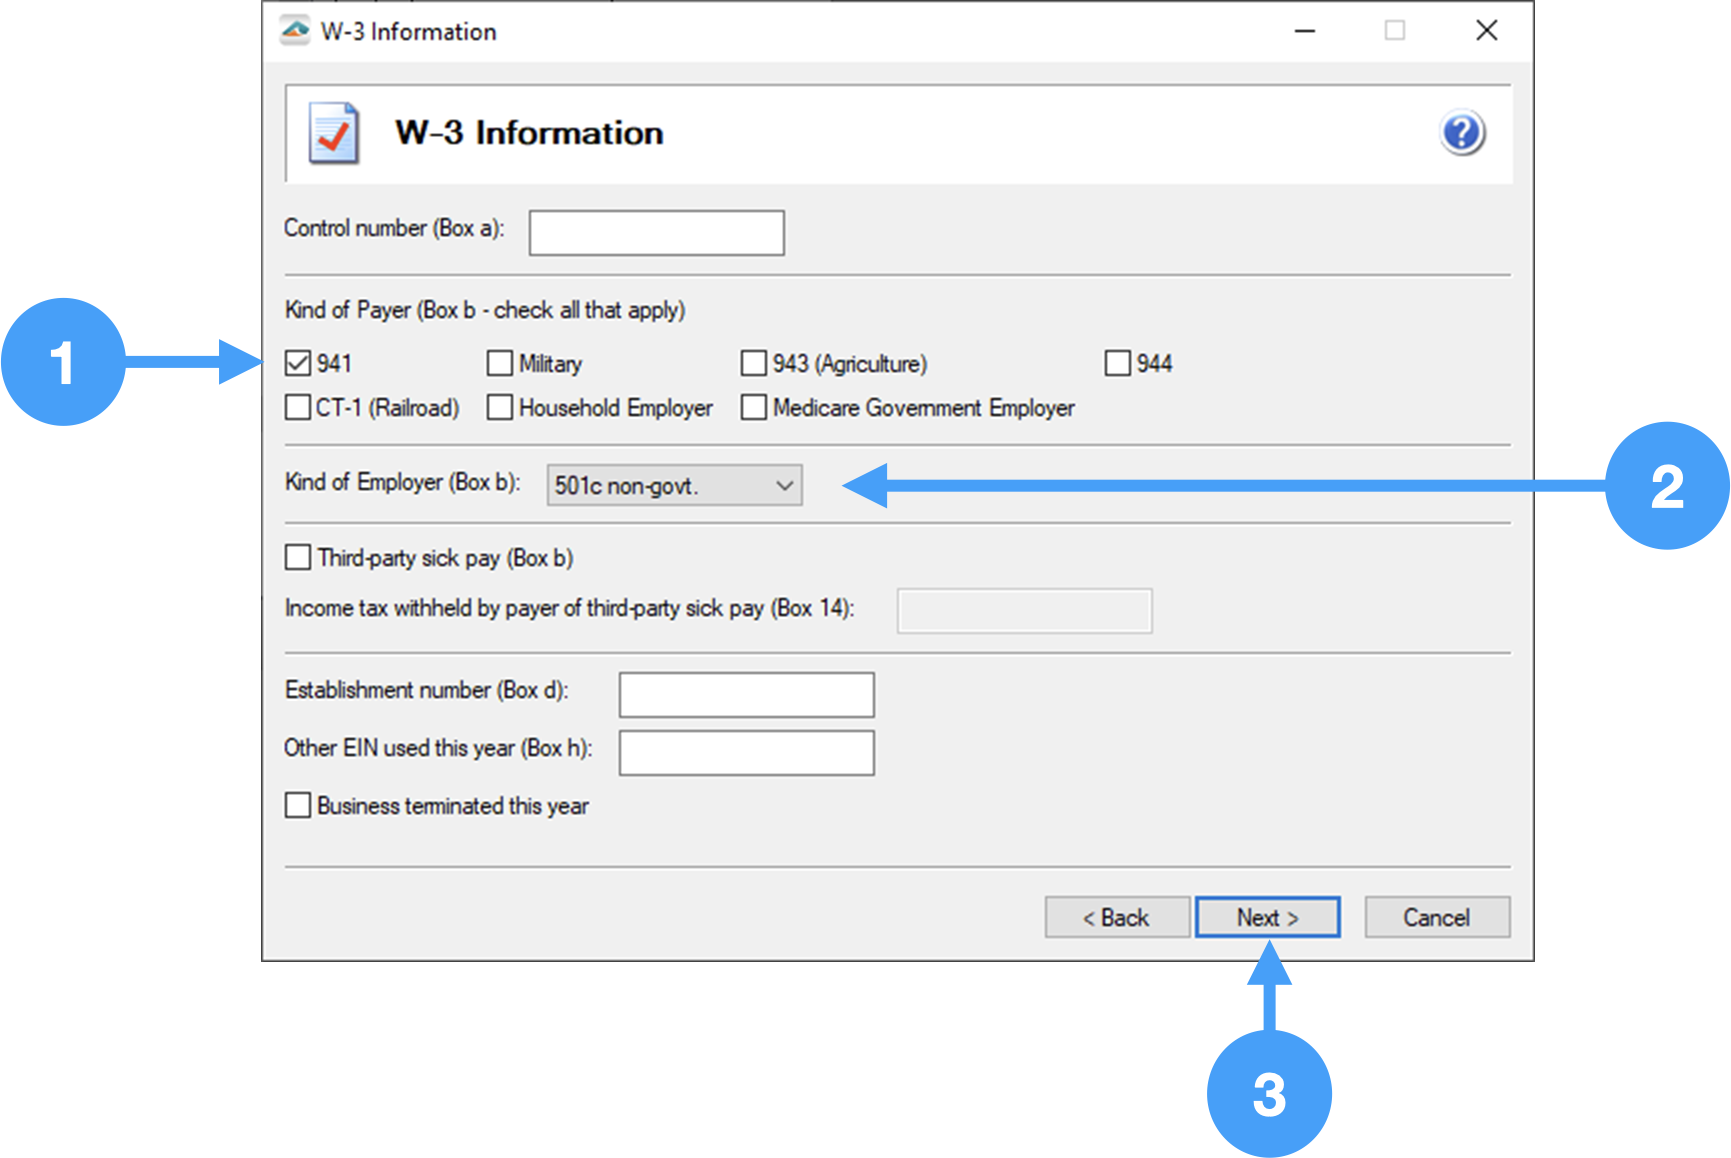
W-3 Setup
-
Under the Kind of Payer section of the window, select the '941' checkbox.
-
Under the Kind of Employer section, select '501c non-govt.'
-
Click Next to continue to the next window.
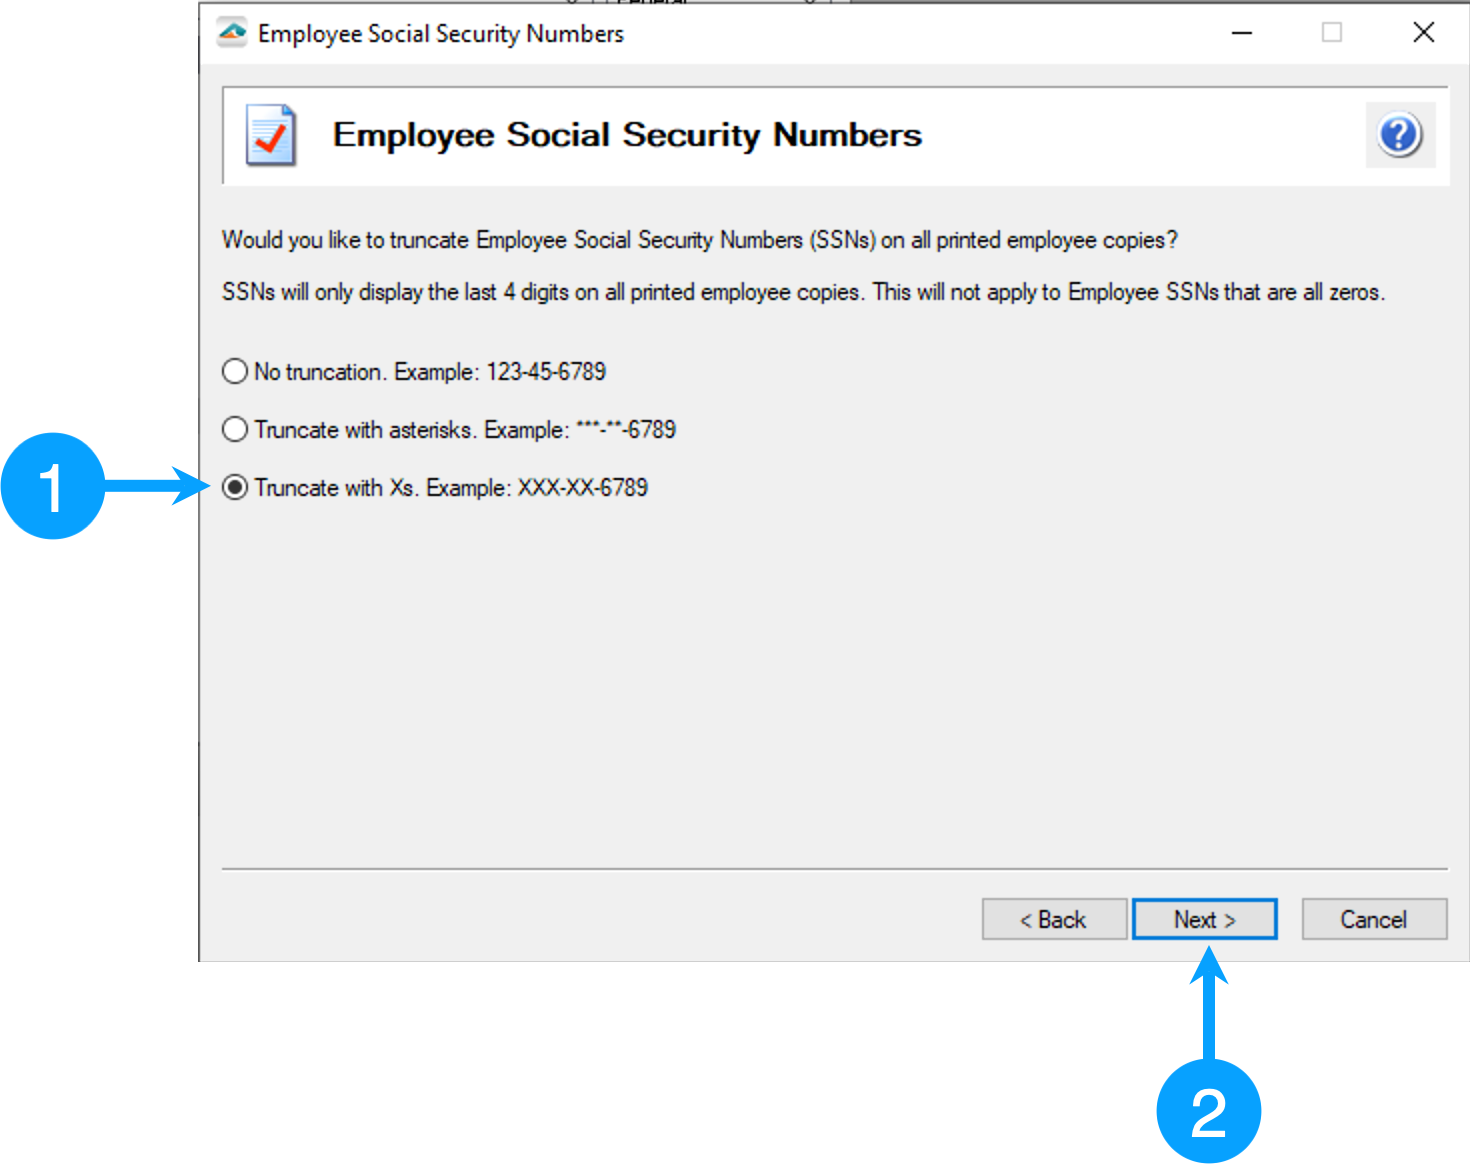
Employee Social Security Numbers
-
In this window, you can set how the employee's Social Security Numbers will print on the W-2 forms. There is the option of truncating the numbers or printing them as entered. In our example, we are going truncate using 'X's. When you truncate the Social Security Numbers, you hide all but the last four digits with asterisks or X's.
-
Click Next to move to the next step of the W-2 process.
Video of the Process
W-2 Form Verification Process
This process requires you to review specific pieces of information as you progress through each stage.
-
You will review the information that is listed, then
-
Click Next
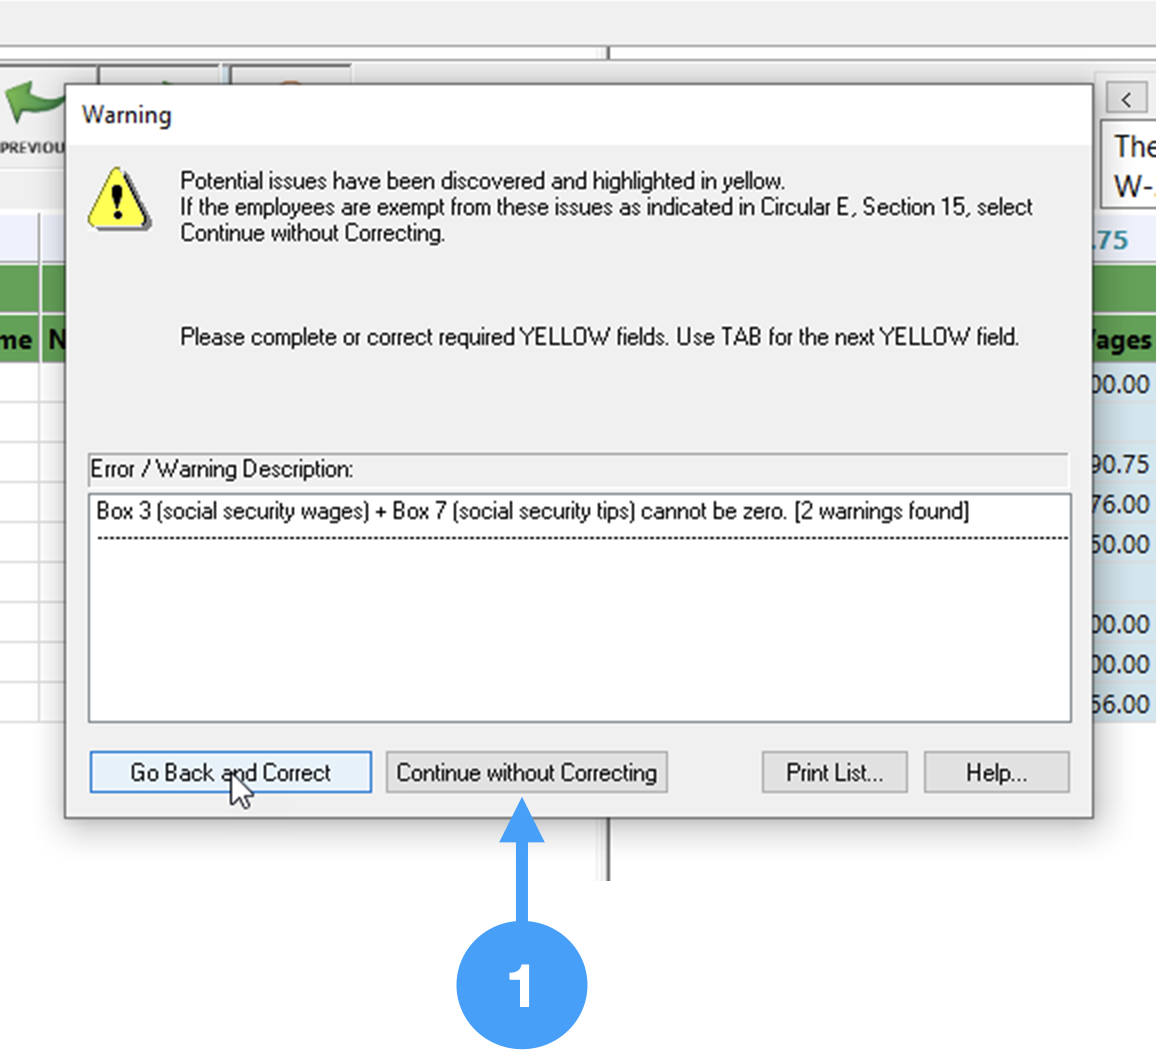
During the verification process, you will encounter a warning. This warning relates to employees exempt from FICA/Medicare (i.e. clergy).
The warning should have a button, Continue without Correcting. If not, you did not set the proper response in the Data Verification Step of the W-2 Setup Wizard. You will need to click Go Back and Correct button to quit the verification process, and start over with the W-2 Setup Wizard.
-
If the Continue without Correcting button is showing, click it and continue.
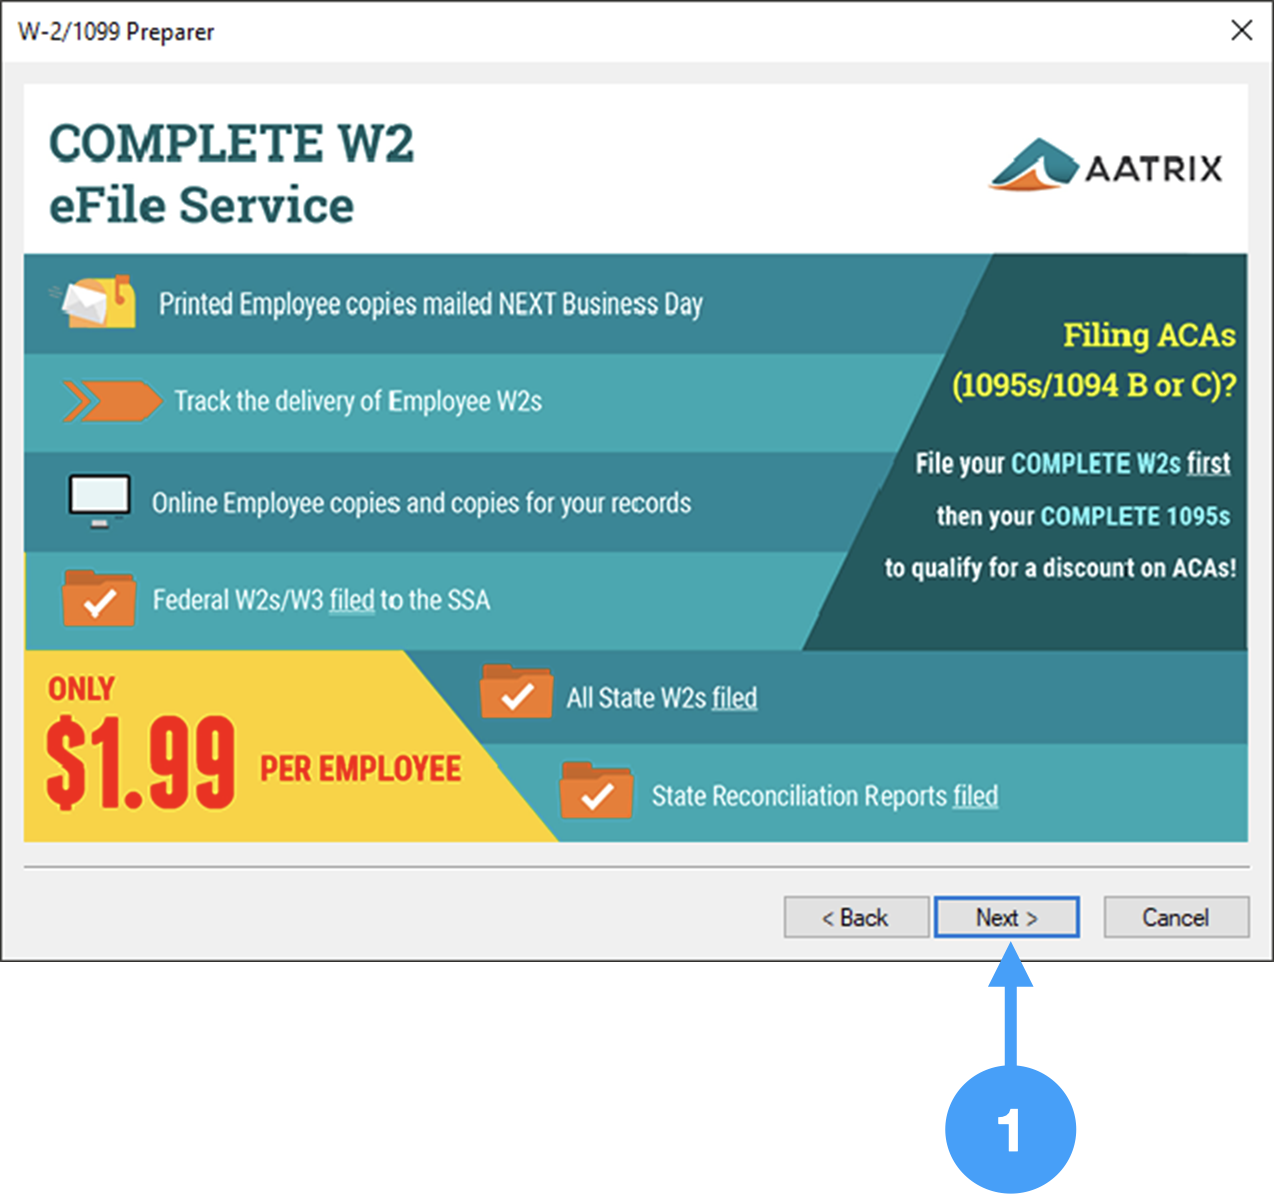
Continue with this process through to the Complete W2 eFile Service advertisement window.
-
Click Next and the W-2 Printing and Filing Options window will appear.
Video of Process
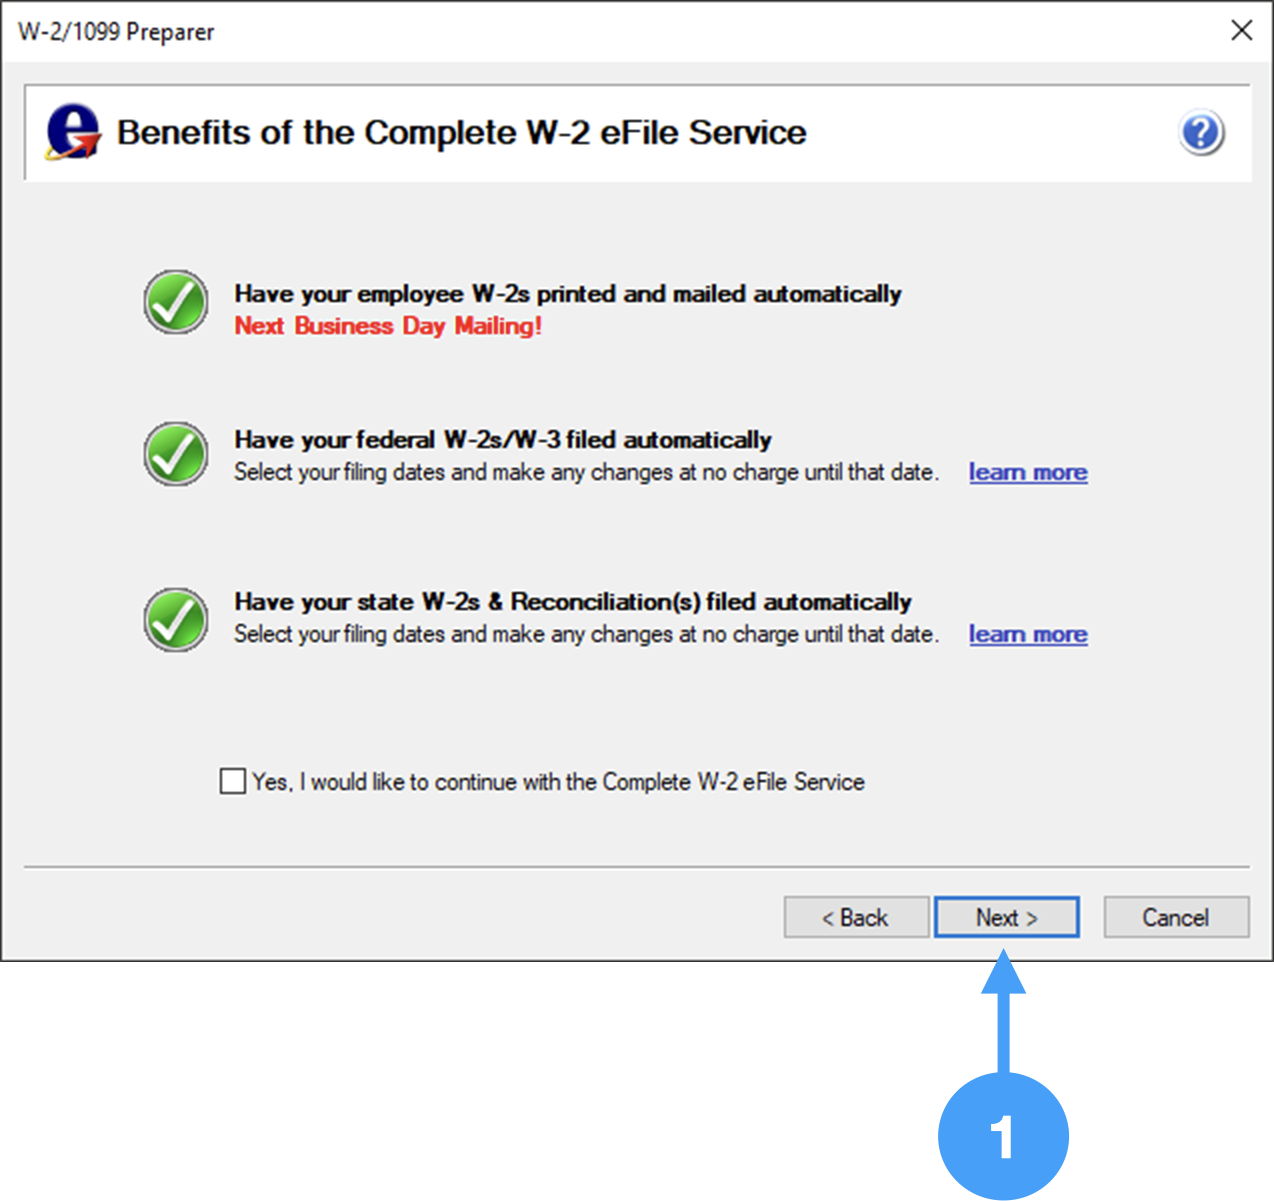
Benefits of the Complete W-2 eFile Service
-
This window is further information regarding the service you selected. When you are ready, click Next to move on.
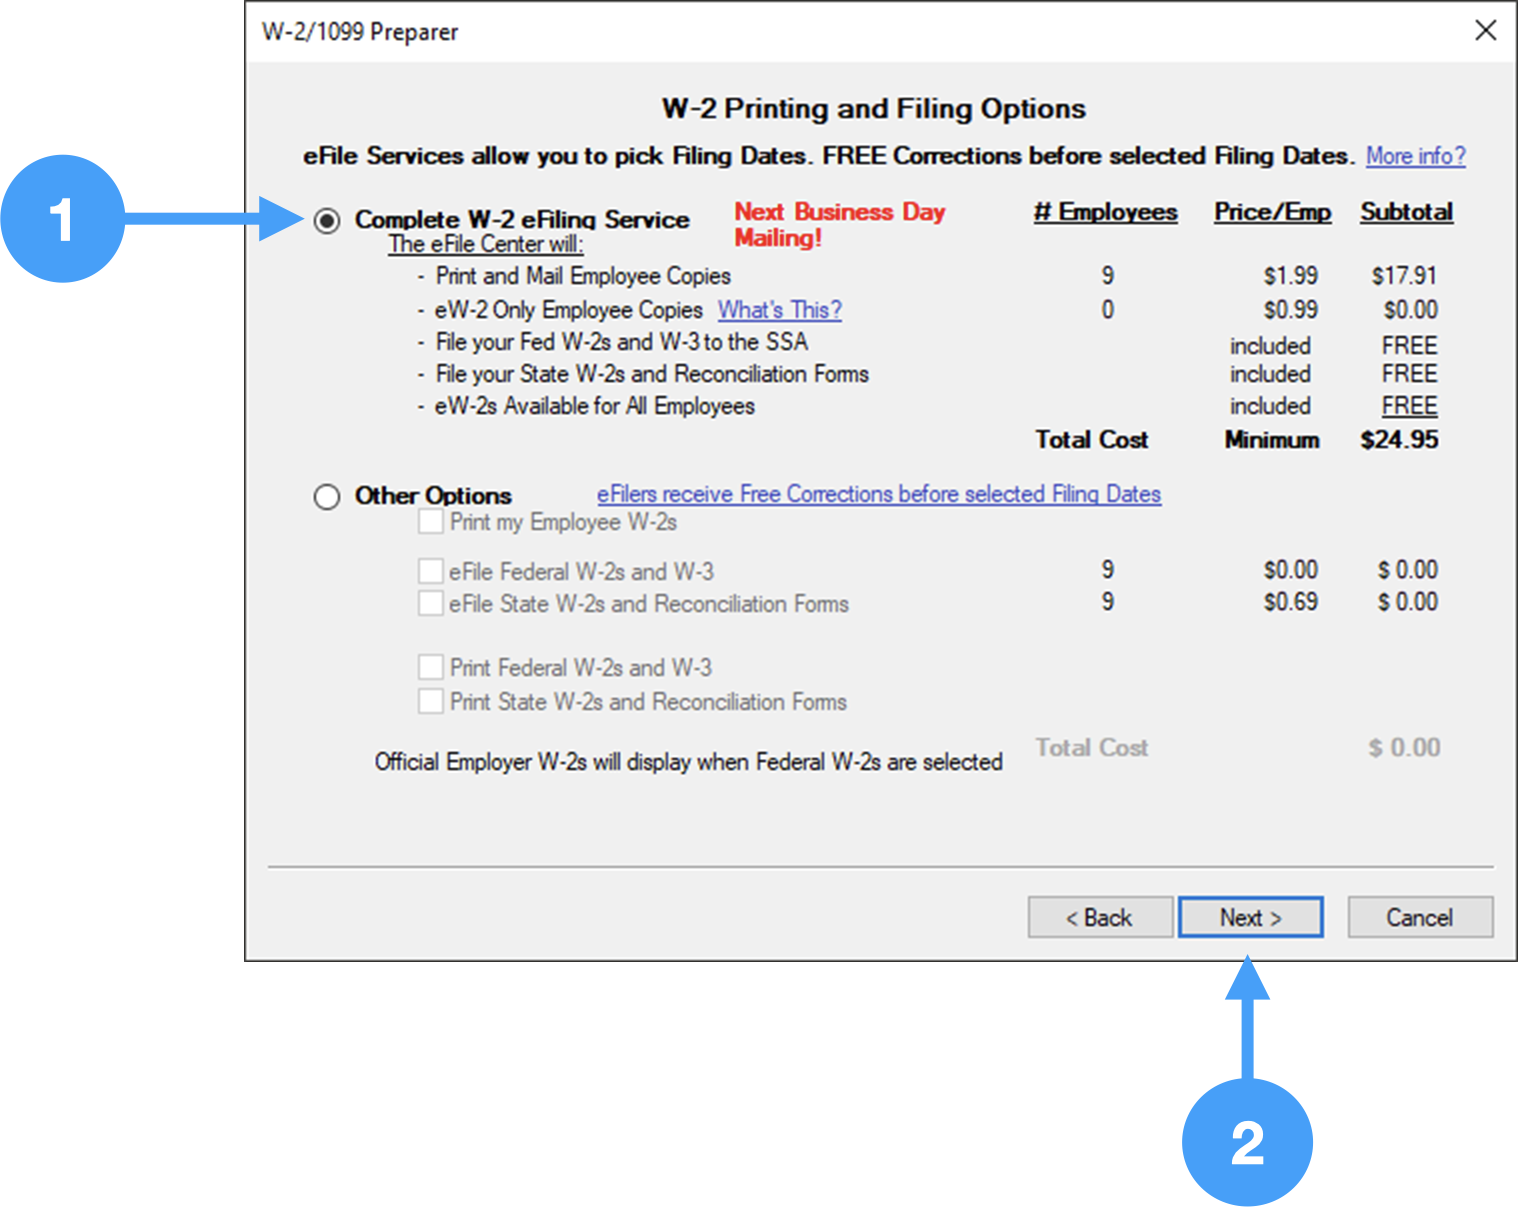
Printing and Filing Options
-
In order to eFile your W-2/W-3s, select the first radio button named 'Complete W-2 eFiling Service'.
-
Click Next to continue to the next window.
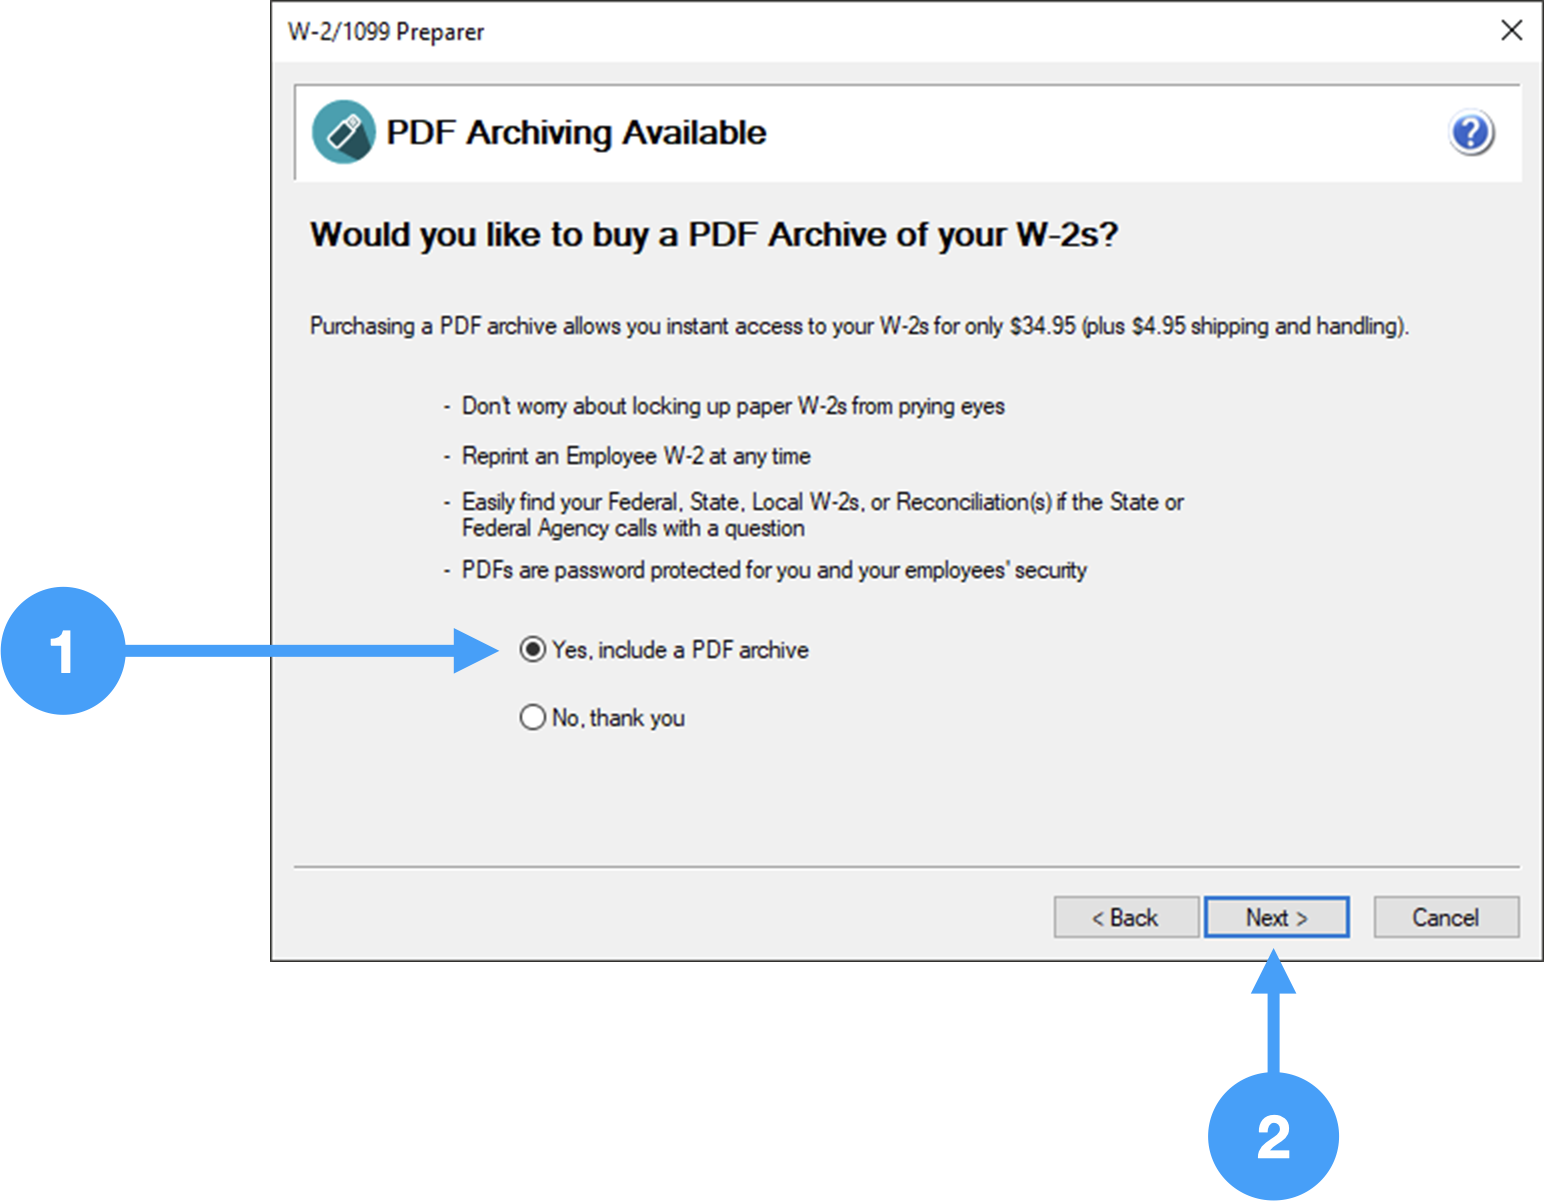
Purchase PDF Archiving
-
If you wish to purchase a PDF archive of your W-2/W-3 forms, select the 'Yes include a PDF archive.'
-
Click Next to continue to the next window.
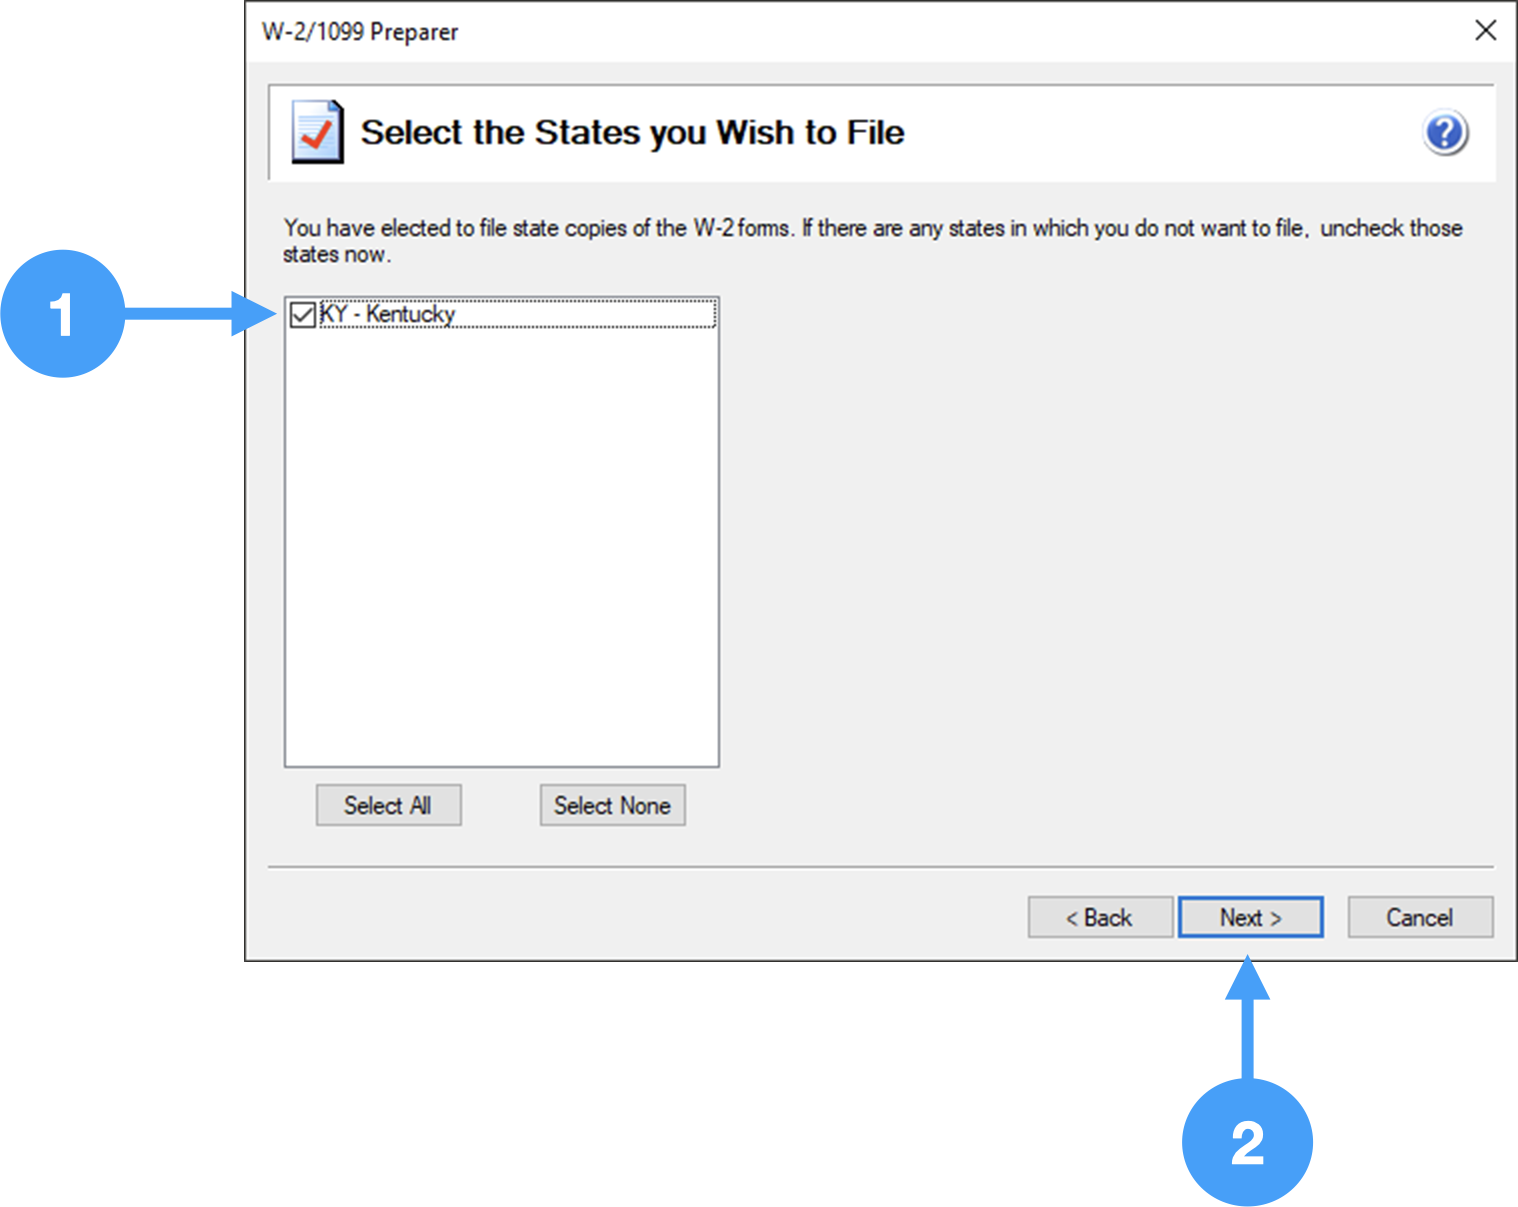
State Setup
-
Ensure that the state for which you will be filing is selected.
-
Click Next to continue to the next window.
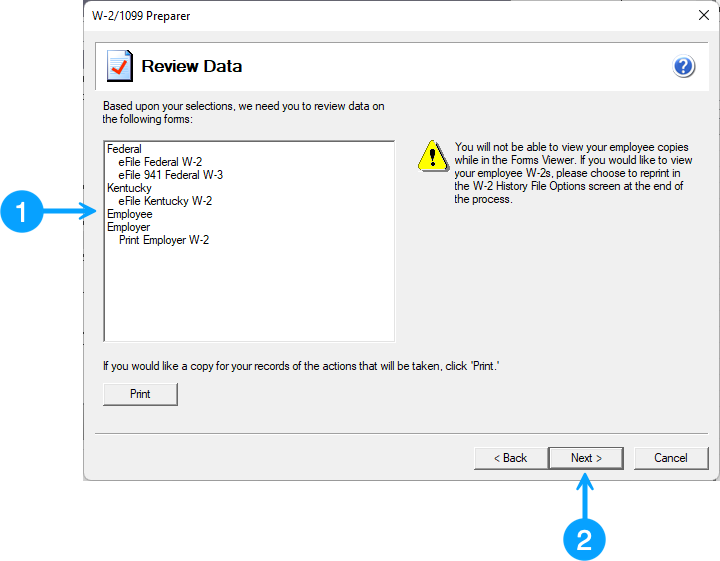
Review Data window
-
This window shows the forms that will be printed. This window does NOT print the W-2/W-3 forms. It prints a sheet listing the forms as listed in the pane.
-
Click Next to continue to the next window.
This window does NOT print the W-2/W-3 forms. It prints a sheet listing the forms as listed in the pane.
Video of Process
Printing of W-2 forms
During the eFile process, the following forms will be printed:
-
Employer W-2 (Final copy)
-
Federal W-2 (office copy)
-
941 Federal W-3 (office copy)
-
State W-2 (office copy)
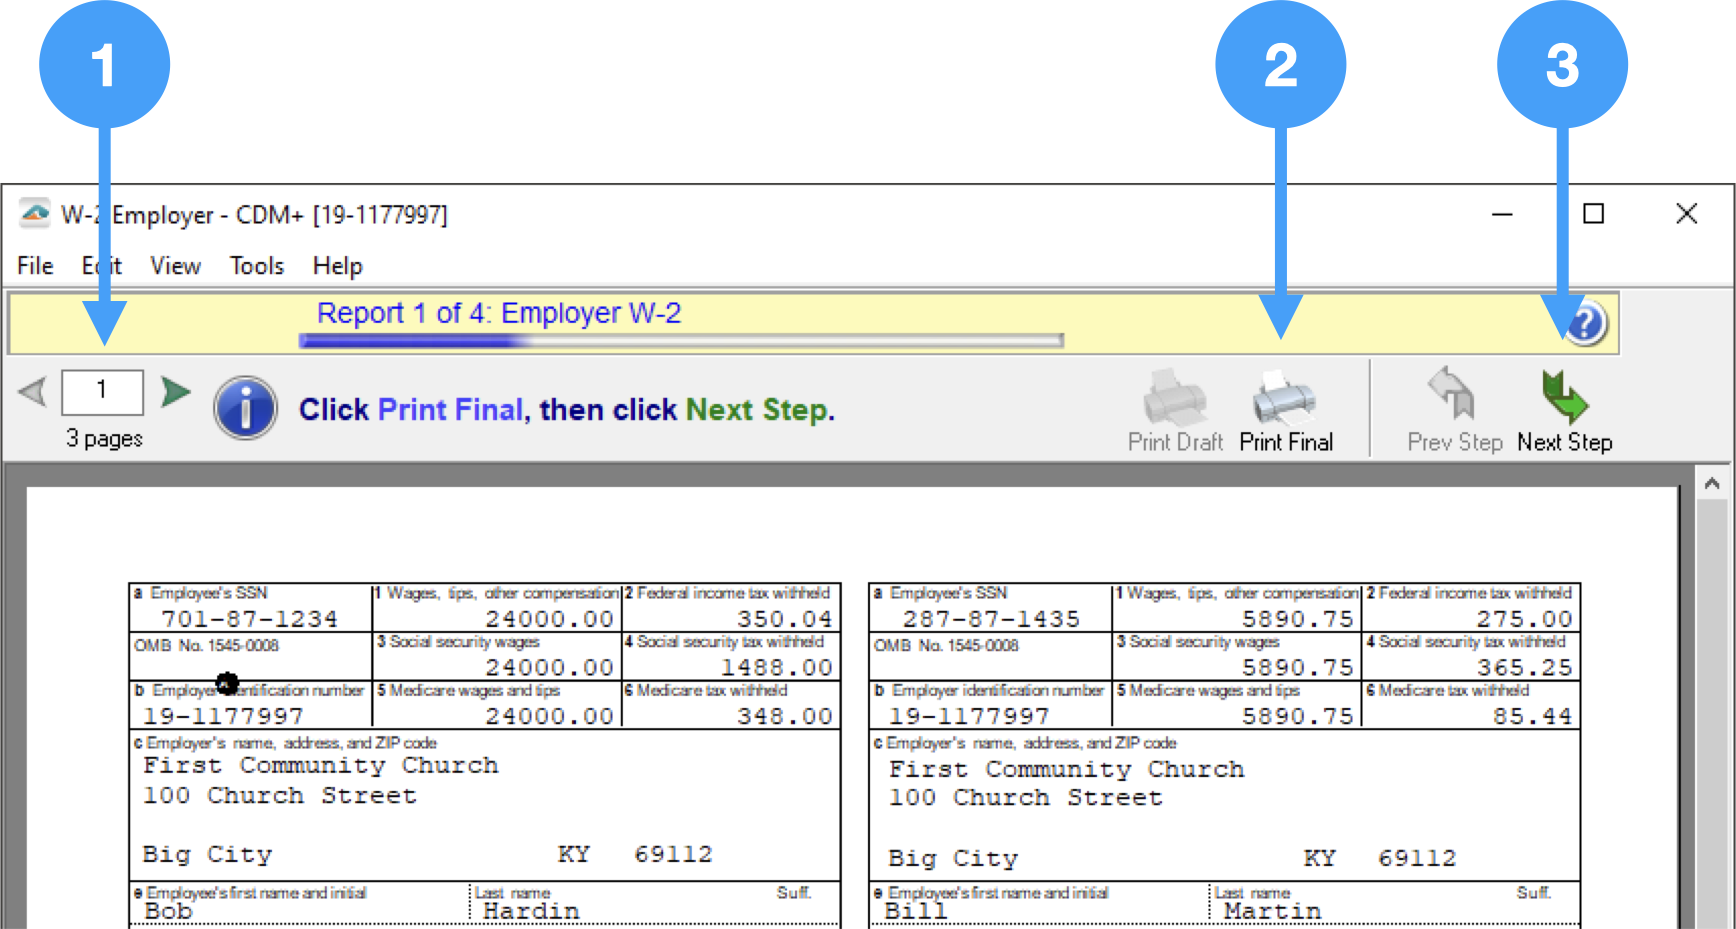
You move through the printing process by doing the following:
-
The page navigation tool is in the upper lefthand corner of the form. The left and right arrows adjacent to the number field are the way you navigate through the pages.
-
When you have reviewed the form's pages click on the Print Final (or Print Copy) icons.
-
After the form has printed, click on the Next Step option to move to the next form.
These steps will be continued until all of the forms are printed and you are at the eFile Login window.
Video of Printing Forms
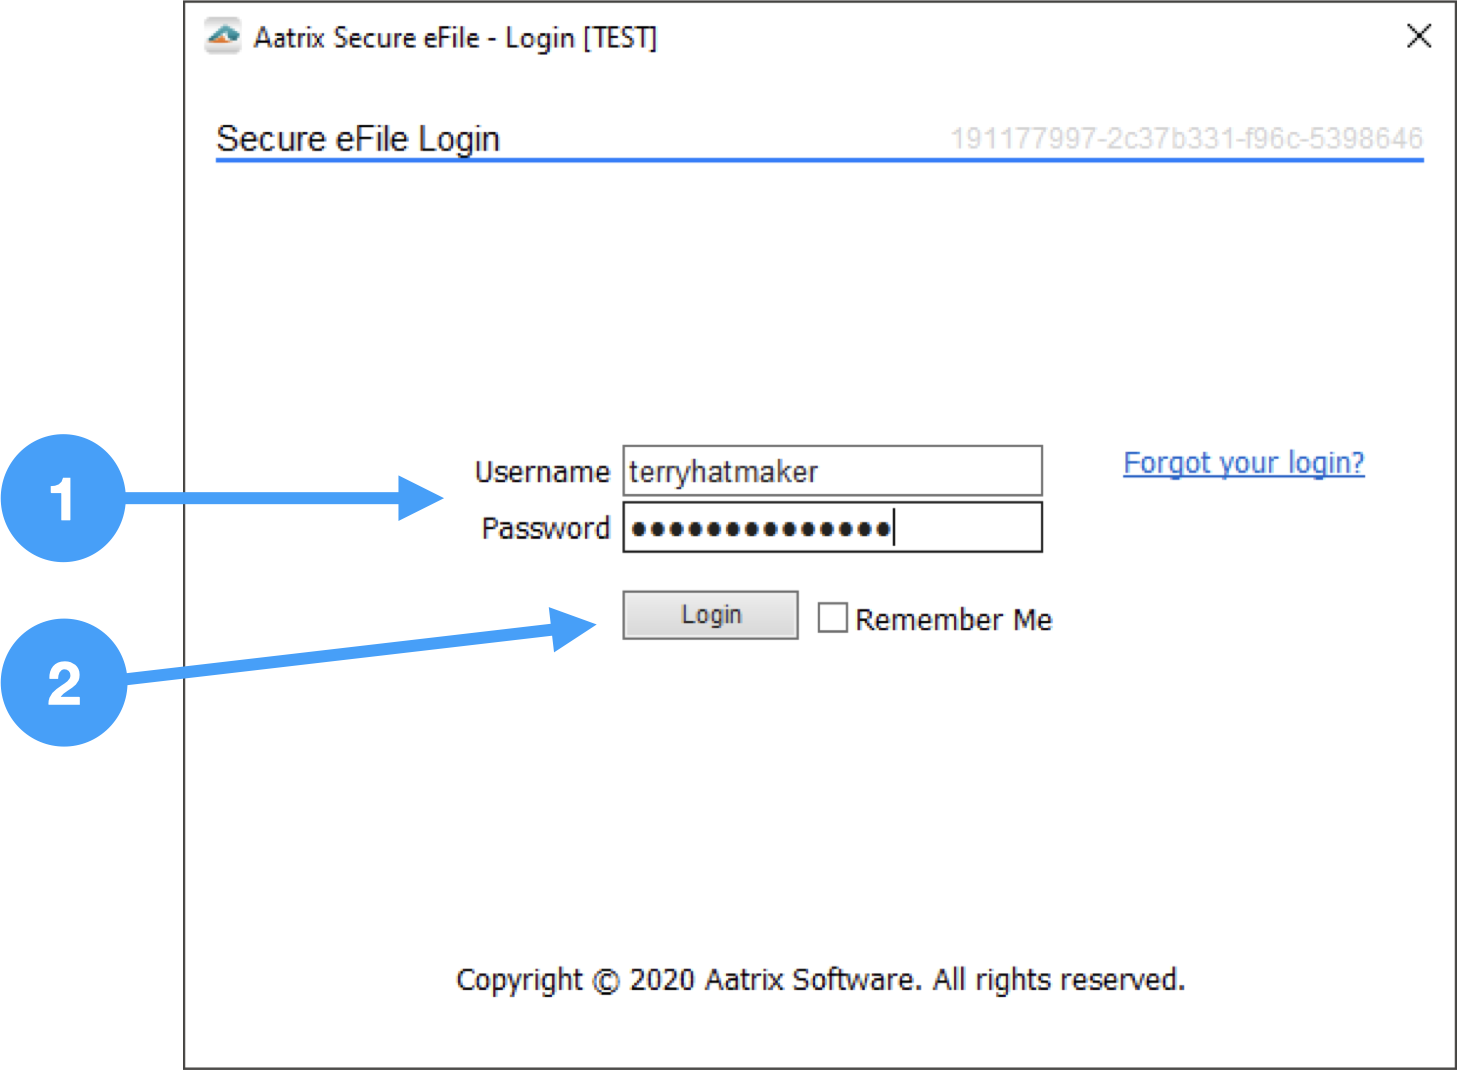
Sign into Aatrix eFile System
An Aatrix eFile account is needed for this step. An account can be created at the Aatrix eFile site.
After you have enrolled in the Aatrix eFile system, you will log in.
-
Enter Username and Password
-
Click 'Login' to begin the process.
Review Enrollment Information
-
Review the information on file and if any changes are needed, click on the link in the window.
-
Click Next to move to the next window.
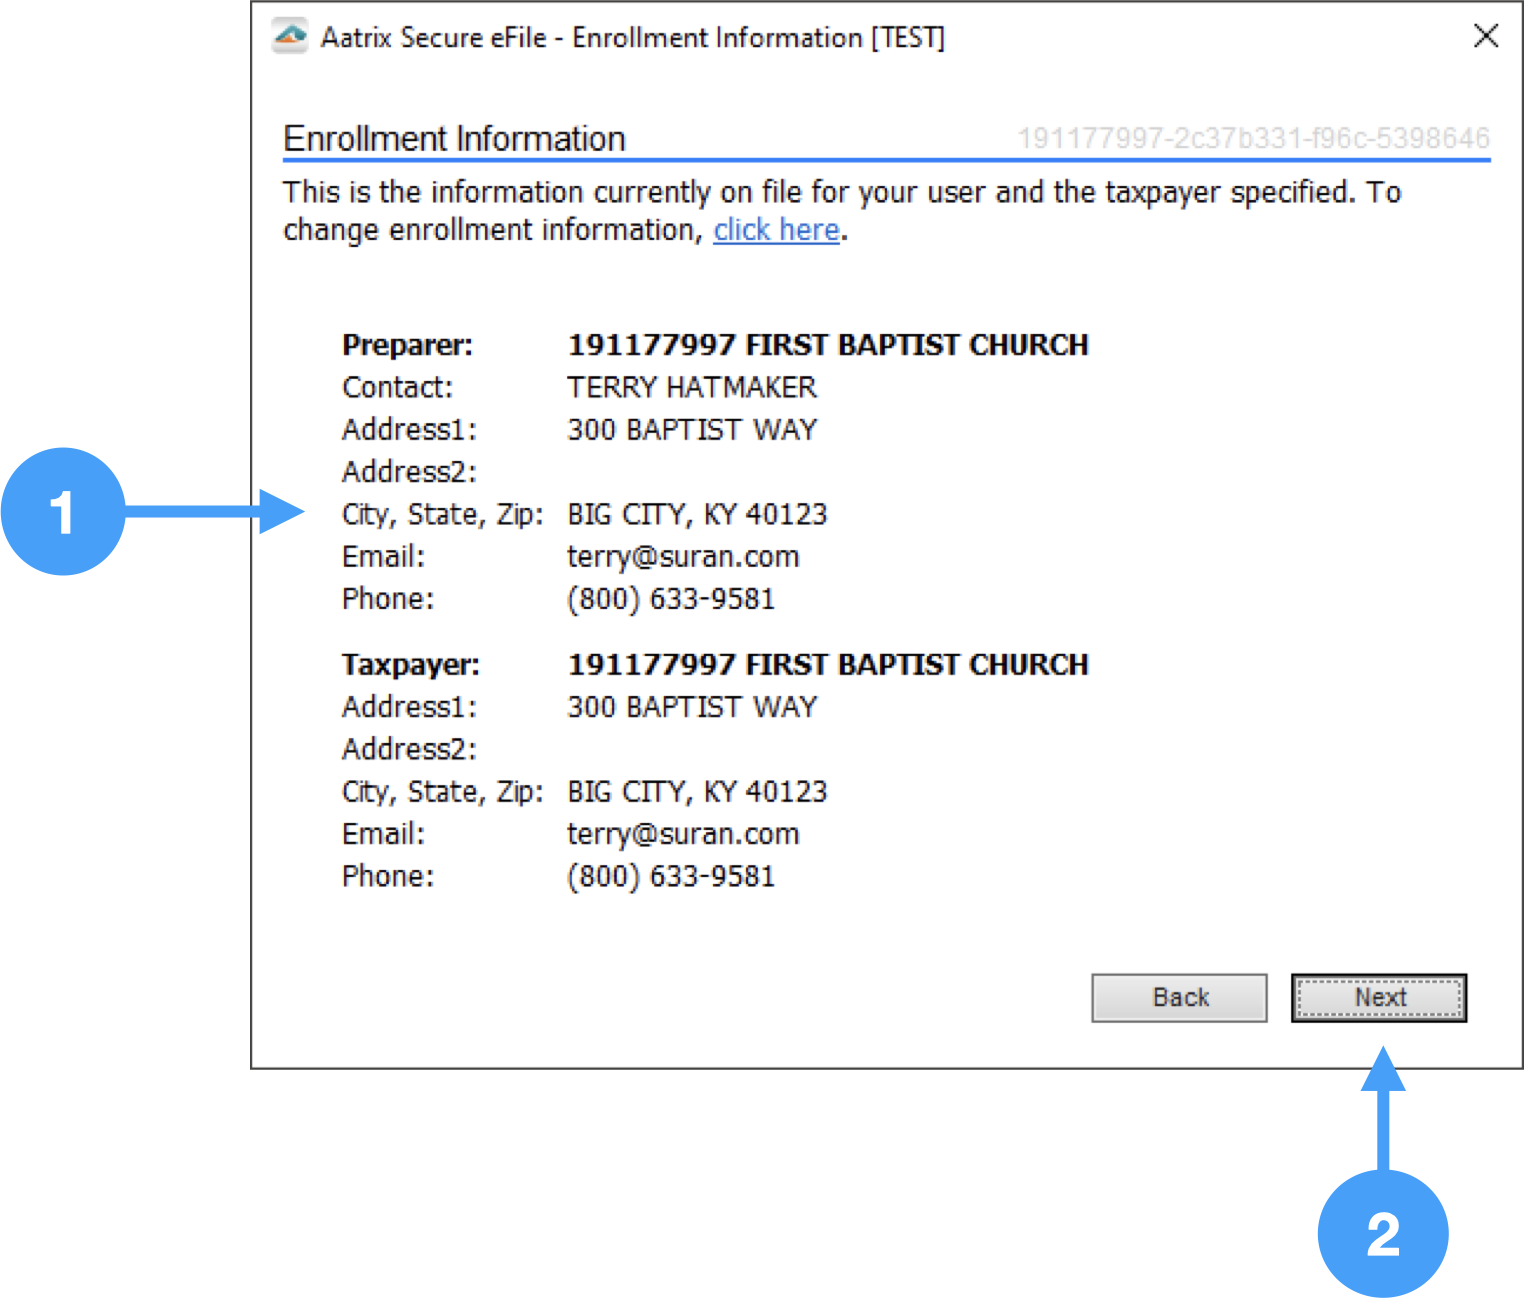
If any of this information needs to be changed, you will need to exit the eFiling process and log into the Aatrix eFile site.
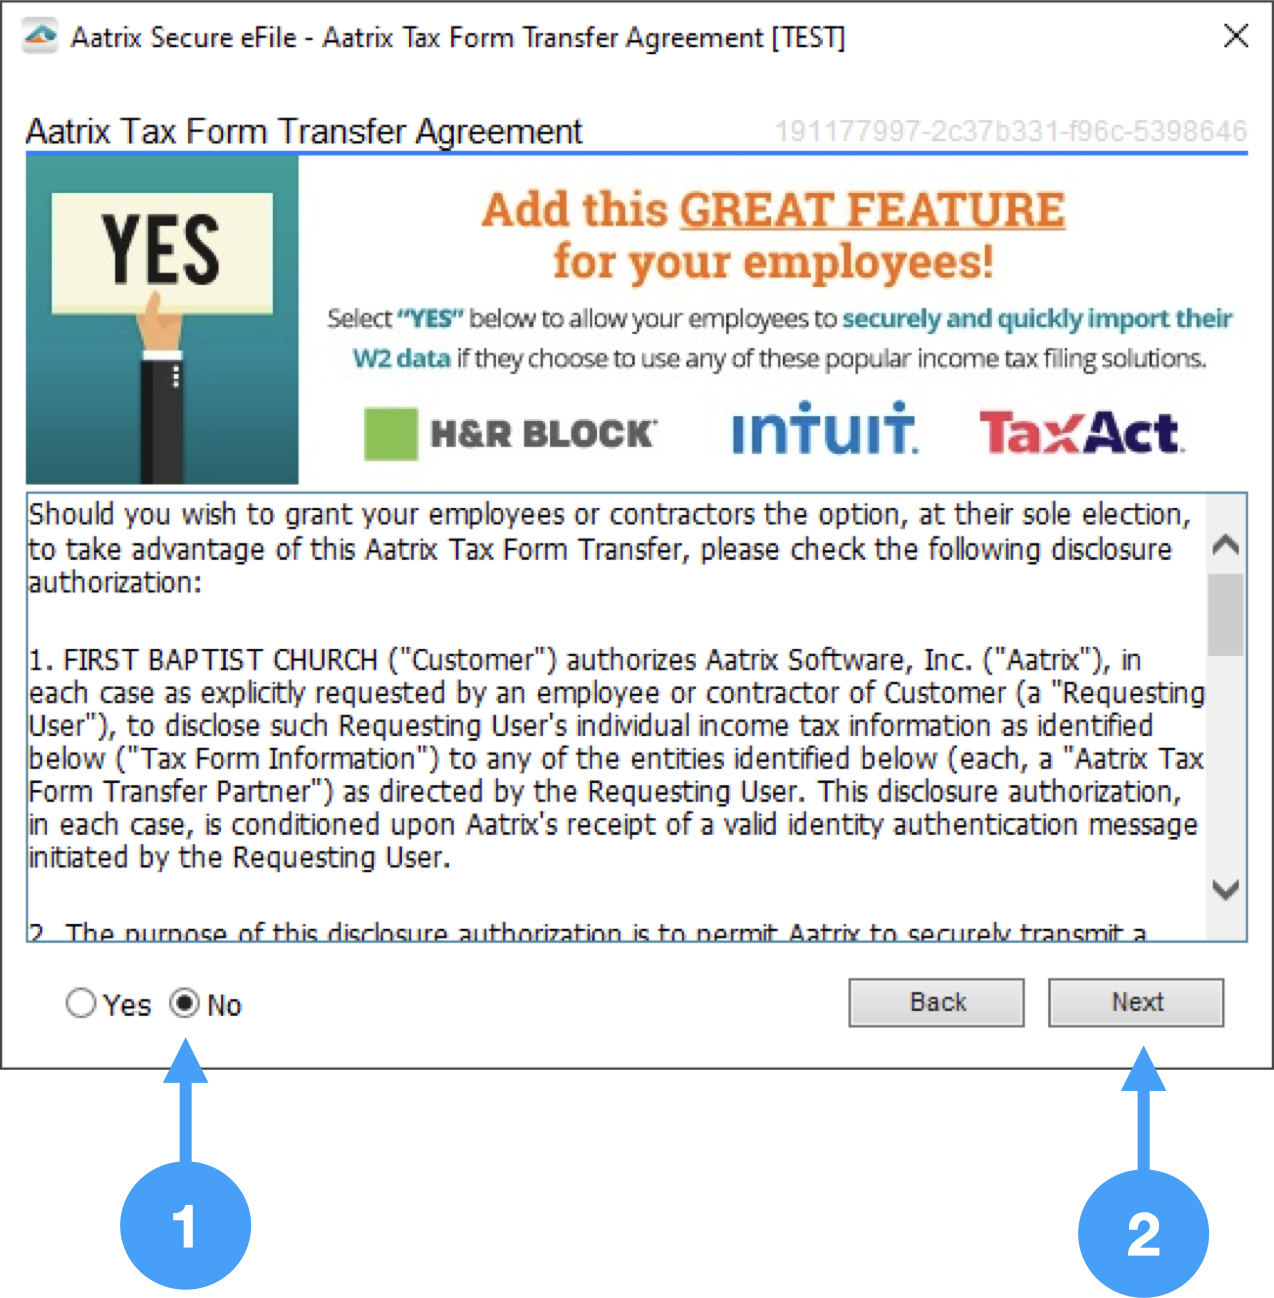
Aatrix Tax Form Transfer Agreement
-
Read the information and determine whether you wish for your employees to securely import their W-2 data into their income tax filing solutions. In our example, we are selecting 'No'.
-
Click Next to move to the next window.
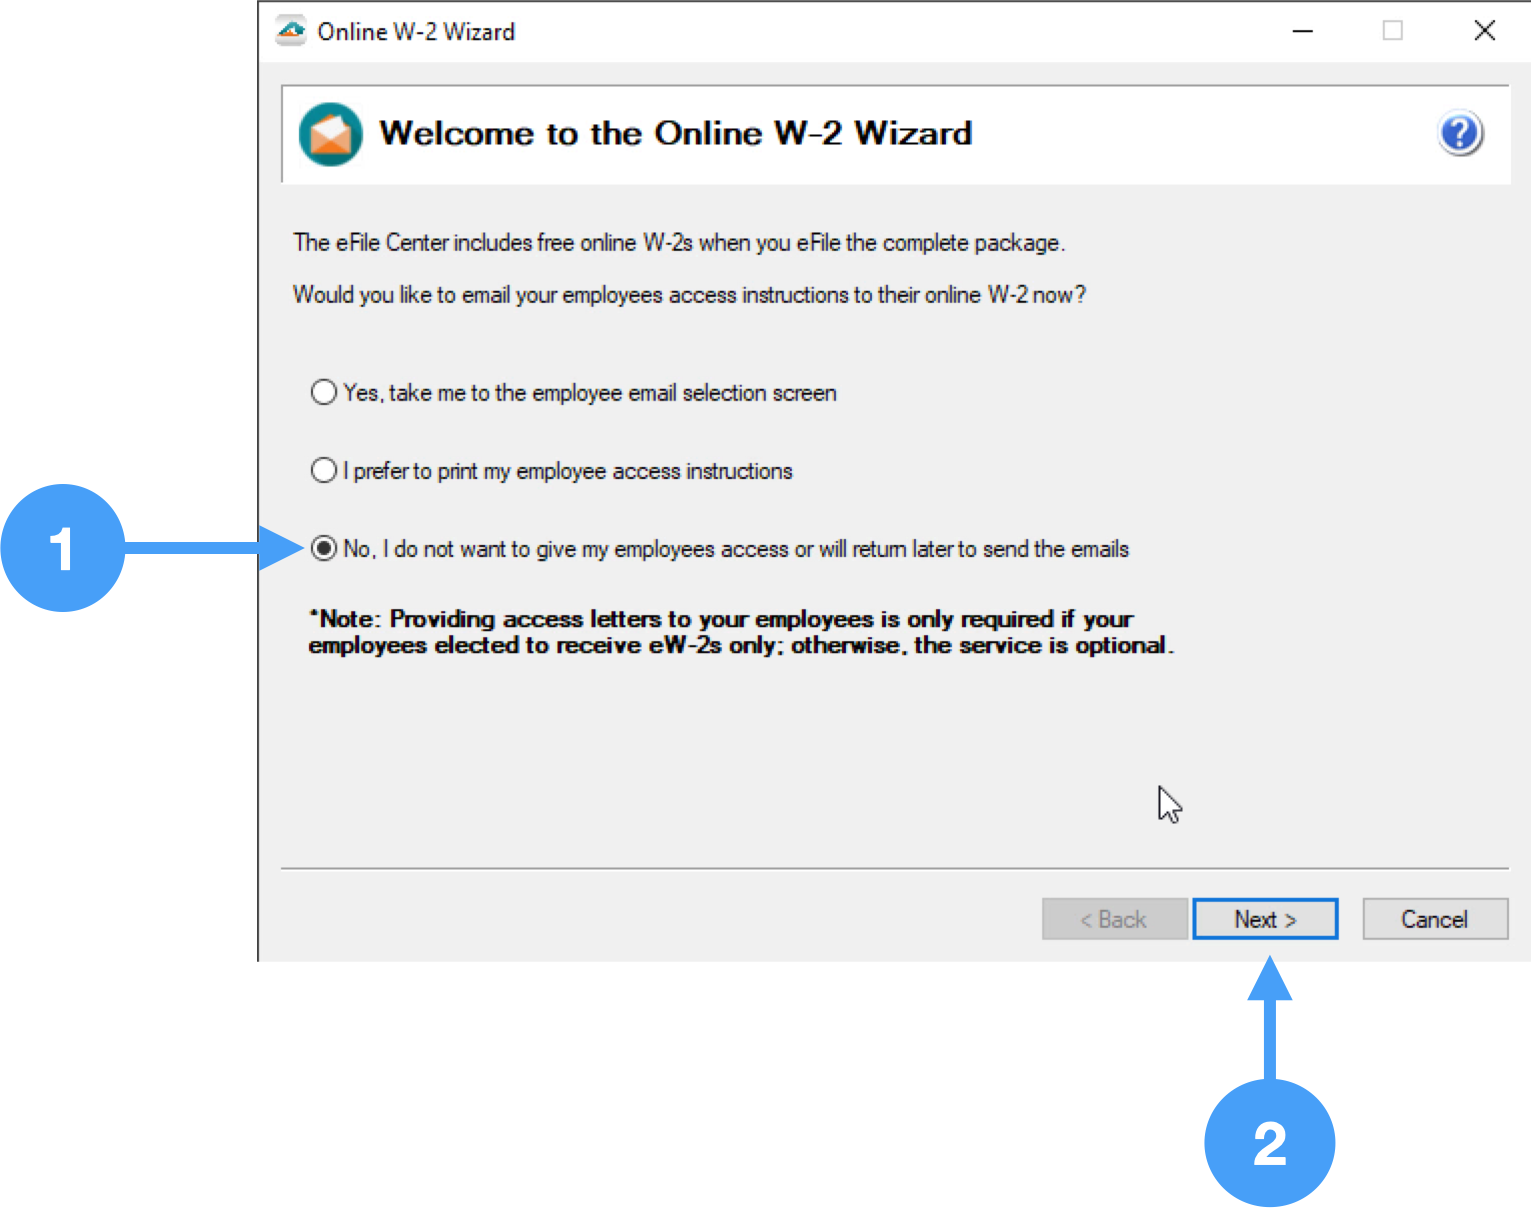
Online Access to W-2's
-
Select the option you want to use. If you select the last option, you will be able to return later to set this access.
-
Click Next.
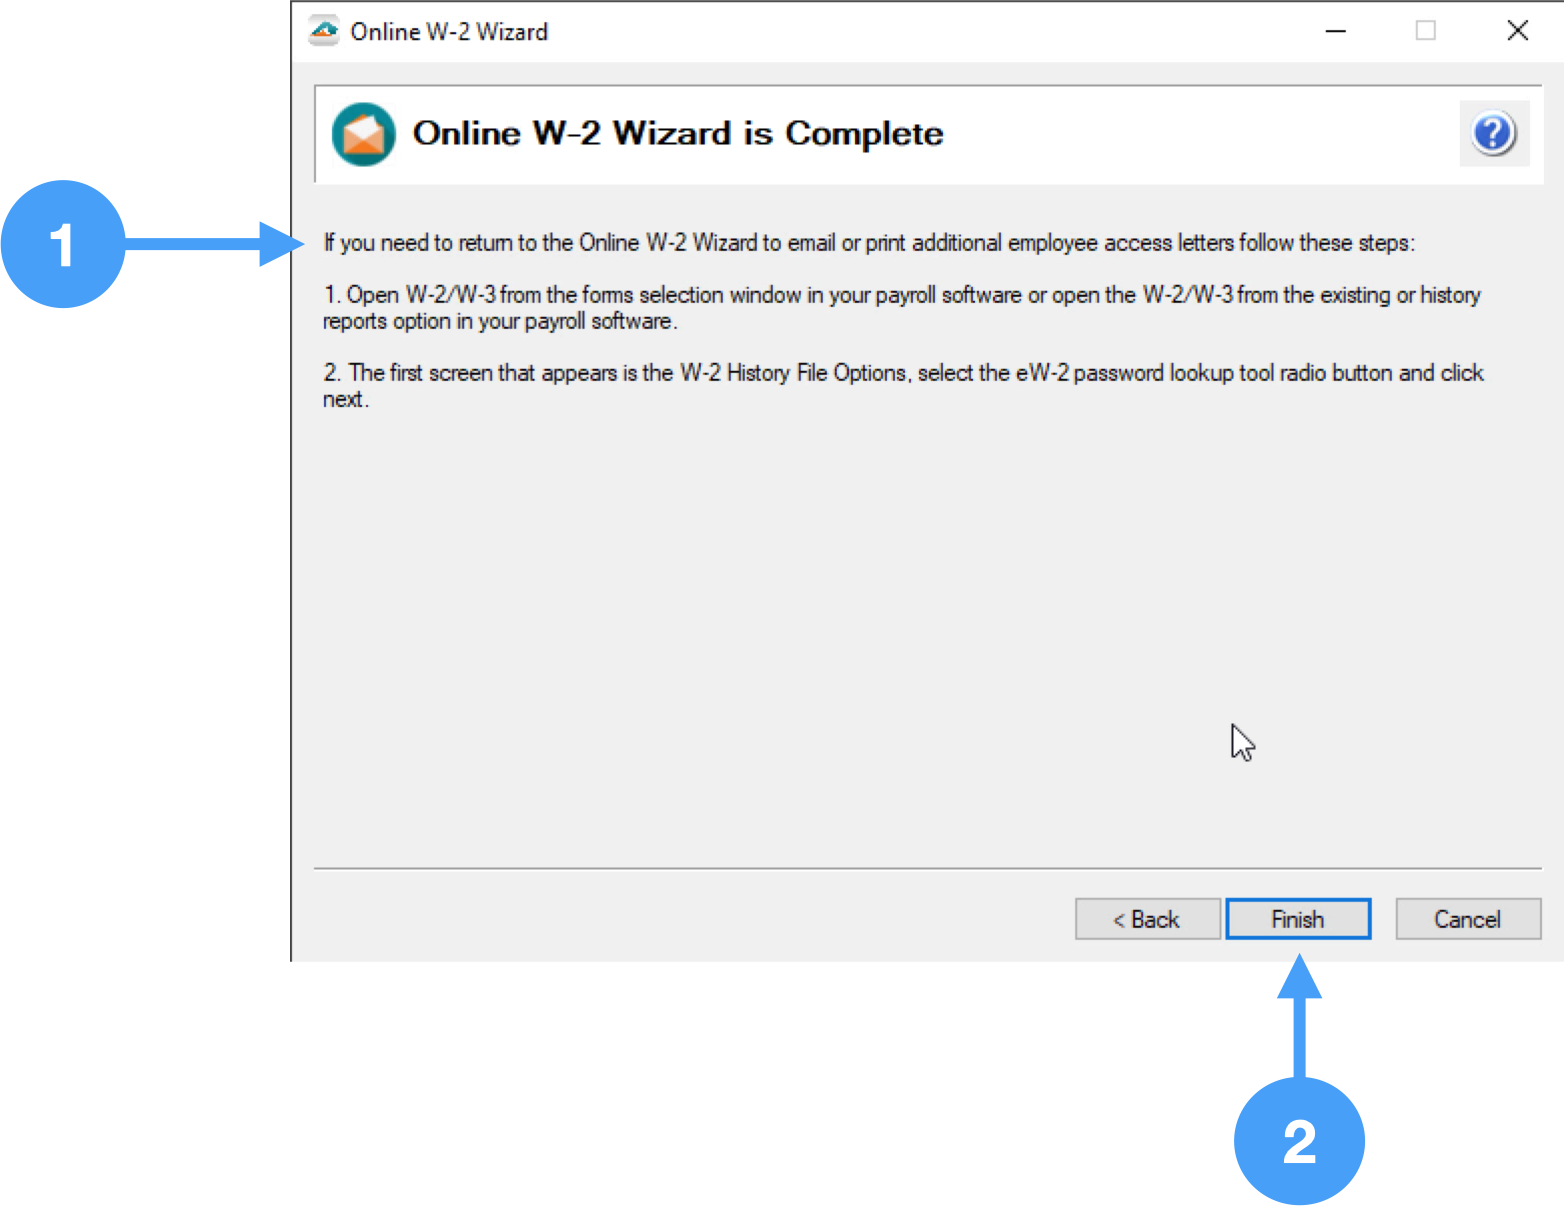
Instructions on Returning to the Online W-2 Wizard
-
Read carefully and make any notes so you will know how to return to the Online W-2 Wizard.
-
Click Finish.
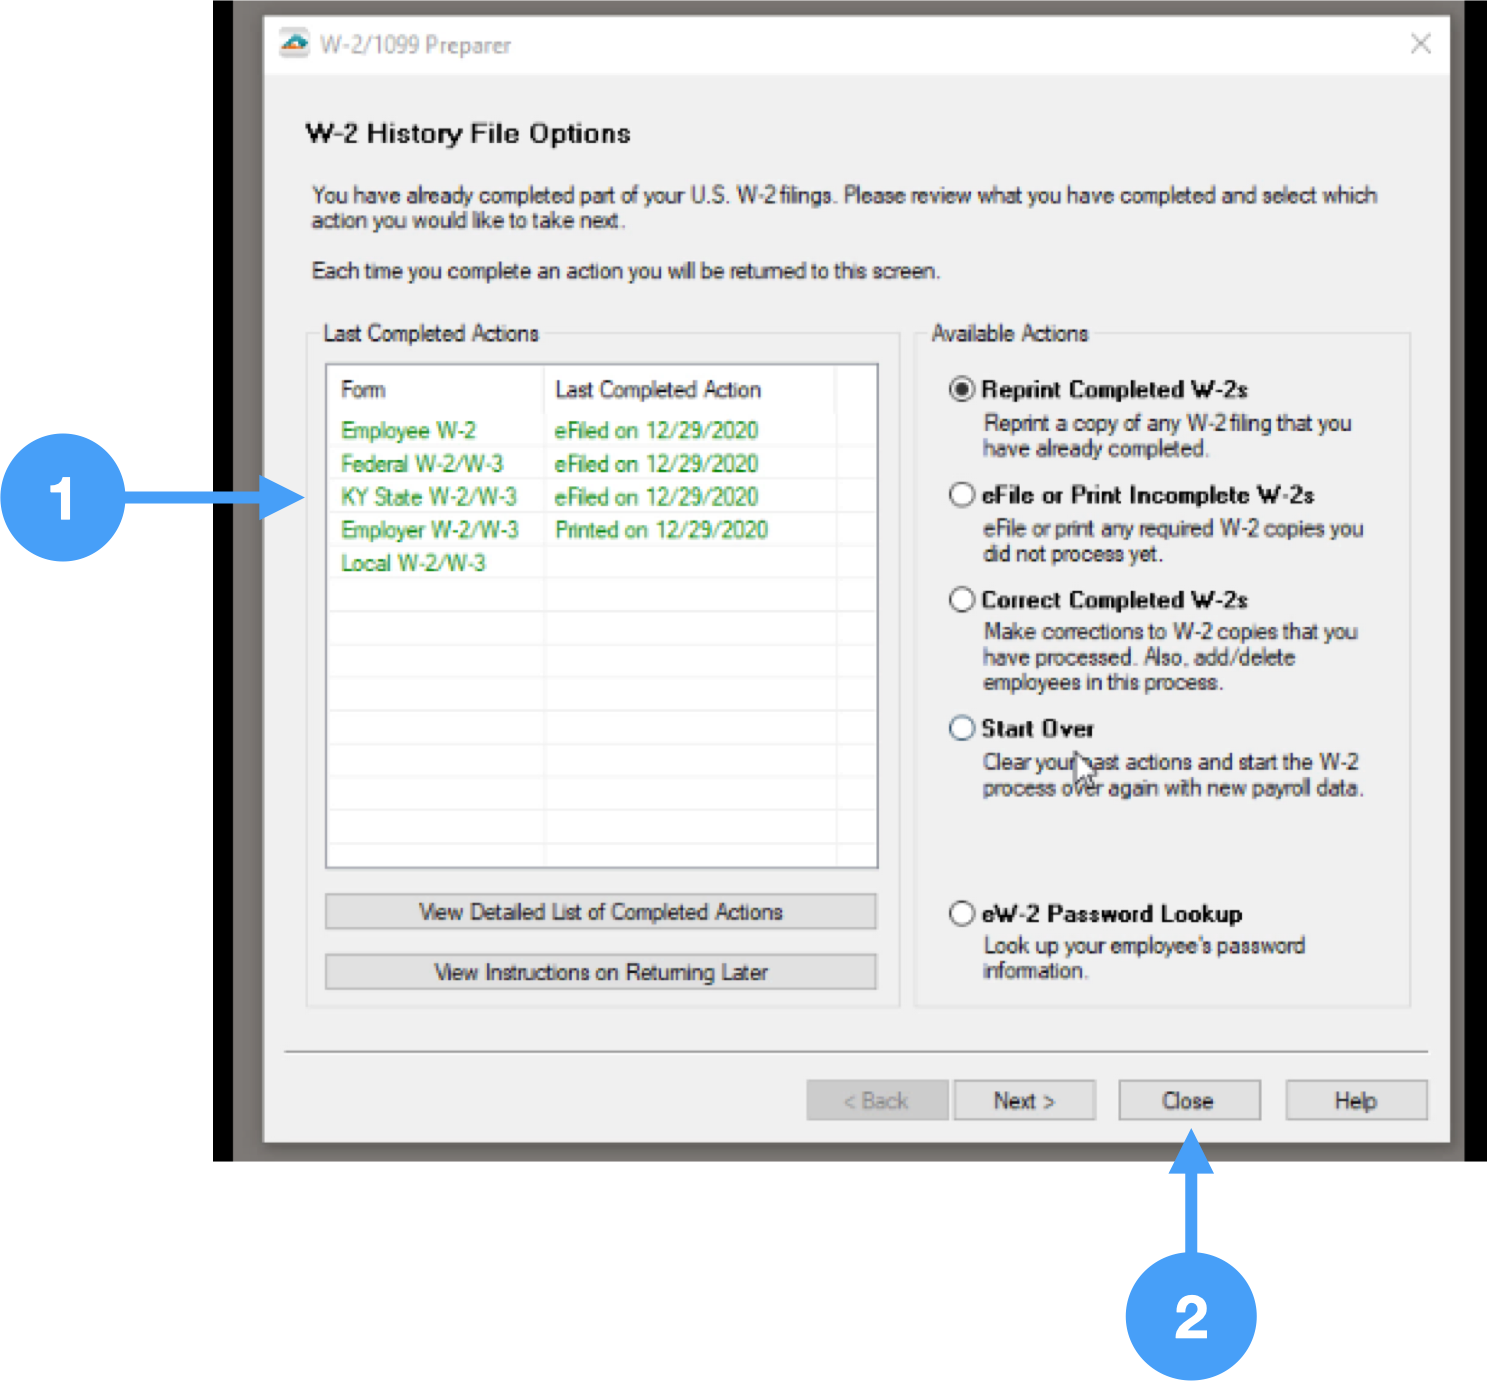
W-2 History File Options
-
The History File window opens. This signifies you're done with the eFile process and the data has been saved to the Aatrix history file on your computer.
-
You can now click the Close button. You are done!
The Aatrix history data is saved directly to the hard drive of your computer. This data is NOT saved in the CDM+ database. If you need to move this data to another computer running the same Operating System (Windows → Windows), then please contact CDM+ Support for instructions on retrieving your Aatrix history data.
Video of eFile Process